


What’s new with the Sales Accelerator

The Sales Accelerator is part of Dynamics 365 Sales and to get access to it you’ll need to have a sales insights license on top of your Dynamics 365 Sales License. This feature went into preview back in April 2020 and has been live for a a while now. I wrote an article about this (preview) feature back in April of 2020 which you can access here, but as you can imagine there were some upgrades made to the the Sales Accelerator since it went GA.
On top of that, some new features were introduced as part of 2021 Release Wave 1, which I can’t wait to tell you about! For folks who don’t know what the sales accelerator is, I would definitely recommend reading my article from April 2020.
Setup
First let’s discuss some of the updates that have been made since April. You’ll notice is when you navigate to ‘Sales Insights Settings’ in the Sales Hub app the sitemap looks a bit different from the April 2020 version. There is a ‘Sales Accelerator’ section with three items we can access below it. The first item is ‘Setup’. This is (as the name suggests) where most of the setup takes place. I have to say the screen looks a lot cleaner this way. The other thing that I like is that you can add sample data to the system and remove it at any time.
Define Team Access
In the ‘Define team access’ section you can choose the security roles for which the Sales Accelerator will be available. Needless to say all users with the security roles that are selected here will have access to the Sales Accelerator.
Content and Layout
Under ‘Choose content and layout’ admins can choose which tables with related activities can be accessed through the sales accelerator and which form will be used for each entity. Previously only opportunities and/or leads could be selected but now we have the ability to add other tables by clicking the ‘+Add record type’ button. You will have the ability to choose from the following tables:
- Leads
- Opportunities
- Campaign Activities
- Cases
- Orders
- Accounts
- Invoices
- Knowledge Articles
- Entitlements
- Contacts
- Campaigns
- Quotes
- Contracts*
I am a little surprised to see contracts in the list of tables, since they have been deprecated some time ago. Below the section where you add the tables, you’ll see the option to navigate to the lead and opportunity scoring settings, which is also a part of the sales insights functionality. Keep in mind that you do not have to use the sales accelerator in order to use opportunity or lead scoring, and vice versa. These features can be turned on/off and use separately of each other if desired.
Active Sequences
In the active sequences setting you will see some information on existing sequences. In order to create and/or edit sequences you have to go click on ‘To to Sequences’. If you installed the sample data (which I would recommend if this is your first time looking at this), you’ll notice that besides data, two sequences have automatically been created as well. Sequences are like a sales cadence flow and each sequence has different steps. Each step represents an activity or task that needs to be done, like an email that needs to be sent, or a call that needs to be made. In the sequence we can configure which type of activity needs to be completed, and the time in between one activity and the next. There have been some major improvements here, like the ability to send an automated email (without interference of a user) and the use of ‘conditions’ in the steps. NOTE: Conditions are currently only available for email and phone call activities. Different conditions will be available for different types of activities.

The conditions available for emails are:
– Email open – When the email in the step is opened by the recipient
– Recipient reply – When a recipient responds to the email that was sent in the step
– Link click – When a link in the email step was clicked
– Attachment downloaded – When an attachment from the email in the step was opened
Conditions available for Phone Calls are:
– User sets phone call status to made
– User sets phone call status to received
Admins can use these conditions to create different action paths. If a condition is met, the sequence will follow the path that has been configured under the ‘yes’ condition. For example if the condition after an email send is to wait 2 days to see if the email was opened by the recipient, an admin can have a step configured for when the email was opened and a different step for when the email wasn’t opened within that time frame. Admins can also select to move on to the next step under the ‘yes’ path if the action (the opening of the email in this case) occurred before to the time limit of 2 days.
Segments
Let me explain what segments are and how they work. Segments are completely new to the sales accelerator. Before segments we had to manually connect records to a sequence, but now with the use of segments this can be automated. Segments allow the system to group records together, which in part can then be added to a sequence. We can group records by creating a segment query to filter out records, very much like an advanced find. The difference with an advanced find query and a segment query is that the segment query will not add existing records that meet the criteria to the segment. So if your segment query is to include open leads that have a lead source of ‘website’, any existing open leads with a lead source value of ‘website’ will not be automatically added to that segment.
If records get updated or new records are created that meet the criteria defined in the segment, these will be added to the segment. So in this scenario if (after you created the segment mentioned above) you create a new lead or update a lead and set the lead source value to ‘website’, these lead records will be added to the segment. If at some point the record doesn’t meet the criteria anymore, it will not automatically be removed from the segment. Meaning if at some point you’re changing any of the segment members’ lead source value to something other than ‘website’, they will not be removed from the segment.
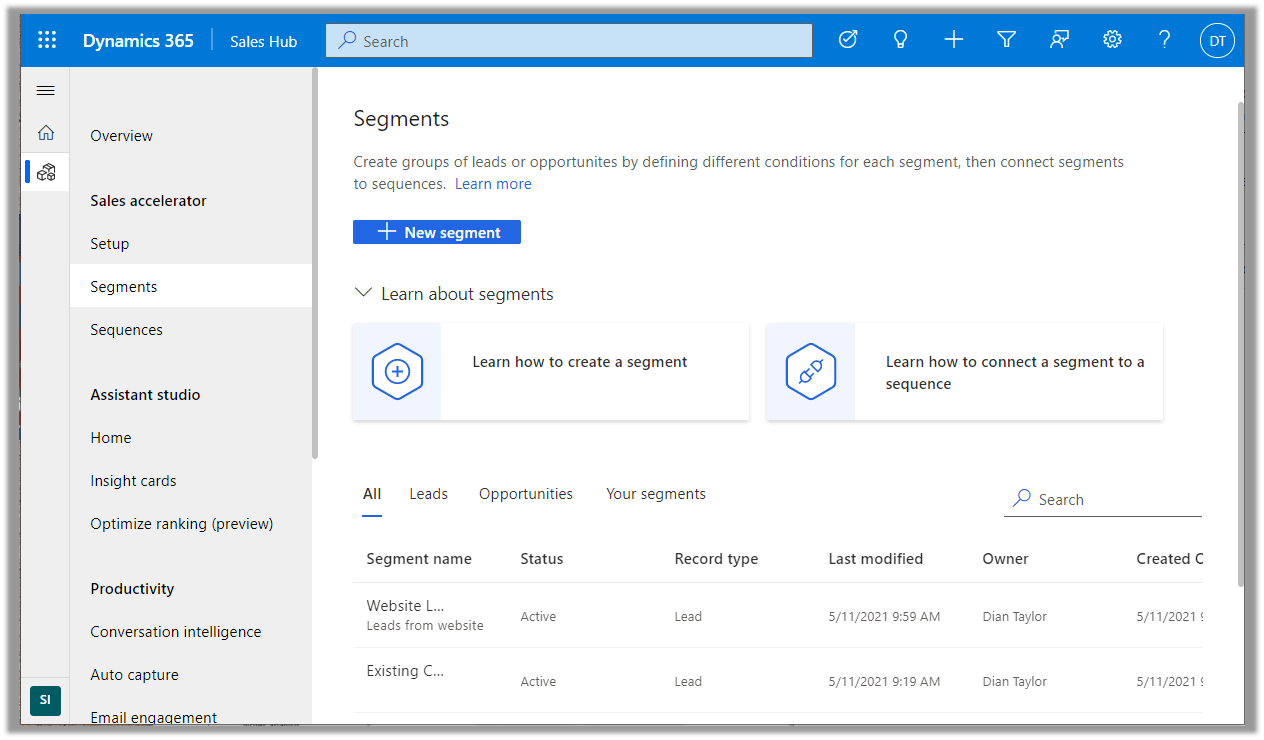
When you click on ‘Segments’ on the left side of the screen you’ll be taken to the segments page. If you click on ‘Learn about segments’ the area will expand and you’ll see two buttons you can click to get more information on how to create a segment and how to connect a segment to a sequence. If you installed the sales accelerator sample data, you’ll notice that two sample segments have been installed as part of the sample data. In order to create a segment, you’ll need to click on ‘Segments’ on the left side under ‘Sales Accelerator’. You’ll have to enter a name and a description for the segment and you’ll need to pick the record type. NOTE: Only leads and opportunities are available in the record type field. Once a record type is chosen, you can’t change it.
After the required information is added and the next button is clicked, you’ll be taken to the ‘builder screen’ of the segment. On this screen you can build the query that I mentioned above and you can simulate the results of the query. If you’re satisfied with the query you can save the segment and activate it. As stated above, keep in mind that existing records that meet the query will not automatically be added to the segment. Only new records and updated records (records that have been updated after the segment has been activated) that meet the the query will automatically be added to the segment. You can view these records aka segment members by opening an existing segment and clicking on the ‘Details’ tab.
Connect segment to a sequence
Segments can be connected to a sequence, this is where the automation part of adding records to a sequence comes in! The thing to note here is that if there are existing records (members) related to the segment prior to connecting it to a sequence, these will not be automatically added to the sequence, however, you can add them manually if needed. Segment members that are added after connecting it to a sequence will automatically be added to the sequence.
In order to add the segment to a sequence you’ll need to open an existing sequence. Click on the ‘Connected Leads’ tab in the sequence. You’ll notice a button that reads ‘+Connect Segments’. When the button is clicked you can add one or more segments to the sequence. NOTE: If you need to remove a segment from a sequence, you can simply check the box that will appear when you hover your mouse on the left side of the segment and click ‘disconnect’. Disconnecting a segment from a sequence will not remove the segment members that were connected to the sequence through the segment.
All in all I think this functionality is very nice, although I would’ve liked some things to work a little differently, for example if a segment has 200 members prior to being connected to a sequence, I would like to be able to select the members that I would want to add to the sequence by checking a box next to the members I want to add. Currently you would have to manually add them one by one. I think we have to keep in mind that there will be updates along the way, the segments functionality is brand spanking new and I am sure it will get better over time.
I hope you enjoyed this article! Be sure to check in again next week for a new article or subscribe here to never miss another post!


Comments are Closed