


Configuration: Form Component Control

I am sure you most of you are familiar with the quick view form in Dynamics 365, which is a great way to show data from a related table on a form. We can use this form where the related table has a 1:N relationship with the table where we are embedding the form in. What this really means is that we can use quick view forms to show data from a record that is populated in a lookup field on a form. For example: Out of the box there is a lookup field called ‘Primary Contact’ related to the account table. If you open the main account form, you’ll notice the field is exposed on the form. The only problem with quick view forms (image below) is that we cannot edit the information in the form. If you wanted to make changes, you would have to open the contact record and make the changes in the contact form. This is where the form component control comes in. Just like with quick create forms, the form component control allows admins to pick a form that will allow users to view data from a record populated in a lookup field. The difference here is that it’s not read only, meaning that users have the ability to update the fields of the related record (which in this example is the primary contact) that are exposed on the form. Another major difference here is that if you want to use the form component control you’ll have to pick a main form, not a quick create form to expose on the parent table.

Create a new main form
In this example I am going to create a new main form for the contact table. In order to create a main form for a table you need to navigate to https://make.powerapps.com/. Make sure you have the correct environment selected (you can view the environment that is selected on the top bar on the right side of the screen. Expand ‘Data’ which is located on the sitemap on the left side of the screen. Select ‘Tables’ and open the contact table. In the contact table click on the ‘Forms’ tab on the top of the screen. Click on ‘Add form’ on the command bar on the top of the screen and select ‘Main Form’. The first thing I did was clean the form up a little. I removed all the tabs except for the ‘Summary’ tab. I changed the layout of the Summary tab to only have one column. You can do this by clicking on the summary tab from the tree view on the left side and expanding ‘Formatting’ on the right side of the screen. Then click on ‘Layout’ and change it to a 1 column layout. The fields I left on the form are Name fields, job title, email, business phone and mobile phone fields, but you can pick any fields you’d like. After you’re done make sure you save an publish the form. I would recommend using a good name for the form so you’ll know how it’s used in the application.
Add the form to the parent table
The next step is to add the form to the parent table. The parent table is the table that has the lookup field on the form. This also represent the relationship between the tables. In our case the Primary Contact field represents the 1 (Contact) to Many (Accounts) relationship between the two tables, the account being the parent table.
Navigate back to https://make.powerapps.com/. Again expand ‘Data’ on the left side of the screen, then select ‘Tables’ and this time open the account table. Click on the ‘Forms’ tab on the top of the screen and open the form where you want to add the contact information. Currently we can’t add this control in the new experience so click on the ‘Switch to classic’ button on the command bar to load the classic form designer. Once the form loads in the classic designer, click on the lookup field you want to show the information for and link the form to that we created in the previous step. In our example this is the primary contact field. On the field properties window, click on the controls tab and click ‘Add control’. Find the ‘Form Control Component’ in the list and click ‘Add’. Here you can set where you want this control to be added, on the web, phone or tablet. In the form component control section below you’ll notice that the ‘Lookup Value’ property has been populated with the system name of the lookup field (Primary contact). Click on the pencil icon next to ‘Forms’ to identify the form you want to show here. This is the form we created earlier. Under ‘Bind to a static value’ you’ll need to select ‘SingleLine.Text’. Then in the field next to it you’ll need to add the text shown below, we just need to make some updates to it.
<QuickForms><QuickFormIds><QuickFormId entityname="TableName">FormID</QuickFormId></QuickFormIds></QuickForms>In the text above we need to replace the actual table name where it shows “TableName” and we need to enter the ID of the form we want to show where it says FormID. You can find the table names when you navigate to the tables in make.powerapps.com, the name field shows you the system name fields of each table, which is what we need to use here. You can find the form id by opening the form. The actual form id is shown after the edit part of the URL and it ends at ‘?’ in the URL.
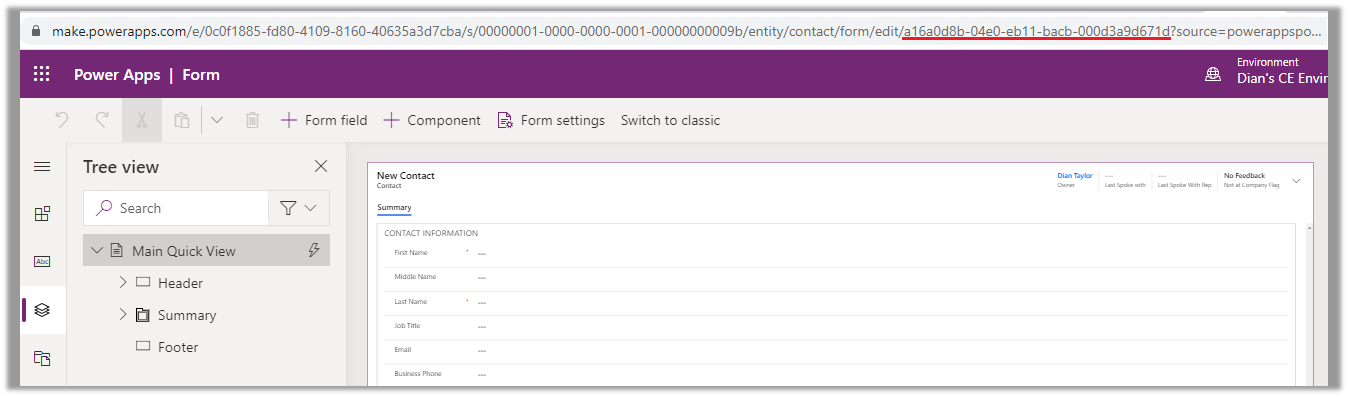
In this example the table name is contacts and the form id is ‘a16a0d8b-04e0-eb11-bacb-000d3a9d671d’, so we’ll use this text:
<QuickForms><QuickFormIds><QuickFormId entityname="contact">a16a0d8b-04e0-eb11-bacb-000d3a9d671d</QuickFormId></QuickFormIds></QuickForms>Click ‘Ok’ on the Field Properties window and save and publish the account form. Keep in mind that this configuration will remove the actual lookup field from the main form. In this case you will no longer see the ‘Primary Contact’ field on the account form. If you want to show the field on the form you should add the field to the form a second time. I actually renamed the label of the Primary Contact field where I added the control to ‘Primary Contact- Form Component Control’ so it’ll be clear to others why the ‘Primary Contact’ field is on the account form twice.

Some things to note here: Before you start to test your configurations, make sure that you add the newly created contact form to the app where you want to use it. I noticed if it’s not added to the app, the contact form will not be loaded in the parent (Account) form. The system will instead load a contact form that is available the app and has been set as #1 in the form order. After you add the new form to the app, you can take a look at the end results! Open the Dynamics 365 apps that has access to the account form and contact forms that you just created and make sure you refresh you page!
I hope you enjoyed this article! Be sure to check in again next week for a new article or subscribe here to never miss another post!


Comments are Closed