









How to Automate Service Reports for D365 Field Service | Part 2

Last week I wrote part 1 of this article, where I am going to show you how you can use Power Automate to populate a word document with data from Dynamics 365, convert it into a PDF and attach it to an email message which will be emailed to the customer.
I created this Power Automate flow for the following Field Service scenario; when a work order’s system status is set to ‘completed’ the the flow will be triggered. Power Automate will query Dataverse for any related work order products and work order services that have a line status of ‘used’. (I don’t want to show any unused products or services on the document that I will be sending to the client.) I ended last week’s article with step 7 where I appended the work order products data to a variable array so I am going to pick it back up again at step 8, where we will be querying Dataverse for the work order products.
7 – List rows services
We finished querying for the related work order products and stored them in an array variable, now we need to do the same thing for the related work order services. Click on ‘New Step’ and select ‘List rows’ using the Dataverse current environment connector. The table name is ‘work order services’ and again we want to filter the data to only include work order services related to the work order that triggered this flow and where the line status of the service is ‘used’. In the ‘filter rows’ field enter the following: msdyn_linestatus eq 690970001 and _msdyn_workorder_value eq
then search for ‘Work Order ID’ in the dynamics content window and click to add it in the ‘filter rows’ field as shown in the screenshot below.

8 – Initialize variable services
Just like we did before for the work order products table, we need to create an array type of variable so that we can store the results of the query for the related work order services. Click on ‘New Step’ and search for ‘Initialize variable’. Enter ‘services’ as the name and set the type to ‘array’. I recommend renaming the step to ‘Initialize variable services’ so that it’s easier to see which step does what.

9 – Initialize variable duration to bill
Since I am using the ‘duration to bill’ field from the work order services table to show the amount of time we’re billing for, this is a little tricky. This field needs to be recalculated, as it shows the duration in minutes not in hours. I noticed a few issues with trying to enter a calculation for this field, as I had to first turn the data in that field into an integer so that I could actually perform a calculation. In order to do that there are a few steps I need to do and the first thing is to initialize another variable so that I can store the data as an integer later in the flow. Click ‘New Step’ and select ‘Initialize variable’. For the name I entered ‘duration to bill’ and the type is integer. Don’t forget to rename this step to ‘Initialize variable duration to bill’.

10 – Compose DTB (Duration to Bill)
The next step will be a compose step. Click ‘New Step’ and select ‘Compose’. In the inputs field select ‘Duration to bill’ from the ‘List row services’ step. This will put the step in an ‘Apply to all’ step which is correct. I’m using this compose step so that I can refer to the output of that step in my next compose step, where I change it to an integer. This is needed in order to perform a calculation on the field from minutes to hours. Again, make sure you change the names of the steps as shown in the screenshots.
11 – Compose DTB Integer
Create the second compose step and rename it to Compose DTB Integer. Click inside the ‘inputs’ field and click on ‘Expression’. Enter the following expression: int(outputs(‘Compose_DTB’))
This will take the output of the previous compose step (Compose DTB) and turn it into an integer value.

12 – Set Variable DTB Integer Value
In the next step I am going to store the integer value of the ‘Compose DTB Integer’ step in the variable that we created earlier. (We created this variable in the ‘Initialize variable duration to bill’ step). Click ‘Add an action from inside the ‘Apply to Each’ step and select ‘set variable’. In the name field select ‘duration to bill’ from the dropdown, for the value select the output of the previous step. You will probably understand now why it’s important to name our steps correctly as this helps identify the correct output for variables and other things as you can see on the screenshot below.

13 – Compose DTB to Hours
Now that I have the integer value for the duration to bill field, I can now do the calculation from minutes to hours. Click ‘Add action’ (still inside the ‘Apply to all’ step) and add another compose step. Click inside the ‘inputs’ field and click on ‘Expression’ in the window that opens on the right side. Enter: div(variables(‘duration to bill’),60)
As you can see we’re using the value in the variable called ‘duration to bill’ which we created earlier in step 10 and we divide that number by 60, which should then return the value in hours.

14 – Append to array services
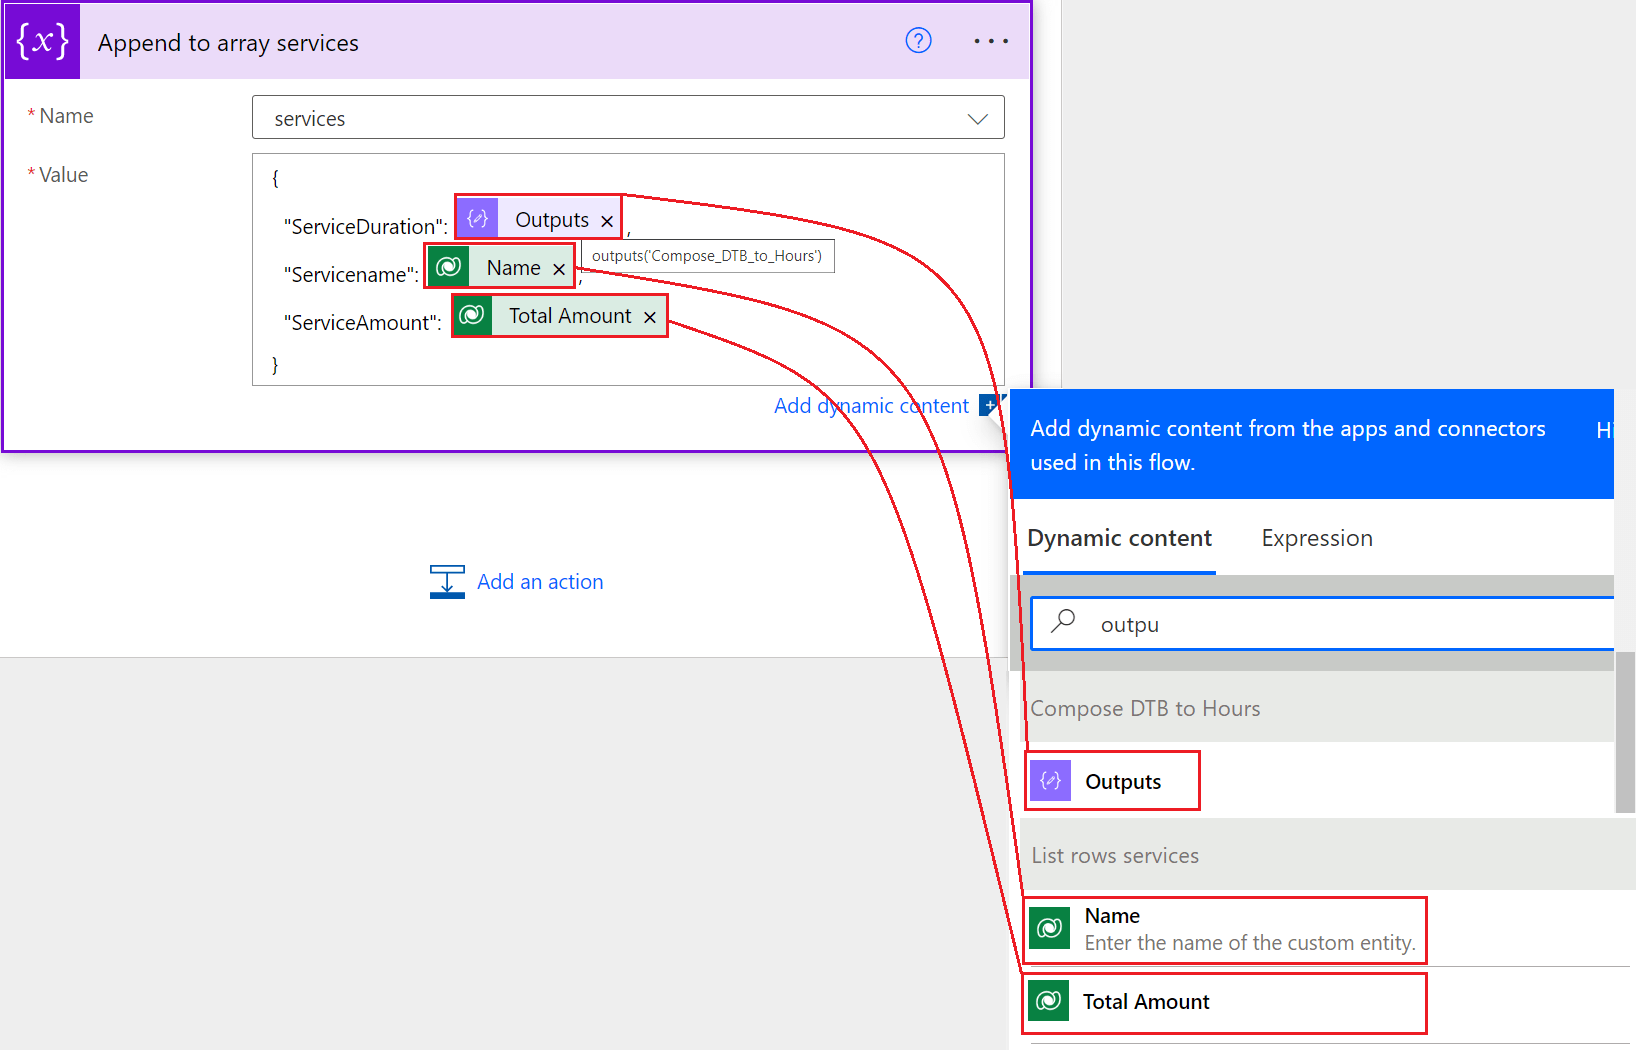
In this step we will actually put the data in the container (variable) we created in step 9. We did this earlier for the work order products, this step is for the work order services table. Click ‘Add an action’ and search for ‘Append to array variable’. In the name field select ‘services’ from the dropdown. In the ‘value’ box we will enter the names of the fields we created in the word document and the dynamic content of the data that will need to be placed in those fields. Place your cursor in the ‘Value’ field and type an opening curly bracket { then hit enter and type double quotes ” and type the field name of the word document, type double quotes again ” and type a comma , and select the related field from the dynamic values as shown in the screenshot below. These values should come from the ‘List rows services‘ step. When all the fields are added in the ‘value’ field make sure you don’t forget to type the closing curly bracket at the end. }
15 – Populate a Microsoft Word template
Now that we have all the data, we can start populating the word document! Now remember this step DOES NOT create the word document, so we’ll have to do another step to actually create the document after this. Click ‘New Step’ and add the ‘Populate a Microsoft Word Template’ step. Select the correct SharePoint location (this is where you actually stored the file) and the document library. In the file field you can click on the folder icon on the right side to navigate to and select the Word document we created earlier. Once the document is selected in the ‘file’ field, you’ll see the fields we configured in the word doc show up in the ‘Populate a Microsoft Word Template’ step. The first thing I’ll do it enter the individual fields. Click in the ‘address field and select ‘Address 1’ from the dynamic content window. Make sure this is the ‘Address 1’ field from the ‘Get a row by ID – Account’ step. For Fullname we want to enter the responsible contacts full name, so I need to enter the ‘Full Name’ field from the ‘Get a row by ID – Contact’ step. For ‘Account’ I enter the ‘account name’ from the ‘Get a row by ID – Account’ step, for ‘Phone’ I enter the ‘Main Phone’ field from the ‘Get a row by ID – Account’ step. Lastly for ‘WO#’ I enter the ‘Work Order Number’ and for ‘WO Total’ I enter ‘Total Amount’, both from the ‘When a row is added, modified or deleted’ step.

What we need to do next is populate the related tables (work order products and work order services) in the word document. You see in the screenshot above that the placeholders for both tables are showing as ‘Materials’ and ‘Services’ (in the orange box). These titles were given during the configuration of the word doc which is mentioned in part 1 of this article. Since I don’t know how many rows of data the tables have, I can’t use the individual fields. Click on the ‘T’ icon in the top right corner of the materials table (green box in the screenshot above). Once clicked, you’ll notice that the individual fields disappear and the table name is visible. Click in the ‘Materials’ field in the ‘Populate a Microsoft Word Template’ step and enter the ‘products’ variable in the field. Repeat this step for the Services Table, entering the ‘services’ variable. Below is a screenshot of what it should look like.

16 – Create file Word
Click ‘New Step’ and select the ‘Create file’ in SharePoint action. I renamed this step to ‘Create file word’ because in another step I am going to create a PDF file so this will help me distinguish which step is doing what. In the ‘site address’ field I enter the SharePoint site the word document will be stored. In the ‘folder path’ field I select the document library where I want to store this file. The ‘file name’ speaks for itself. I am using the ‘Work Order Number’ field as part of the ‘File Name’ and enter .docx as the file extension. For ‘file content’ I select ‘Microsoft Word Document’ from the previous step.

17 – Convert Word Document to PDF
In the next step I am going to convert the word document that we created to a PDF File. We could send the word document to the customer, but I prefer a PDF. Click ‘Next Step’ and select the ‘Convert Word Document to PDF’ action. Keep in mind that this step doesn’t actually create the PDF file, we will still need to add another step for that. Select the SharePoint site the doc that needs to be converted is stored in the ‘Location field’. Select the document library the file resides in the ‘Document library’ field. In the name field I use ‘Name’ from the ‘Create file word’ step.

18 – Create file PDF
This step will be another ‘Create File’ (SharePoint) action where I will create the actual PDF from the previous step where we converted the Word document to a PDF. Click ‘New Step’ and select ‘Create File’ (SharePoint). I renamed the step to ‘Create file PDF’. In the ‘site address’ field I enter the SharePoint site the PDF will be stored. In the ‘folder path’ field I select the document library where I want to store this file. The ‘file name’ speaks for itself. I am using the dynamic value of the ‘Name’ field from the ‘Create file word’ step as part of the file name, then type ‘-PDF’ and enter .pdf as the file extension. For ‘file content’ I select ‘PDF Document’ from the previous ‘Convert Word Document to PDF’ step.

19 – Get file content
Unfortunately we need one more step before we can send out the email with the PDF attached; we need to get the file content which includes the unique ID of the file. Click ‘New Step’ and select the ‘Get file content’ (SharePoint) action. Enter the site address the PDF is stored in. For the ‘File Identifier’ field I enter the ‘Id’ from the previous ‘Create file PDF’ step using the dynamic values chooser. This is all you have to do here. Now we can go to the last step, which is sending the email to the customer. This would be a good place to check if the responsible contact actually has an email address.

20 – Send an email (V2)
In the last step I am going to send the email to the contact who reported the work order, which is the contact record that is populated in the ‘Reported By Contact’ field on the work order. We already queried Dataverse for this information in step 3, so now I can use the email address from the contact to send the email to. You might want to have an extra step prior to the send email step to check that these contacts actually have email addresses so the flow doesn’t error out when trying to send the email. In the ‘To’ field I enter ‘Email’ from the ‘Get a row by ID – Contact’ step. In the ‘Subject’ field I type ‘Work Order’ and add the ‘Work Order Number’ value from the ‘When a row is added, modified or deleted’ trigger. You can type a short message in the body of the email like ‘Thank you so much for your business. The work order report is attached.’
In the ‘Attachments Name – 1 ‘ field I enter the ‘Name’ value from the ‘Create file PDF’ step. In the ‘Attachments Content – 1’ field I enter the ‘File Content’ value from the ‘Get file content’ step. It should look something like the screenshot below.

Now all you have to do is test to make sure it is working and that’s it! (Make sure you add steps to delete the docs when you’re testing this, otherwise you’ll see more errors saying the document you’re trying to create exists already.) If you want to download the word document and the power automate flow solution so you can try it in your own sandbox, you can grab them from here!
I hope you enjoyed this post! Be sure to check in again for a new article in two weeks or subscribe here to never miss another post!


Comments are Closed