


How to use Rich Messaging in Customer Service to Create Better Customer Experiences
Posted by: Dian Taylor | on December 23, 2025

We all know that in customer service, the right tools can make all the difference when it comes to providing a great customer experience. The new rich messaging feature in Dynamics 365 Customer Service and Contact Center that was announced as part of 2025 Release Wave 2 is one of those tools. With rich messaging, customer service reps can do more than just typing and sending a message. Think of rich messages as quick replies on steroids! With rich messages we can add images, videos, forms, and even interactive elements like adaptive cards with just one click! This makes it a lot easier for customer service reps to communicate and capture important information clearly and quickly. Instead of typing out long messages, customer service reps can send a rich message with predefined questions, images, or videos. This feature helps customer service reps save time and make interactions feel more personal, while also making it easier for customers to get the answers they need. By adding visual and interactive elements, customer service teams can create more engaging conversations that lead to faster resolutions, fewer misunderstandings, and a more polished experience for customers across every channel.
How does it work?
In Dynamics 365 Customer Service and D365 Contact Center, Customer Service Managers can create rich message templates that Customer Service Reps can use during live conversations with customers. These templates are built and managed in the Customer Service Admin Center. Because the templates are preconfigured, Customer Service Reps don’t have to worry about formatting or content. They simply select the appropriate rich message and send it in the chat. On top of that, some of these rich messages can also be used by Copilot Studio agents, simply by copying and pasting the JSON from a related rich message into a topic node!
Rich messages give Customer Service Managers more control over the customer experience while also making life easier for CSRs. Templates help ensure that information is accurate, approved, and aligned with company messaging, which is especially important for high-volume or high-impact scenarios like troubleshooting steps, policy explanations, data collection etc. They are also a big help for new CSRs: Instead of memorizing scripts or typing long responses, they can focus on the conversation itself and use the preconfigured rich messages.
Designing Rich Messages
You can start designing your rich message templates by opening the Copilot Service Admin Center and clicking on ‘Productivity’. You should see the ‘Rich Messaging’ option below ‘Personal Quick Replies’. Click on ‘Manage’ to start creating Rich Message templates. At the time when I am writing this article there are 10 different rich message types available. Each rich message type can only be used for selected channel types. For example there is an ‘Apple Pay’ rich message type, which can only be used in the ‘Apple Messages for Business’ channel. So if a customer service rep is having a conversation through the Whatsapp channel or any other type of channel, these rich messages can’t be used in those conversations. Below is a list of the rich message types that are available today and the channels they are available for:
- Apple Pay | Channel Type: Apple Messages for Business
- Authentication | Channel Type: Apple Messages for Business
- Cards | Channel Type: Live Chat
- Custom JSON | Channel Types: Apple Messages for Business or Live Chat
- Forms | Channel Types: Apple Messages for Business or Live Chat
- List Picker | Channel Type: Apple Messages for Business
- Suggested Reply | Channel Types: Apple Messages for Business, WhatsApp and Live Chat
- Time Picker | Channel Type: Apple Messages for Business
- Video Rich Link | Channel Type: Apple Messages for Business
- Website Rich Link | Channel Type: Apple Messages for Business
By default published rich messages are available across all workstreams with the same channel type as configured in the rich message. However, if you wanted a rich message to only be available in a specific workstream, that can be configured as well, just like we can with Quick Replies! For example: There are two ‘Apple Messages for Business’ type workstreams called ‘General‘ and ‘Bill Payments’ and you want a rich message called ‘Pay Bill‘ only to be available in the ‘Bill Payments‘ workstream. In this scenario you can associate the message to that specific workstream. Rich messages can be added to a workstream by navigating to the workstream in the Copilot Service Admin Center and expanding ‘Advanced Settings’ on the bottom of the form. You’ll see a section has been added where you can add the rich messages to the workstream. Keep in mind that once a rich message has been added to a workstream it will ONLY be available in this workstream, and it will no longer be available in any other workstreams.
Cards/Carousel
Some of the rich message types I mentioned above are pretty self-explanatory, but for the ones that are not, I will explain what you can do with them. The Cards Message type allows us to configure card-like messages with a title, a description, an image (URL) and (action) buttons. Customer Service Managers can add one or multiple cards to a rich message (with a maximum of 10 cards per rich message), allowing the functionality to show are a carousel in the chat (if more than one card is added). Below is an example of a card rich message that has multiple cards configured in the rich message.

This type of rich message can be used to quickly show a list of options for the customer to choose from. Below you see there are two buttons configured for each card, allowing the customer to click on the ‘More Info’ link will take them to a website with more details and the ‘Select’ button allows them to select a card from the carousel. As you can see below, besides the option for the CSR to send this card to the customer in the conversation, they also have the ability to edit the card/carousel. This is an option that can be configured when the card /carousel is created.

The configuration for cards is not too complicated. When creating a new rich message, you will need to set ‘Cards’ as the rich message type. Under ‘Channel Type’ you can select for which channels the message will be available. When the form opens, you’ll notice several fields that need to be populated. The first one is the card tile, which represents the bolded title on the top of the card as shown in the image above, a subtitle which shows the information below the title and an image URL. Admins can add several card actions to a card, the current actions available are: Send a message, Open URL and Make a Call.
Custom JSON
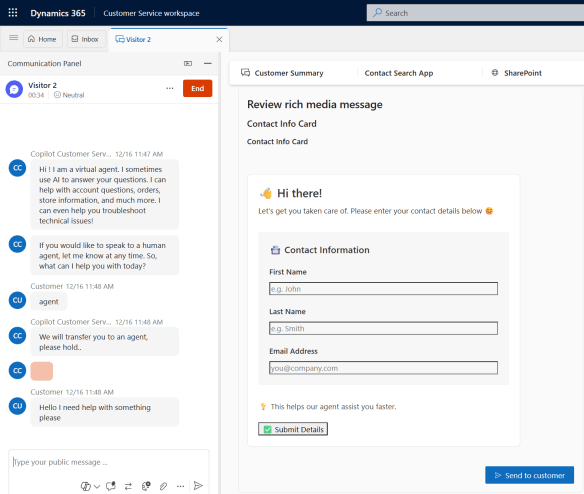
The custom JSON rich message type allows rich message creators to manually add JSON to the rich message to create custom adaptive cards quickly. Creators can use the adaptive card designer to create adaptive cards and get the JSON code. I love that this option is available, as this opens up a lot of possibilities, we can create any type of adaptive card we want! Recently I’ve been very successful in using AI programs like ChatGPT or Copilot to help me generate the JSON for adaptive cards! Keep in mind that creators need to use version 1.5 for these, otherwise the adaptive card will not work in the Customer Service Workspace app. Below is an example of a custom JSON rich message that collects customer information which allows the customer service rep to quickly confirm the customer’s details against what is in the system. To create this card, a maker only has to populate the JSON code into the ‘Custom JSON’ field in the rich message form.
Forms
This is another one that I REALLY like! This literally allows rich message creators to create a ‘mini-form’. Instead of asking the customer a series of questions, CSRs can present a structured form within the conversation that captures all the required information. I’m sure you can see how this creates a much better experience both for the customer and the CSR! (Less back-and-forth!)
There are many scenarios where this type of rich message works especially well, and returns are a great example. Most organizations need specific details before a return can be processed, think about an order number, reason for return, etc. By using a rich message form, all of that information can be collected at once. The customer knows exactly what is required, and the agent receives complete, information without having to ask additional follow-up questions. Below is an example of what a customer return form message could look like.

I found that configuring these ‘Form’ type of rich messages was very straight forward. When the rich message form loads, there are options to create the questions in the form. The first section is not a question but it shows the name of the form and you can upload an image here as well, which (as you can see in the above image) will be visible to the customer. Makers can add multiple questions to the form, and they can also select different question times. Currently the available question types are: Single line input, multi-line input, date picker, single-select, multi-select and dropdown. Makers can also select a response type for a question, the current options are: email, text, number, URL and phone number. Under ‘More options’ makers can set placeholder text, the max length of the data that can be entered in the field and view regex expressions. These help to make sure the data that is entered by the customer is in the right format. Lastly they can configure a field to be required or non-required.
Suggested Reply
If you’ve build AI Agents in Copilot Studio before then this one will look familiar to you. The suggested reply message type allows rich message creators to send messages with buttons for customers to click on. Each button can have an action associated with it which happens when the button is clicked. The options available are sending a message in the chat, open a URL, and making a call. When a message creator configures the rich message, they will need to configure the option that is selected, meaning when the ‘Open URL’ action is used for a button, a URL will need to be provided. When the ‘Make a call’ action is selected a phone number needs to be entered. There are also lots of great scenarios when this can be used, for example as a starting message in a conversation. In the image below you see that the rich message asks what type of help the customer needs, with buttons that allow them to navigate to the portal, call the customer service department or return an item. If none of the buttons are what the customer is looking for, they can also type a message in the chat.

When admins configure ‘Suggested Reply’ rich messages, they will see a title field and the ability to configure the buttons when the rich image form opens. The title field represents the data that will show above the buttons. Below the title admins can create one or several suggested reply buttons. For each suggested reply admins will need to select a reply type. The current options are: Send a message, Open URL and Make a call. Depending on which reply type is selected, admins will see different configuration fields. For example if the ‘Open URL’ option is selected, they will need to provide a URL that will open when the customer clicks on that suggested reply. When the “Make a call’ reply is selected, a phone number will need to be populated.
Once a rich reply message has been created, don’t forget to click the publish button to make them visible to the customer service reps! I hope you enjoyed this article! Be sure to check in again soon or subscribe here to never miss another post!
Posted in Configuration, Contact Center, Customer Service Workspace, D365 Customer Service | Tags:apple pay, Channels, Chat, custom JSON, media, rich message, rich messaging, whatsapp | Comments Off on How to use Rich Messaging in Customer Service to Create Better Customer Experiences


Comments are Closed