


Field Service: Send email with resource pic
If you are using Dynamics 365 Field Service to schedule resources that go onsite to perform work, you probably would have the need to send notification emails to your customer when the resource is on their way. Maybe you want include the picture of the resource so they’ll know what the resource looks like. This could be very helpful for home care type of work, where a nurse get scheduled to visit a patient at home, and by sending this communication to the the patient, he or she will be able to see what the care giver looks like. In the scenario that I am going to cover today I will be scheduling a work order to a resource and when the resource sets the booking to ‘traveling’, the email will be sent to the customer. I will have a picture of the resource in the email, with the estimated arrival date and time.

Configuration
The first thing I did was add a field called ‘Photo Url’ (text field) to the resource record. This is where I will store the URL to the picture of the resource. Keep in mind where ever you store the actual image, this has to be public facing otherwise the image won’t show up in the email. I tried storing the image on Onedrive, but that didn’t seem to work. You might be able to use Azure blob storage as well, but I haven’t tried that. After adding the Photo Url field on the resource record, I added it to the form and published it. Then I copied the actual URL of the image into the ‘Photo Url’ field of my resource records. Once that is done, we can build our flow pretty easily.
Power Automate: Build the Flow
I want the email to go out to the customer when the booking status changes to ‘Traveling’, and I want to send it to the contact on the work order. I want to make sure I do a check to see if the contact actually has an email address, other wise we shouldn’t sent the email. This means we’ll need to create a new automated flow. You can create a solution and add the flow from here or you can create this from the ‘My flows’ area and click ‘+New’ from here. Make sure you select ‘Automated-from blank’. From here you can add a name for your flow and add a trigger or you can click ‘Skip’ and select your trigger on the next page.
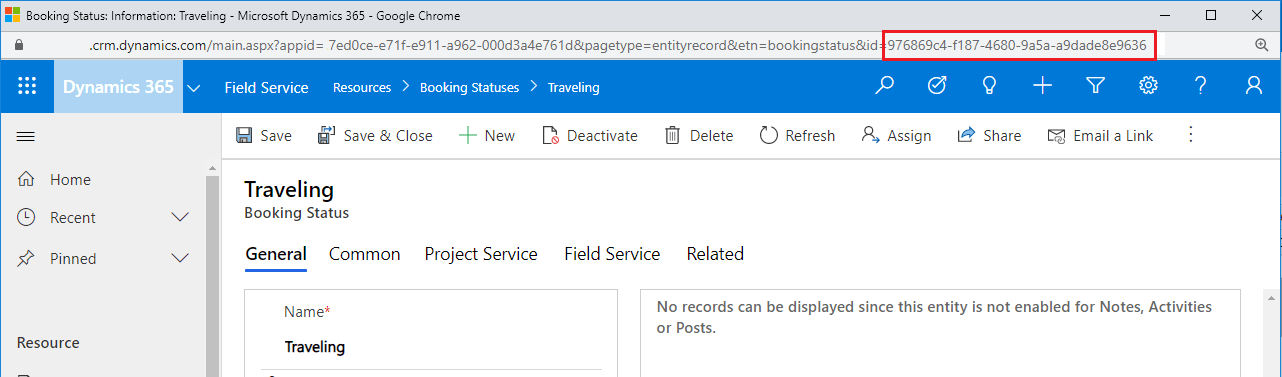
Select ‘When a record is created, updated or deleted’ but make sure you use the ‘current environment’ trigger. When the trigger loads, make sure you select ‘update’ as the Trigger condition and ‘Bookable Resource Bookings’ as the entity name. You also want to add a filter expression (I used XRM toolbox for this) because we only want to send this email out when the booking status equals traveling: _bookingstatus_value eq 976869c4-f187-4680-9a5a-a9dade8e9636. Keep in mind that booking statuses are records, so you will need to make sure you replace the last part (bold) with the unique ID of the ‘traveling’ booking status in your environment. You can get to that by opening the ‘traveling’ booking status record, as the guid will be visible on the record URL (after bookingstatus&id=).
Lastly you’ll need to select how you want to run the flow. I choose to run this as the process owner. For the next step we want to get the resource record that the booking is assigned to, so choose the ‘Get a record’ step using the Common Data Service(current environment). The entity name here is ‘Bookable Resources’ and the item ID is the ‘Resource (Value)’ which we get from the dynamic content window (from the ‘When a record is created, updated or deleted’ trigger. I renamed the step to ‘Get a resource.’
In the next step we want to get the work order and the contact that reported the work order so we can send them an email (if we have an email address in their contact record). Click on ‘+New Step’ and choose the ‘Get a record’ step using the Common Data Service(current environment) again. Again I am renaming this step to ‘Get work order and contact’ so it’s easier to troubleshoot later. This time select ‘Work Orders’ as the entity name and in this case, item ID is the ‘Work Order (Value)’ which again we get from the dynamic content window (from the ‘When a record is created, updated or deleted’ trigger. In this step we are going to expand the query by getting the first name and email address of the contact lookup (msdyn_reportedbycontact)on the work order. I will use Fetch XML builder in the XRM toolbox again to get the following which I’ll enter in the ‘Expand Query’ field: msdyn_reportedbycontact($select=firstname,emailaddress1,lastname)

The next step is an ‘Initialize Variable’ step, where we will copy and paste the HTML we are going to use to send in an email message. There are a few different programs you can use to create html content, and then you can add data from Dynamics 365 to personalize the message. I actually used the website https://wordtohtml.net/ to create the message and then I copied the HTML into the value field of the variable. Make sure you set the name for the variable (I used HTML1) and set the type to string. Below is what I used to make the email look nice. I would recommend visiting https://wordtohtml.net/ and copying this in the HTML editor side so you can see what it looks like. Then you can change logos and other stuff too.
<hr>
<table style="border-color: #191616; width: 596px;">
<tbody>
<tr>
<td colspan="3" style="width: 99.8322%;"><img src="https://rsmus.com/etc/designs/mcgladrey/images/RSMLogo.png"></td>
</tr>
<tr>
<td style="width: 148px;"><br></td>
<td style="width: 10px;"><br></td>
<td style="width: 438px;"><br></td>
</tr>
<tr>
<td style="width: 148px;"><img src="https://rsmus.com/content/dam/mcgladrey/images/spotlight/spotlight-career-v2-sept-2017.jpg" alt="" width="144" height="144"></td>
<td style="width: 10px;"> </td>
<td style="width: 438px;">
<p>Hi CONTACT!</p>
<p>We are just emailing you regarding Work Order NUMBER to<br>let you know your technician RESOURCE is on the way! </p>
<p>Est. Arrival Time: TIME HERE </p>
</td>
</tr>
<tr>
<td style="text-align: center; width: 148px;">RESOURCE </td>
<td style="width: 10px;"> </td>
<td style="width: 438px;"> <img src="https://drive.google.com/file/d/1_tji1MhW_CcpIWhe9FWeY5J5hC4bvKqf/view?usp=sharing" alt=""></td>
</tr>
<tr>
<td colspan="3" style="text-align: center; width: 99.8322%;"><img src="https://d365goddess.com/wp-content/uploads/2020/10/bar2.png"></td>
</tr>
</tbody>
</table>
<hr>
<p> </p>
<p> </p>Notice I have typed certain words in caps as these will need to be replaced by dynamic content. The first one is the url that holds the picture of the tech. In my example above this is the url after the second ‘img src=’. You’ll need to delete the url and replace this with our new ‘photo url’ field from the resource entity. You also need to replace the following text:
CONTACT – Reported by contact (from work order entity)
NUMBER –
RESOURCE (two places)
The last piece of text we need to replace in the HTML is ‘TIME HERE’. Since date fields are being stored in UTC, I will need to convert this to my time zone (Other time zones can be found here) for which I will use the following expression: convertFromUtc(triggerOutputs()?[‘body/msdyn_estimatedarrivaltime’],’US Eastern Standard Time’, ‘MM/dd/yyyy hh:mm tt’) This is converting the data in the Estimated Arrival Time field on the booking from UTC to EST time, so we can use that later when we send the email.
In the next step I am going to enter a condition that checks to see if the contact record that is populated on the work order (msdyn_reportedbycontact field) has an email address. If it doesn’t, I am going to terminate the flow otherwise I am going to to send an email. Click +New Step and add the condition action. In the first field, enter the ‘Reported By Contact Email’ value from the ‘get work order and contact’ step. Set the middle field to ‘is equal to’ and then click your mouse in the third field, then click on expression and type in ‘null’. This condition states the email field of the contact is empty (null). Under ‘If no’ inside the box, click ‘Add an Action’ then select se4nd an email or send an email from a shared inbox. Select the ‘To’ field click ‘enter dynamic content’, then add the ‘Reported By Contact Email’ value from the ‘get work order and contact’. Make sure you enter a subject, and then add the content from the variable (called HTML1) into the body of the email. Now all you need to do is test!!
I hope you enjoyed this post! Be sure to check in again next week for a new article or subscribe here to never miss another post!


Comments are Closed