


Deal Manager Workspace(preview)

I was lucky to have access to the deal manager workspace private preview a couple of months ago, but since July 2021 this feature, which is part of 2021 Release Wave 1, is in public preview and started to roll out across all the regions! (If you want to see if this is enabled for your region you can check that here, you’re looking for build 9.0.21072, which is coming to North America regions on August 13th, 2021.) So let’s talk about what it is exactly, or what it’s not! I heard a lot of people ask me if this is a new app that is part of Dynamics 365 Sales, but that is not what this is. It is, as the name already suggests, a work space that sales users can access from within the Sales Hub app in Dynamics 365 Sales. This workspace has a lot of information related to deals on one page. I almost want to say it’s like a really cool dashboard on steroids! You do need to enable the preview and grant users access before you can start testing it. I would recommend trying this in a sandbox environment, since this is not a completed feature yet, as mentioned earlier; it’s still in preview.
Enable the Preview
In order to enable the preview you need to open the Sales Hub app, and change the area to ‘App Settings’. If you don’t see the Deal Manager settings under the ‘General’ section, you will have to add these navigation items yourself. You can do this by navigating to https://make.powerapps.com, (make sure you’re in your sandbox environment), and clicking on ‘Apps’ on the left side of the screen. Click on the three dots next to the Sales Hub app and click on ‘Edit’. The App Designer window will open. Click on Site Map to start editing the site map. From here you can drag a subarea on the site map (where ever you like). Let’s first add the Deal Manager Settings, so type that in the ‘Title’ field. Enter ‘URL’ as the type and copy and paste the following in the URL field:
/main.aspx?appid=860f4439-9cf8-ea11-a813-000d3a54419d&pagetype=control&controlName=MscrmControls.Sales.DealManagerSettings.DealManagerSettings
Now let’s add the second item on the site map. Drag another subarea onto the site map and enter ‘Deal Manager Workspace’ in the ‘Title’ field. The ‘Type’ is again ‘URL’ and enter: /main.aspx?pagetype=control&controlName=MscrmControls.Sales.DealManager.DealManager&data={“entityType”:”opportunity”} in the URL field. Now click ‘Save’ and after the save is done, make sure you click ‘Publish’ to make sure the configurations and published to the app.
Accessing the Deal Manager Workspace Settings
As I mentioned before, you need to enable the preview first before you can start using the Deal Manager Workspace. You can do this by clicking on the Deal Manager Workspace settings, which out of the box can be found in the Sales Hub app, under the App Settings area (under the General section). You’ll notice there is a blue button that reads ‘Get Started’ as you can see on the screenshot below. Click the get started button.

Define Access
When you click the ‘Get Started” button you’ll be redirected to a ‘Settings’ page where you can make some changes. You can select who has access to the Deal Manager by defining the team access section. You can choose to make the Deal Manager accessible to all security roles, which means that all users will be able to use Deal Manager, or you can choose specific security roles. Needless to say only users that have one of those security roles assigned will be able to access Deal Manager.
Configure the Workspace
Below the ‘Define Team Access’ section on the settings page you’ll notice the ability to customize/configure how underlying records in the Deal Manager workspace behave by adding JavaScript. I am not going to do that as I don’t really know how to write JavaScript, but I bet this is a very nice feature that our developers will get excited about!
Another section under ‘Customize the workspace’ is the ability to turn any of the charts off that come with the application. There are two charts available, the Deal Tracker chart, which is a bubble chart and the Sales Funnel chart, which is a funnel type chart. When you click on the properties (pencil) icon you have the ability to change the name of the cart, update the Horizontal Axis and/or Vertical Axis data values, change how you want to segment the data and change the field that shows the size of each deal. You also have the ability to set the sort legend either to ‘Start to Finish’ or ‘Finish to Start’. I have to play around with this a little bit so I understand what this means.
Below these settings you’ll also notice there are some tooltip fields which you can add to the chart. This will come in handy if you want to show some custom fields. The fields you select here will show as a tool tip when your users hover their mouse cursor over the cart. Besides selecting the fields you want to show, you can even move the position of each field by dragging them up or down. The maximum number of tooltip fields you can show is 8. Once you made your changes to the settings you need to make sure you publish your changes by clicking ‘Publish’ on the bottom of the screen.
If you want to learn more about the ability on customizing the Deal Manager Workspace you can take a look at this article. In order to turn off the preview feature, you can go back to the settings page and set the ‘Preview enabled’ slider (on the top right of the screen) to off.

Accessing the Deal Manager Workspace
Now that you have enabled and configured the Deal Manager Workspace it’s time to see what it looks like! Before you do this, make sure you have some opportunities in the system so that you can take full advantage of the visuals.
There are a lot of things that sales users can see and do in the Deal Manager Workspace. Below you can see a screenshot of the Deal Manager Workspace and the different items that are accessible to view and interact with the data. I just love the Deal Tracker chart. By default the axes are set to ‘Probability’ and ‘Close Date’ and the bubble size is related to the ‘Revenue’ field, but these can be configured differently. You will notice that the larger the deal size, the bigger the bubble on the chart.
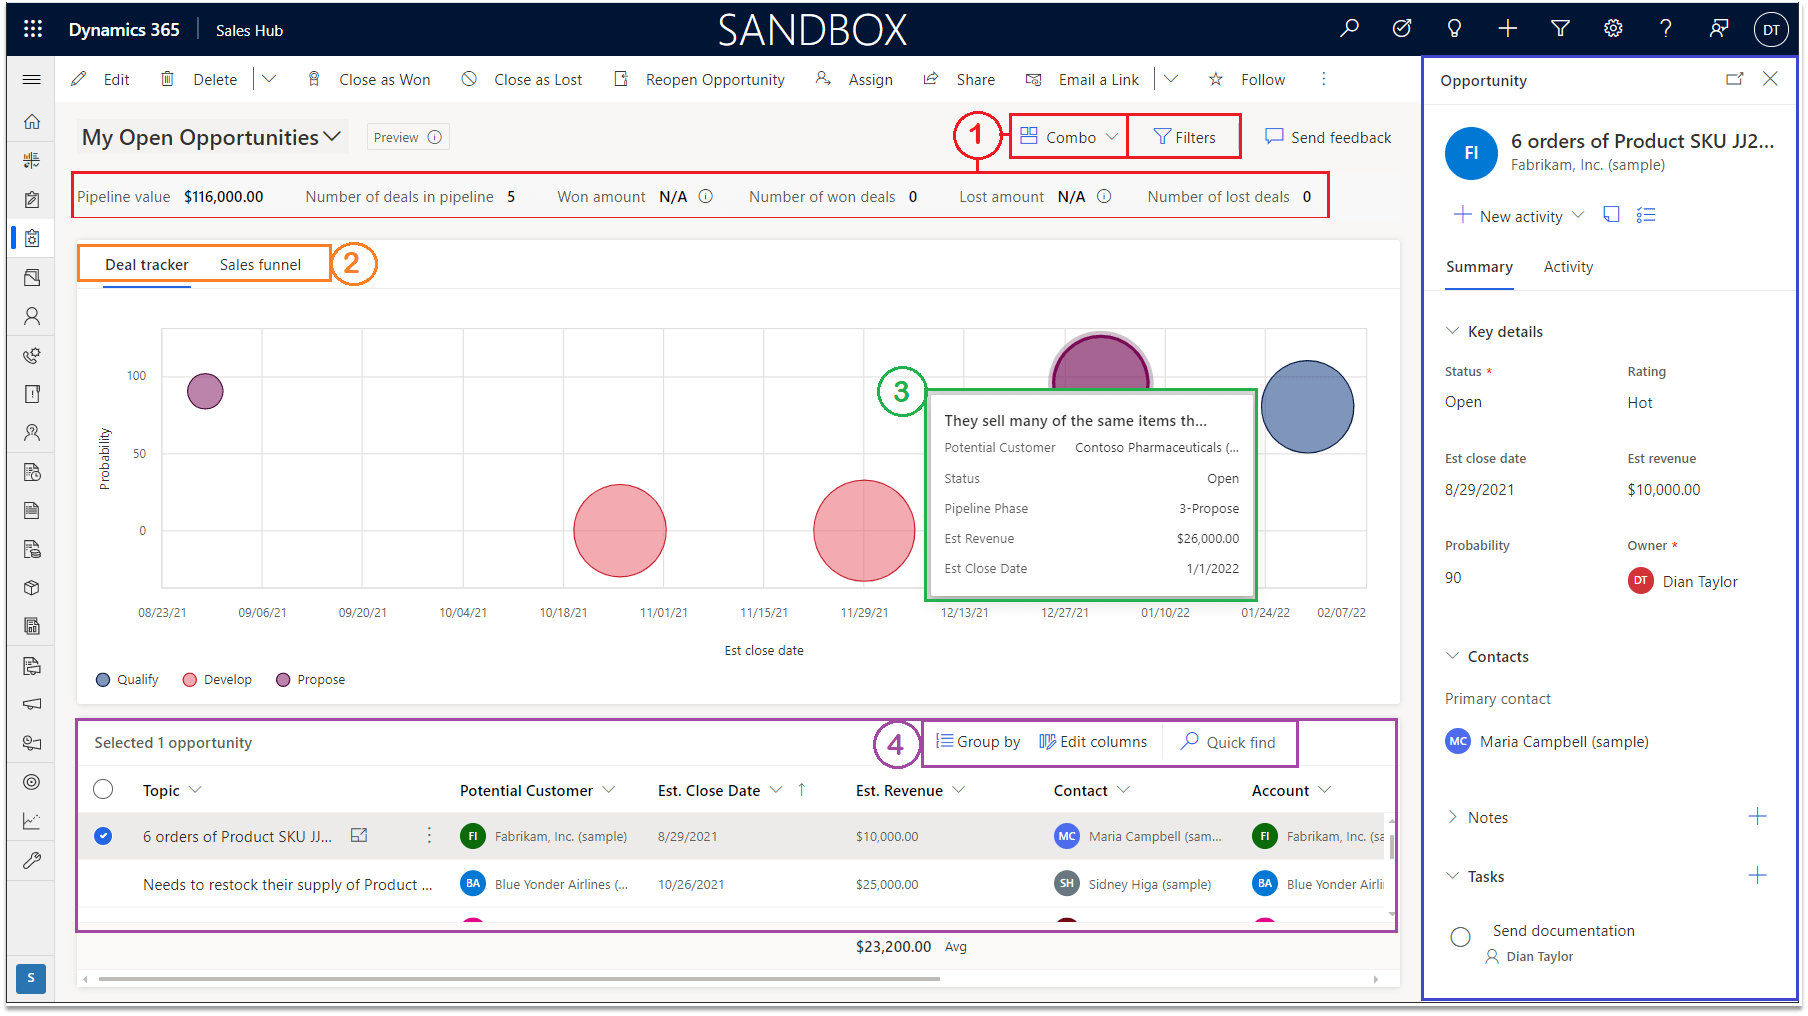
1) This is a switcher that allows users to switch between ‘Combo‘, this is showing a combination view of a chart and a list of opportunities. ‘List’, this is only showing a list of opportunities with no charts, or ‘Edit Metrics‘, which allows them the fields to choose in the metrics below the switcher.
2) This shows the charts that are available for viewing, which are the Deal Tracker and Sales Funnel charts.
3)This tooltip shows up when a user hovers their mouse over one of the bubbles in the chart.
4) This is the list of opportunities. Users can change the opportunity view on the top of the screen, right above the metrics. Sales users have the ability to configure the grouping of the records and edit the columns shown in this list. They can also drag the columns in any order they prefer and lastly there is a ‘quick find’ section where they can search for records. When a sales user clicks on the icon on the right side of the opportunity topic field, the opportunity will open in a window that lies on top of the Deal Manager Workspace. The edit button next to a field allows for updating of the value in that field.
5) When an opportunity is selected in the opportunity list, a pane with opportunity details will open on the right side of the screen. User can review the opportunity details and make updates to the record. They also have the ability to view and add activities and notes. When clicking on any of the related records in the pane (I.E Primary Contact) details of this record will be shown in the pane.
A few things that are currently not yet supported in the Deal Manager Workspace you can find here. I have to say I really love this new feature in Dynamics 365 Sales. The team has really outdone themselves! This will be a great way for sales people to get a good grasp on their deals and will allow them to be more productive as they can interact with the records without having to navigate away! I hope you enjoyed this article! Be sure to check in again next week for a new article or subscribe here to never miss another post!


Comments are Closed