


Custom Process Views in Dynamics 365

For the past 4+years I have been working as a presales engineer which means that I am strictly on the sales side of things, and I am not working on any customer implementations anymore. Before I joined my current employer, I was involved in customer implementations of Dynamics 365 or Dynamics CRM as it was called then and last night I came across of some notebooks from my implementation days. One of the things I found in my notes was something that I still use to this day: custom views for processes. You’re probably wondering what I am talking about, because we can’t create system views for processes in Dynamics 365?? That statement is correct, but we CAN use advanced find and save the view as a personal view! This allows admins to put a custom view together with data from processes like business process flows, work flows, business rules etc. These views can then be shared with other administrators of Dynamics 365. This is a big deal because lots of times administrators need to be able to see which workflows are triggered for a specific entity. We also want to make sure that we’re not creating separate workflows for actions that can be done in the same workflow. Which means that having a view that will show the workflow triggers would be very helpful. Even though background workflows are moving to Power Automate, we still have the ability to create real-rime workflows, and we can also use this to create views for other processes, like actions, business process flow or business rules!
Let me show you how this can be done!
We will first navigate to the processes area in dynamics 365 by clicking on the gear icon and selecting ‘Advanced Settings’. Then you’ll need to click on ‘settings’ and select ‘processes’. You’ll see there are a few system views there already, but there are not a lot of columns on any of those views, so let’s create our own personal view(s). The first view I’ll create is a view for my workflows. Click on the advanced find icon on the top bar, which is on the right side of the gear icon. The view should pre-load with the processes entity, if it didn’t you can select ‘processes’ in the ‘look for’ dropdown, and you can select a system view in the ‘Use saved view’ dropdown as shown in the image below.
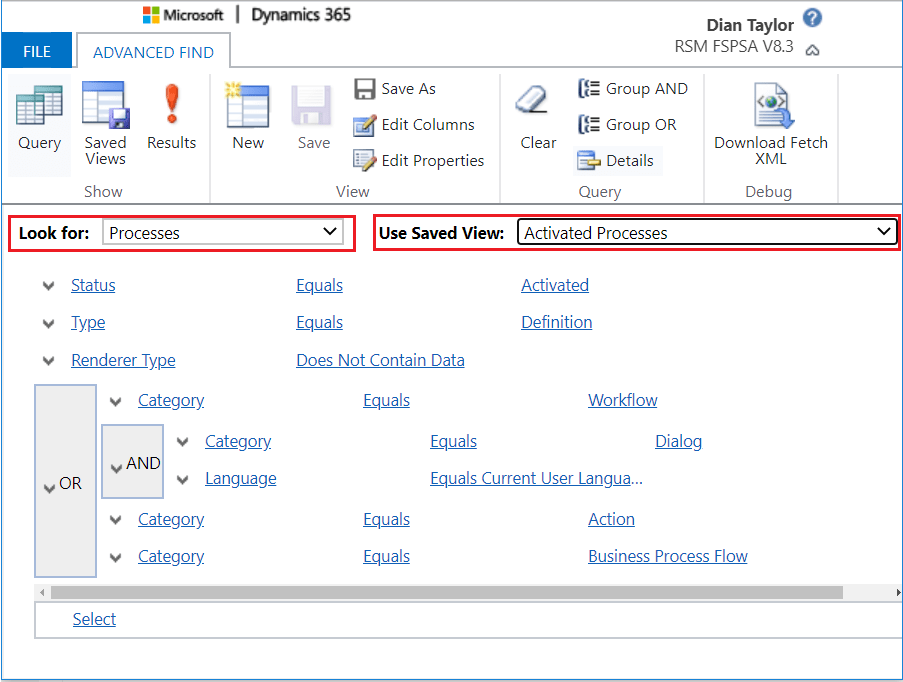
From here you can start editing the view by adjusting the filters. You need to make sure that you leave the ‘renderer type’ does not contain data, those are the workflows that are /were automatically created by the system for SLA’s, automatic creation rules etc. In the category field you can filter out the type of processes you want in your view. (I.E workflow, business process flows, business rules, etc.) As mentioned before in this example I am going to create a view for workflows. Below are the filters I’ll be using for this view which will show all workflows in the system:
– Type equals definition
– Renderer Type doesn’t contain data
– Category equals workflows
Now the filters have been set we can start adding the columns to the view. The columns I added to the view are as follows:
- Process Name – Name of the workflow
- Primary Entity – The entity the process runs on
- Trigger on Create – Y/N field if yes that means this workflow will trigger on create of an entity record
- Trigger on Update Attribute list – All fields that will trigger the workflow when updated
- Trigger on Delete – Y/N field if yes that means this workflow will trigger on deletion of an entity record
- Run as onDemand – Y/N field showing if this workflow can run ondemand
- Run as User – Showing how this workflow runs (as the owner or calling user)
- Scope – workflow scope
- Status – Status of the workflow (active or draft)
- Description – Description field on the workflow which is on the administration tab of the workflow. I would recommend entering a short description for each workflow so that everyone knows what the workflow is supposed to do.

Once the view is done don’t forget to click the save-as button and give it a name that makes sense. You’ll see the view now shows us when you click on the view selector. The second view I wanted to create is a view for business rules. It probably goes without saying that some the columns we’ll be using for the business rules view are different than the ones we used for the workflow view, but there are a few that these processes have in common, like the process name field, primary entity, category, description etc. The description field of business processes are on the mail page and again I recommend admins to always enter a good description in these types of fields. Fields that need to be added to the business rules view are:
- Process Name – Name of the business rule
- Primary Entity – The entity the process runs on
- Process Trigger – Scope field on business rule (I.E form or entity) unfortunately the name of the form is not accessible
- Is Managed – Showing of this BR is managed or unmanaged
- Status – Status of the workflow (active or draft)
- Description – Description field on the business rule
Below is an example of what the workflow view looks like after saving the personal view. The other thing to consider is that you can export this data to excel at any point , another reason to make sure you enter information in that description field!

Another idea is to put a similar view together for system jobs, and create a system admin dashboard for this, where you will be able to view all system jobs that are failing or are waiting for resources. I hope you enjoyed this post! Be sure to check in again next week for a new topic or subscribe here to never miss another post!


Comments are Closed