


Setup Mailbox for Automatic Case Creation in Unified Interface

In the past I’ve written an article on how to setup and configure a support mailbox in exchange where customers can send emails to if they have an issue that needs to be resolved. We were able to use the automatic record creation and update rules (ACR) in the legacy interface to configure the logic to create a case record for the email that came in. I’ve tried to set this up again in after ARC moved to the Unified Interface in 2020 Release Wave 1, but was unsuccessful as there were some issues with the logic in Power Automate. In 2020 Release Wave 2 these issues have all been fixed so I am now writing this article to show you the steps you need to complete in order to get this working! Some of the steps remain the same, but the configuration in Dynamics 365 is a lot different. Since it’s a pain to have to flip back and forth between pages, I will write all the instructions (even the ones that remained the same) in this article.
Setup Mailbox
The first thing we have to do is setup a shared mailbox in exchange, this is also where we will determine the email address of the mailbox, where customers can send their emails to. Navigate to the admin portal of office 365. Then expand ‘Groups’ on the left hand side and select Shared Mailboxes. Click ‘+Add a Mailbox’ and set the mailbox name and email address. Once the mailbox has been created remember to add members to the mailbox by selecting the mailbox and clicking ‘edit’ next to Members.
Create a queue in Dynamics 365
The next step in the process is to add a queue in Dynamics 365, where we will tie this exchange mailbox that we just created to the queue. We will do this by entering the support email address in the email field of the queue record. In the Customer Service Hub app navigate to Service Management>Case Settings and click ‘Queues’. Create a new queue (I’m calling mine ‘Support’) and enter the email address of the mail box you just created in the ‘Incoming Email’ field. Select whether this is a private or public queue. If this is a private queue, don’t forget to add members to the queue (this will be the folks who can access the queue) When you save the record Dynamics 365 will automatically create a mailbox using the email address provided in the ‘Incoming Email’ field of the queue. Lastly you need to set the ‘Convert Incoming Email to Activities’ field to ‘All Email Messages‘.
Configure Dynamics 365 Mailbox
On the queue record, click on the mailbox under ‘Email Settings’ to open the mailbox or click the gear icon on the top navigation bar and select ‘Advanced Settings’, then navigate to Email Configuration and click Mailboxes. Search and open the newly created mailbox. Set the ‘Incoming Email’ and ‘Outgoing Email’ fields to ‘Server-Side Synchronization or Email Router’, then click ‘Approve Email’ on the ribbon and click ‘Test and Enable Mailbox’. Once the email has been enabled you will see the Incoming Email status and Outgoing Email Status on the mailbox record showing as ‘Success’.
Create and Configure Automatic Record Creation and Update Rules
Navigate back to the queue that was previously created. You will see the ‘Record Creation and Update Rules’ section on the bottom of the form. Click on the ellipse and select ‘+Add new Record Creation and Update Rule’. On the ‘Basic’ tab you need to enter a rule name (I called mine ‘New Case Update Rule’), the queue to monitor (which will default to the queue you were just in when creating this record) and the activity type to monitor, which in this case is ’email’. Save the record to get access to the ‘Advanced’ and “Activity Monitor’ tabs.
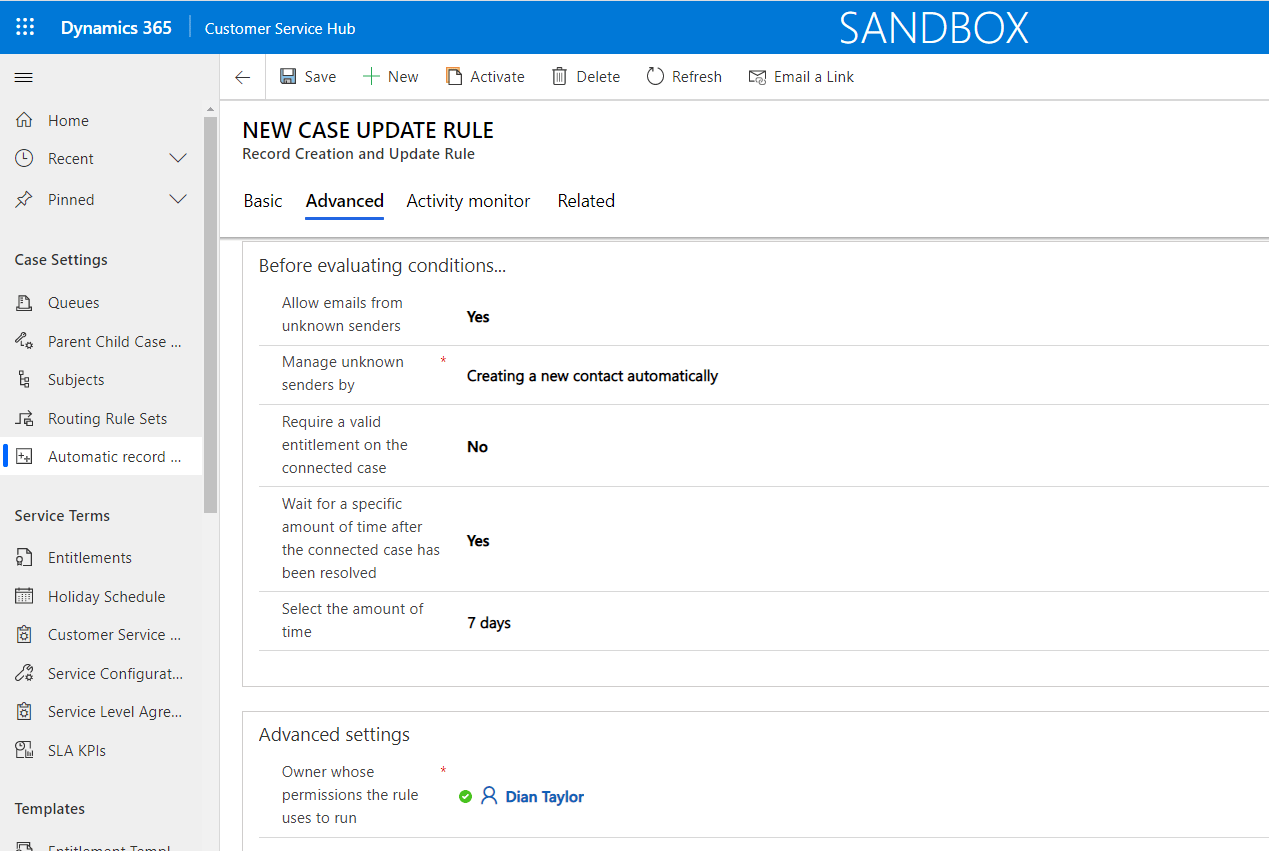
Click on the ‘Advanced Tab’ to configure the following:
– Allow emails from unknown senders – If an email is received from an email address that is not in the database, you can configure Dynamics 365 to automatically create a contact record using the email address, and use that record as the contact related to the case. When this field is set to yes, the ‘Manage unknown sender by’ field will become visible.
– Manage unknown sender by – There are two options for this field: ‘Creating a contact automatically’ which I just mentioned above and ‘Mapping in Power Automate Manually’, which means you’ll have to manually map the email address using the Power Automate logic. I think having the system automatically creating a contact is the easiest setup so that’s what I select here.
– Require a valid entitlement on the connected case – If you only want to auto-create cases for customers that have a valid and active entitlement, you need to set this field to ‘Yes’. I have mine set to ‘No’ as I want to create a case for anyone, no matter if they have an entitlement or not.
– Wait for a specific amount of time after the connected case has been resolved – This is where you choose if an email that is related to an exiting case needs to be converted to a new case or just tracked to the ‘old’ case. If this field is set to ‘No’, a case will be created even if a related case exists. If you set this field to ‘Yes’ then the ‘Select amount of time’ will be visible.
– Select the amount of time – Dynamics 365 only creates a new case AFTER the selected time has passed after case resolution. For example, if you have set ‘Wait for a specific amount of time after the connected case has been resolved’ to yes and specify one day in the ‘Select amount of time’ field, and a case exists, when a mail comes for the same issue, another case will not be created till one day lapses after the existing case is resolved.
Click back on the ‘Basic’ tab to add a Record Creation and Update Rule Item. In the ‘Step Two: Conditions to evaluate and actions to take’ box click the ‘+New’ button. This is where you will configure the logic of what conditions need to be met in order to create a case record in Dynamics 365. Enter a name for the condition and configure the conditions:’Condition that must pass to continue’. In my case I want the logic to run regardless of any conditions so I left this blank. You’ll see that the ‘Record to create’ field is automatically set to ‘Case’. Which is what we want for this example. Click on ‘Save and open Power Automate’ to open the flow associated with this rule.

Now there is not a lot of logic you’ll have to configure here, most of it is already pre-configured based on values picked above, this is what will happen:
1) When an email comes in from someone who’s email address doesn’t exist in Dynamics 365; the system will create a contact record using the email address and the case that gets created will have the contact populated in the case customerid field.
2)When an email comes in from a contact with no related account record the case that gets created will have the contact populated in the case’s customerid field.
3)When an email comes in from a contact with a related account record the case that gets created will have the account populated in the case’s customerid field and the contact populated in the case’s primarycontactid field.

When you open the flow you have the ability to make changes to it. Since the logic I just mentioned above works for me, I am not going to make a ton of changes/updates. What I am going to do is make some changes in the ‘Create a record’ step of the flow, where I will set the case origin field to ‘Email’. If you read my article on Automatic Case Assignment you’ll understand that I want to populate the Category and Subcategory fields on the case so they will be neatly assigned to the correct team and that’s it! Make sure you give the flow a name and save it. Return to the Record Creation and Update rule and activate the rule. Make sure to run some tests and you’re all done!
Q: What do you need to do if you want to connect an existing mailbox with emails?
A: If you want these emails to be processed just like a new email would be, there are some steps you need to take. On the mailbox entity there is an out of the box field that isn’t visible on the form called ‘Process Email Received After’, so you’ll have to put it on the form first. This field allows you to pick a date from when you want to start syncing the emails into Dynamics 365. After you entered a date and saved the mailbox, you’ll need to approve and test and enable the mailbox. Keep in mind only emails that are marked as ‘unread’ will be processed.
I hope you enjoyed this post! Be sure to check in again next week for a new article or subscribe here to never miss another post!


Comments are Closed