


Using Power Automate conditions with Power Virtual Agents

In this article I am going to discuss a scenario where I need to pass data from Power Automate to Power Virtual Agents, but the data I’m passing will depend on the outcome of a condition. If you’re not familiar with conditions, conditions are statements that you can use in Power Automate. (Similar to check conditions in workflows). The condition will either be true or false, and therefore below the condition you’ll see one path that will be taken if the condition is true (If yes) and another path that will be taken if the condition is false(If no). Usually, we would add additional steps in the ‘If yes’ or ‘If no’ branches, but when using Power Automate with Power Virtual Agents, the last step in a flow is always to ‘Return value(s) to Power Virtual Agents’. I learned you can’t add this step to the ‘If yes’ and ‘If no’ branches, so I will explain how you can handle this.
The scenario is as follows: a customer starts a conversation with the chat bot about a problem they are having. In my example the customer is having issues with their HVAC unit. Since my Power Virtual Agent instance is integrated with Dynamics 365 for Omnichannel, I have a few pre-chat survey questions that need to be filled out before they can start the chat with the Power Virtual Agent. One of the (mandatory) questions is asking for the customer’s email address, which I am using to query my data verse database to find the related contact record. You can read all about how I did that in this article. There are other ways to do this, you could also setup authentication in Power Virtual Agents. If you don’t have your Power Virtual Agent integrated with D365 Omnichannel for CS, another option is to have the bot ask what the customer’s email address is.
The bot is asking some additional questions and then asks if the customer wants to create a case. If the customer says ‘Yes’ I will use Power Automate to find the customer contact record in Dynamics and create the case. I want to make sure that if the contact it tied to an account record, the case is logged to the account, and the contact is logged in the case’s contact field. If there is no account tied to the contact, then I want the contact to be tied to the case as the main customer. This is where the condition in Power Automate comes in, so let me explain how I configured the flow to make either scenario work.
Solution
I created a topic in Power Virtual Agents, which will be triggered by questions about a HVAC Unit. Some of my trigger phrases are ‘I think my ac is broken’ , ‘Problem with HVAC’, etc. I was able to get the contact ID as explained here (due to my integration with Dynamics 365 Omnichannel for CS, but I will explain how you can do this if you don’t have this setup. My first question in the topic is what the customer’s email address is. Make sure you set the ’email’ entity in the identify step below ‘Ask a question’. I also renamed the variable to email. (You can find the variable under ‘Save response as’. Usually it will say something like ‘Var1’ (shown in the image below), which you can edit and change the name. This will help identify the data that is stored in the variable.

The next step will be where I call a Power Automate flow to query Dynamics 365 using the email address that was entered in the previous question, to find the contact record in Dynamics 365. Click on the + button to add a node, and select ‘Call an action’. This will open a window on the right side of the screen where you can either pick an existing Power Automate flow, or create a new one. Click on ‘Create a flow’. This will open the Power Automate flow window where you can start to configure your flow. Make sure you name your flow so you’ll be able to tell what it does and what it’s used for. I am going to call this flow ‘PVA-Contact Lookup by Email’.

In the first step called Power Virtual Agents, click on ‘+Add an input’, select ‘Text’ and call the variable ‘customer email’. This allows us to store the email address that the customer entered while interacting with the Power Virtual Agent. We will configure the passing of that data from Power Virtual Agents to Power Automate later in the PVA topic. Hover your mouse on the down arrow below the first step and click on the + button that appears. Select ‘Add an action’. Since my PVA environment is not in the same environment as Dynamics 365, I will need to use the Microsoft Dataverse(legacy) connector for this step. I choose the ‘List rows’ step and will filter for the email address that was entered by the customer in the chat. In the Filter Query field, enter emailaddress1 eq ‘ (don’t miss the single quote), then click on ‘customer email’ (this is the placeholder/variable we created in the first step) and add another single quote on the right side of the ‘customer email’ dynamic content. Example is shown in the below image. Under advanced options I will enter 1 for the top count.

In the next step you could have a condition that will check if there are multiple contacts in the database with this email address, but I am going to keep it simple and move to the compose step. I will click my mouse in the compose input field and click on expression of the dynamic content window that opens on the right side. I enter the following:
body('List_rows')['value'][0]['contactid']This will store the unique ID of the contact record. I renamed the compose step to ‘Compose – Contact ID’. Now that we have captured the Contact Unique ID we’re going to feed it back to Power Virtual Agents to use later. Under the last step “Return value(s) to Power Virtual Agents’ click ‘+ Add an output’ and select ‘text’. In ‘Enter Title’ enter contact ID, in the ‘Enter a value to respond’ enter the output from the ‘Compose – Contact ID’ step. Make sure you save your flow, then return to the topic in Power Virtual Agents.

Back in the topic in Power Virtual Agents, click on on the + button and select ‘Call an Action’. Select the flow you just created from the list of flows. You’ll notice this is where we’re going to configure what data will be feed into the customer email field in the flow. Under Power Automate inputs it should say ‘customer email’ gets value from‘ this is where you’ll select ‘Email’ (this is the question variable in Power Virtual Agents, representing the answer the customer types into the chat. Below the Power Automate action you can create a few other questions, like ‘Please give me a short description of the issue’, make sure you rename the variable to ‘CaseTitle’, as we will use this data as the title of the case when creating a case later. After you entered all your questions in the Power Virtual Agent topic, we’ll ask if the customer if they want to create a case. Click on the + button to add a question. We’re going to use multiple choice options for this question. Enter Yes and No as the options for the user. Under the ‘No’ option click on the + button and select ‘End conversation’.
Under the ‘Yes’ option, we’re going to call another Power Automate Flow, so select ‘Call an action’ and click ‘Create Flow’ again. Make sure you name the new flow correctly. In my example I called the flow ‘Power Virtual Agents Create Case’. Below the Power Virtual Agents step click ‘+Add an input’ and select Text. Enter ‘Contact ID’. This will be the placeholder of the contact ID that we got from the other flow, and fed back into PVA. Add another text input for ‘Topic’. This will store the response to the question from the bot to enter a short description of the issue, we will use this later to populate the title of the case. Now I am going to query the database for a contact using the email address. Since my Dynamics 365 environment is not in the same environment as Power Virtual Agents, I will use the Microsoft Dataverse(legacy) connector for this step. Choose the ‘Get Row’ step, select the Dynamics 365 environment you’re planning to query the data for, and enter ‘contacts’ as the table name. In the item identifier enter the dynamic value for the ‘Contact ID’ from PVA.

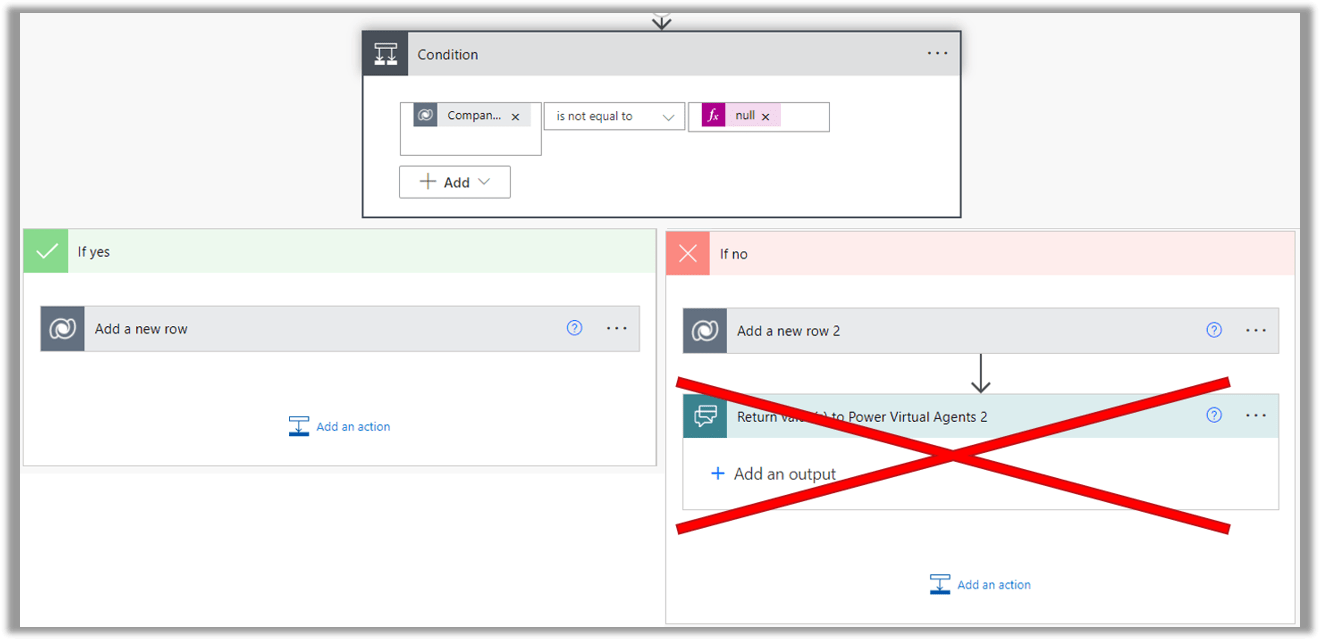
The next step will be where we will enter the condition step in order to see if the contact is related to an account or not. Click on +New Step and select the condition step. In the first field select ‘Company Name’ (or whatever the display name of the account field in the contact table is) from ‘Get Row’ step in the dynamic content window. In the middle field select ‘is not equal to‘. and in the last field type ‘null‘ as an expression. We are saying here that the company field on the contact record is not empty, the field has data and there for there is an account associated with the contact.

You’ll notice below the condition there is a path if the condition is met (If yes) and a path if the condition is not met. If the condition is met (which means the contact is indeed associated with an account) we will create a case and tie it to the company record. We will also populate the contact field on the case with the contact that initiated the chat. Click the ‘Add an action’ button inside the ‘If Yes’ box and select ‘Add a new row’. Select the correct environment you want to create the case in, enter cases as the table name and set the ‘Topic’ value in the ‘Case Title’ field in the step. In the ‘Customer’ field enter ‘Company Name’ from the dynamic content window. Don’t forget to enter ‘Accounts’ in the ‘Customer Type’ field below the Customer field in the flow step. This shows that we are entering an account record in this lookup field. NOTE: The customer field in the case table can store either an account or contact record in this field.
Lastly scroll down to the ‘Contact’ field in the flow step and enter the contact from the dynamic content window.

Now let’s configure the ‘If No’ condition. This path will be followed by the flow if the contact record isn’t tied to an account, meaning the parentcustomerid field in the contact row is blank. If this is the case, we want to set the contact in the customer field of the case. Click on ‘Add an action’ under the ‘If no’ condition. Select the correct environment you want to create the case in, enter cases as the table name and set the dynamic ‘Topic’ value in the ‘Case Title’ field in the step. Now we need to enter the contact as the customer. We can do this by clicking inside the ‘customer’ field in the step and selecting ‘contact’ from the dynamic values of the ‘Get row’ step. For this step we need to make sure that we set the ‘Customer Type’ field in the ‘Add a new row 2’ step to ‘contacts‘. This will tell the system that there will be a contact record entered in the Customer field.
The last step in the flow is really what this article is all about! We have 2 conditions with two different outcomes so how do we pass information (in this scenario it’s the case number) from either scenario back to Power Virtual Agents? Add an output to the Return value(s) to Power Virtual Agents step. Select ‘Text’ and enter ‘Case Number’ in the first field. Now here comes the trick! In the second field, add the case number from the dynamic content ‘Add a new row'(this is the case that is created if there is an account related to the contact, and also add the case number from the ‘Add a new row 2’ step from the dynamic content window. This will allow Power Automate to feed back the correct case number no matter which path it takes! This way you can feed back the correct case number to the customer in the chat.

- Contact ID gets value from ContactID
- Topic gets value from CaseTitle
Below the Power Automate flow add a message. Type in ‘Your case ‘ then click on the X symbol to enter the variable. Pick the CaseNumber variable to feed the case number into the message, and that’s it! Make sure you test everything!

I hope you enjoyed this article! Be sure to check in again next week for a new article or subscribe here to never miss another post!


Comments are Closed