


D365 Customer Service: Customer 360 Component

In today’s article I am going to discuss yet another feature that was part of 2023 release wave 1 which is called the Customer 360 component. This component allows system administrators or makers to display details of a customer field on a case record. We already had the ability to do that by using a quick view form, but by using this control makers can configure which fields to show (in the control) and give users the ability to edit information on the related account or contact row. As I mentioned before, this is a new control that was added as part of 2023 release wave 1 which can be added to a form that has a customer field. In this example I am going to add it to the account and contact forms and then configure the case form to show the related customer data on the form.
Add Customer 360 Control to Account & Contact forms
The first thing you’ll need to do is create a new form for the account table and the contact table. (If you don’t want to do this, you could also use the already configured ‘Account form for Customer Card’ account form and/or the ‘Contact form for Customer Card’ for contacts.) You could also use an existing form, but for my example I am going to keep it clean and create a new form for each of those tables and show you how to configure the forms. The reason for this is that I don’t want too much clutter on the new forms as they will be embedded on the case form and show related data of the row that is populated in the ‘customer’ field. You can create a new form by navigating to make.powerapps.com > tables, opening the related table (account and contact) and clicking forms. On the top of the page you’ll see the ‘+New form’ button. Since the form will only show what’s on the first tab, I would recommend removing all the other tabs on the new form and just keeping the ‘summary’ tab. I removed all the fields from the ‘Summary’ tab, because I am going to configure the fields I want to show in the customer 360 component. The next thing we need to do is add the customer 360 component to the form. You can do this by clicking on ‘Components’ on the sitemap (left of the screen) and searching for ‘Customer 360’. If you don’t see it in the list, click on ‘Get more components’ which you’ll see on the bottom of the components list and search for it in the ‘Get more components’ window. Clicking it from the ‘Get more components’ window will add it to the controls available in the form designer.

Drag the Customer 360 component on the form. You’ll notice a fly out window opens with the title ‘Edit Customer 360’. This is where you can select the fields (columns) you want to show within the component. At this time we can select up to seven simple and three composite columns on the control. Keep in mind that while you can edit most of the columns after you clicked ‘Done’, you can’t change the first column you choose. Once you configured all the columns (called attributes in the fly-out window) you’ll notice the ‘enable editing’ field. If this field is set to yes, users can edit the rows/fields that we configured earlier in this article. The ‘Show border’ allows you to configure to either show a border or not, and the ‘Margin Start’ field allows you to pick a starting margin for the control. Since I set the Show border value to ‘No’, the ‘Margin Start’ field will be ignored. Below the ‘Margin Start’ field you’ll see the ‘Show Static Header’ option. This will allow you to set a static value as the header.
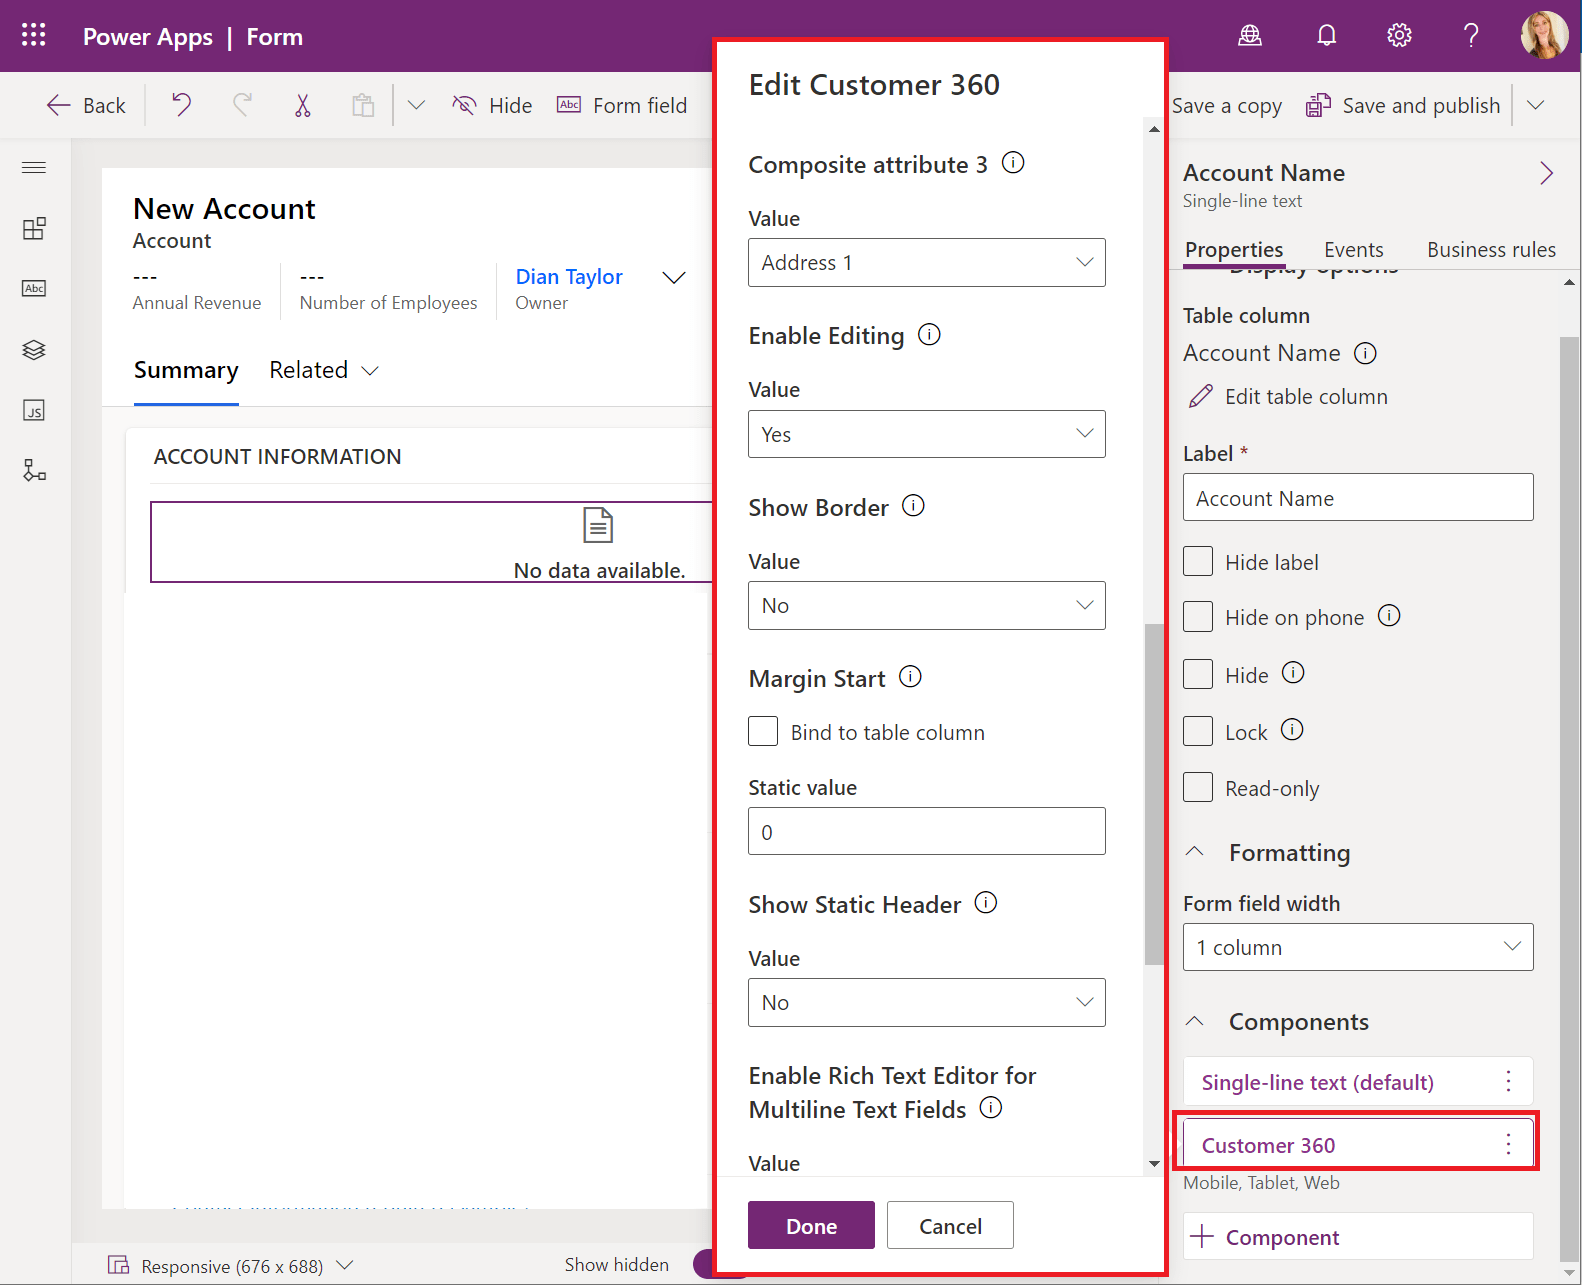
I didn’t see a place to configure the static text in the header, when I tried this is just showed ‘Customer Details’ in the header instead of the account name with hyperlink. ‘Enable rich text editor for multiline text fields’ allows you to do exactly that; show the rich editor for multiline text fields. The ‘Custom Rich Text Editor Configuration URL’ will allow you to use a custom rich text editor instead of the built in one. Lastly, on the bottom of the form you can configure where the component should be visible (web, mobile and/or tablet). Don’t forget to save and publish once you’re finished configuring the form. Once the account form is done, repeat the same steps to add the control to a new contact form.
Add New Account & Contact Customer 360 forms to Case form
The next step is to add the 360 forms we just created for the account and contact tables, to the case form. This will ’embed’ the forms into the case form, with the ability to edit the account or contact data (if configured to be editable). The first thing you’ll need to do is navigate to make.powerapps.com. Make sure you have the correct environment open. From there you’ll click on tables and click on the case table to open it. Click on ‘forms’ under ‘Data experiences’ to access the case forms. Open the form you want to add the control to. Make sure the ‘customer’ column is added to the form.

The properties window of the customer field opens up on the right hand side. Scroll down until you see the ‘Components’ section. Expand the section and click ‘+component’ to add a component, then select ‘form’. Click on ‘+Related form’ to add the account customer 360 form, then do the same steps to add the contact customer 360 form. Once the customer 360 forms are added for the account table and the contact table, click the ‘done’ button and make sure you save and publish the form. If you look at the control, you’ll notice that it’s called ‘Form Component Control’. This is a control that existed for some time now, I even wrote a very detailed article about this control a few years back, which you can read here if you haven’t read it yet.

Another thing to note is that you will have to add the newly created 360 Customer forms to the model driven apps they will be used in. Once that is done, all you have do is to clear the cache on your browser and take a look to see how it looks! I didn’t set the header to be static, so you’ll notice the header of the embedded customer 360 form shows the account name and a link that will open the account row, when clicked. You’ll also notice click to dial and copy buttons on phone fields and address fields. If you enabled editing on the control, you’ll see an edit button on the right side of the header. When users click this button, they can edit the values in the 360 customer form. Once the edits are complete, users can click the save button to save the changes to the related account or contact table. Is this everything we can do with these controls? Absolutely not! Next week I am going to show you how we can show the form that we embedded here in a separate pane, and I will discuss another control that came out as part of 2023 release wave 1 so don’t forget to check back next week! I hope you enjoyed reading this article! Be sure to check in again next week for a new article or subscribe here to never miss another post!


Comments are Closed