


Command Bar designer for model-driven apps(preview)

Most of you who have needed to customize buttons in the command bar in Dynamics 365 found out that this is not something that we can do by using any of the configuration tools that come with Dynamics 365. I’ve been pulling my hair out on many occasions until I found the ribbon workbench created by Scott Durow (one of the nicest people I have ever met!) which is part of the XRM Toolbox. If you haven’t checked out the XRM Toolbox I would highly suggest doing this, as it has a lot of wonderful tools you can use to configure/customize Dynamics 365. The ribbon workbench is an amazing tool that has saved many of us over the years as the tool is very easy to use and (depending on what you’re trying to do) doesn’t require you to know a lot of code.
As you probably guessed by the title of this article, Microsoft is finally rolling out a new (preview) feature that is part of the configuration tools in Dynamics 365 which will allows us to configure the command bar/ribbon in model-driven apps! Since this is still a preview feature there are certain things we can’t do yet, like edit the existing buttons. For example, maybe there are certain out of the box buttons that you would like to hide from your users, well unfortunately that is not something that you can do with the new command bar designer…yet…? I’m hoping this is something that will be coming later. What is important to understand is that there is more going on than just this new designer being added to the application. Microsoft actually rebuilt the command infrastructure because there were several problems with the classic commands (formerly known as the ribbon). This new infrastructure comes with a lot of benefits, like being able to use low code solutions such as Power FX, and better app level control, as these commands are configured and applied to individual apps.
I have to say I really like where Microsoft is going with this. When makers create new buttons they have the ability to use existing icons, or they can create their own icons which will need to be added to Dynamics 365 as a web resource (SVG file). As I mentioned above, to add logic (commands) to the buttons in the command bar, you’ll need to use a Power FX formula or JavaScript. So, this means JavaScript is not going away (yay!). There is a bit of a learning curve with Power FX though. If you want to learn more about Power FX functions take a look at this article. You can use Power FX formulas to decide what happens when the button in the command bar is selected as well as the logic to control whether the button is visible or not. For example, if you add a button on a list view, you can configure the button not to be visible until one (or more) records are selected (to run the command on).
Accessing the Command Bar editor
You can access the command bar editor from the new modern app designer. If you’re not familiar with the new Power Apps Designer, you can read the article I wrote about it here. Once you open the modern app designer, you’ll need to hover your mouse over a table under the page section and click on the ellipse where you’ll notice the ‘Edit command bar(preview)’ button in the fly out menu.

When you click the ‘Edit command bar(preview)’ button it will take you to a screen where you will have to select which command bar you want to edit. The options here are:
- Main Grid: The command bar for the main grid is the list view of records. This grid is accesses when using the sitemap to navigate to a table. For example, if you click on accounts on the sitemap in the sales hub, it will take you to the main grid for accounts.
- Main Form: This is the command bar that lives on a form. When you open the form, you’ll notice the command bar on the top of the form.
- Sub grid View: These views are displayed on forms of other tables. For example, if you open the account form you can see the contacts sub grid view on the account form.
- Associated View: This command bar is shown on the form of a parental table and will show related data. For example, if you are on an account form you can access the opportunity associated view by clicking on ‘related’ and choosing the opportunity table to view all related opportunities related to the account.
There is no option to access quick actions (these are visible when using Dataverse search) as these are edited from the table’s main grid.
Adding a new button
In this example I am going to add a ‘Copy’ button that will allow me to make a copy of an account record by simply pressing the ‘Copy’ command on the account table’s main grid. Once I opened the command bar designer I selected ‘Main Grid’ as the command bar to edit. To create a new button, you can click the ‘+New’ button on the top left side of the screen. This will open a side pane where you can enter the details of the button. I added ‘Copy’ as the button label. The button label is what users will see next to the button on the command bar. The ID will automatically be created, so nothing to do there. In the icon field you can choose if you want to use an existing icon, not use an icon at all, or use a web resource (this is where you would be able to use your own custom icon. Keep in mind this needs to be a web resource where the file is in SVG format). Since the clone icon already exists, I am going to use that one.
The text entered in the Tooltip title field will show when a user hovers their mouse over the button in the command bar. The Tool tip description will show below the tool tip title when a user hovers their mouse over the button. I left the Accessibility text blank, but in case you’re interested, this is what will be read by screen readers.
Below the accessibility text you’ll notice the Order Number field. This field determines the order the button will be displayed in, in relation to other buttons in the command bar. Now we’re getting to the important stuff! The Action field is where you will select what type of command/logic you want to run when the button is pressed. The options to choose from here are Run Formula (this is the Power FX formula that will run) or JavaScript. Needless to say this will be the JavaScript that will be executed when the button is pressed. In this example I will use Power FX. Before I share my Power FX code with you, I want to mention the last field related to the button, which is the Visibility field. This field will determine when the field should be shown to the users. In this example I only want to show this field if one (yes only 1) account is selected from the account list. In this field you can choose to always show the button or to ‘Show on condition from formula’, and you guessed it, I am going to select the latter, so let’s add that logic first. Click on ‘Open formula bar’ below the Visibility field. You’ll notice that the section on the left side of the command bar now shows ‘Visible’ vs ‘OnSelect’. This means, when should this button be visible? Which, as I stated above should be when one account is selected. The Power FX formula here is as follows: CountRows(Self.Selected.AllItems) = 1
After you added this formula your screen should look something like the image below.

My next step is going to be adding the action, where I choose to ‘Run a formula’. After selecting the ‘Run a formula’ option, click on ‘Open formula bar’ below the action section. Besides copying the selected account record, I also want to show a message to the user, letting them know the copy was successful and the name of the newly created (copied) account. Unfortunately, I didn’t find a way to add a URL to access the newly created record, but maybe that’s something we can do later. I am going to use the patch function where I will select the fields that will be copied over from the selected account to the new account. First, I will create the name of the copied account, which will be the name of the original account followed by ‘- Copy’. For example, if the selected account is called ‘Datum’ then the copied account will be called ‘Datum – Copy’. Once I have selected all the fields that need to be copied into the new account, I am going to add a notification (Starting at ‘Notify’ in the formula below) Here is what my formula looks like:
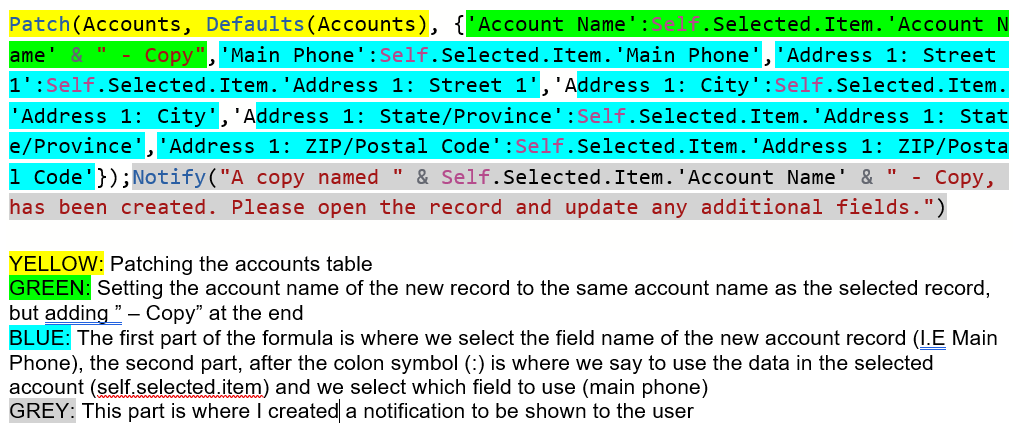
Patch(Accounts, Defaults(Accounts), {‘Account Name’:Self.Selected.Item.’Account Name’ & ” – Copy”,’Main Phone’:Self.Selected.Item.’Main Phone’,’Address 1: Street 1′:Self.Selected.Item.’Address 1: Street 1′,’Address 1: City’:Self.Selected.Item.’Address 1: City’,’Address 1: State/Province’:Self.Selected.Item.’Address 1: State/Province’,’Address 1: ZIP/Postal Code’:Self.Selected.Item.’Address 1: ZIP/Postal Code’});Notify(“A copy named ” & Self.Selected.Item.’Account Name’ & ” – Copy, has been created. Please open the record and update any additional fields.”)
NOTE: If you are having any issues with the formula above, I would suggest instead of copying and pasting it, to manually type the formula out. This will make sure the correct fields are used in your environment. After you copied the formula it should look something like the image below.

I didn’t want to just show you the formula without explaining what I’m doing here, so take a look at the below image to get a better understanding of how the formula works. I hope this will help you in the future building your own formula’s.
After you configured your button you’ll need to save and publish your changes. The button to do this is in the top right corner of the designer. Once the changes are published you can click the ‘Play’ button (on the left side of the ‘Save and Publish’ button) to check out and test your new button. Keep in mind you might have to do a hard refresh and clear the cache if you don’t see the new button on the command bar. (Sometimes even twice).

Above is what it looks like after I clicked the button. You see the notification on the top and the copy that was created of the selected account when I clicked the ‘Copy’ button on the command bar. I hope you found this article informative! To see a visual representation of this article, check out the video below! Make sure to check in next week for a new article or subscribe here to never miss another post!


Comments are Closed