


Passing D365 Customer Service data to Copilot Studio

In today’s article I will talk about Copilot Studio, but I am not discussing any new features. Instead, I am going to discuss some very important things that are happening in Copilot Studio when you integrate with Dynamics 365 Customer Service! Things you might not be aware of, I know I wasn’t! I will also talk about how we can bring additional data from Dynamics 365 Customer Service into Copilot Studio. The reason I am writing this article is because I’ve had some issues after I upgraded my classic copilot to the new copilot. The major issue was that data from Dynamics 365 Customer Service was no longer being passed to Copilot Studio. If you’re having the same issue, then definitely keep reading, as I will go over several things that could cause this problem!
When I mention ‘passing data from D365 Customer Service’, I am referring to customer related data that lives in Dynamics 365 Customer Service. For example, the unique id of a the customer, or the name of the customer who initiated the chat and entered data in the pre-conversation survey when they started the chat. I wrote an article on how to configure this in the classic Copilot aka Power Virtual Agents back in June of 2021, but the way to set this up has drastically changed from the Power Virtual Agent days! There is a simple reason for this! Today, when you connect Copilot Studio to Dynamics 365 Customer Service, the system will automatically install a new topic called ‘Set Omnichannel context items (ConversationUpdate activity)‘. NOTE: You will not find this topic in the topic list of Copilot Studio, as it is hidden.

This is very important information, because this means we don’t have to configure anything anymore to bring basic Dynamics 365 Customer Service data into Copilot. This new topic (which is managed and non-customizable) automatically stores basic data from Dynamics 365 Customer Service in several global variables so that we have access to this data inside of Copilot Studio. Copilot can then use this data during the conversation with the customer. You’ll recognize these variables in Copilot Studio, as their name starts with global.msdyn_. Below are the most important variables that are storing data from Dynamics 365 Customer Service:
- Global.msdyn_CaseNumber: The Case Number (ticketnumber)
- Global.msdyn_CaseTitle: The title of the case
- Global.msdyn_CustomerId: The unique id of the customer
- Global.msdyn_CustomerName: The name of the customer
- Global.msdyn_CustomerType: The type of customer, this can be set to ‘contact’ or ‘account’.
- Global.msdyn_CustomerPhone: The phone number of the customer. I assume this will only be available if you have the voice channel enabled and configured.
Passing pre-conversation survey answers to Copilot Studio
You’ll probably noticed that out of the box there is not a lot of data that is passed from Dynamics 365 Customer Service to Copilot Studio. The good news is that admins can add configurations that will allow us to bring over more data. Microsoft talks about custom context variables (like pre-conversation survey answers) that we can configure for Copilot here , but the article wasn’t very clear to me, which is why I am writing my own. So, let’s talk about how to bring the answers to the pre-conversation survey questions over to Copilot Studio.
First let me explain what these pre-conversation survey questions are. If you have this enabled and configured, the customer will see one or more questions when they initiate a chat by clicking on the chat widget. These questions can be configured in Dynamics 365 Customer Service. To do this, open the Customer Service Admin Center app and navigate to Workstreams. Click on the name of your chat workstream to open the workstream, then click ‘Edit’ on the right side of the screen, next to the ‘Delete’ button. This will open the chat channel details settings screen. When you click on the ‘Behaviors’ tab, you’ll need to set the ‘Pre-conversation survey’ button to ‘On’, which will then show the ‘Survey Questions’ section. To create a new survey question, you’ll need to click on ‘+Add’ and enter a unique survey question name, question text and select an answer type. The answer type refers to the type of data that will be entered for the question. Optionally you can configure this question to be required when a user initiates the chat from the chat widget.
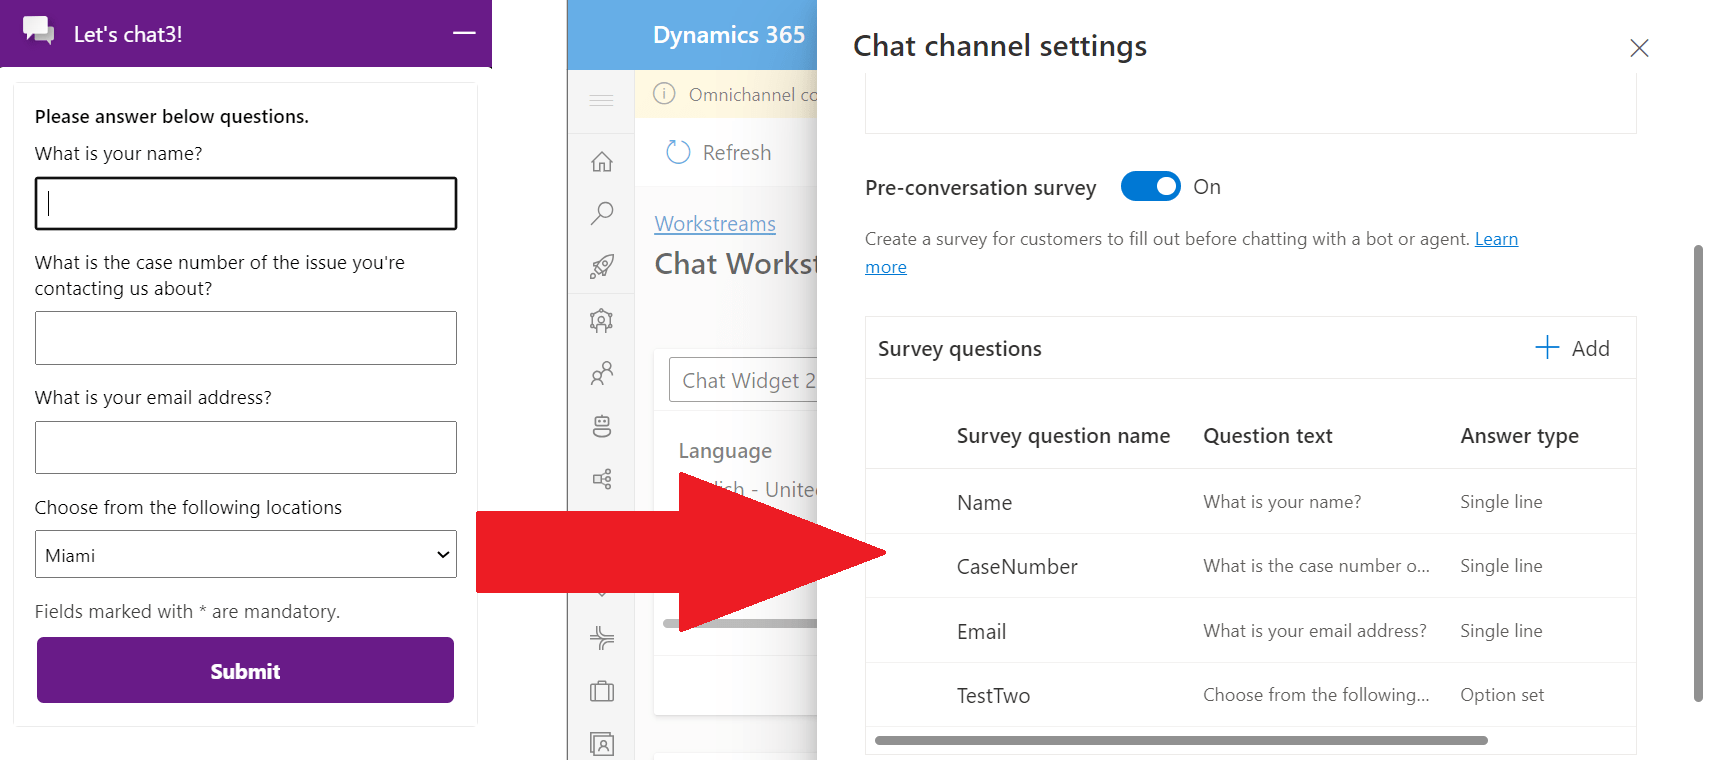
It is important to understand that when we are setting the variable values to store the pre-survey question data in Copilot Studio, we need to match the survey question’s name exactly. For example, I have created a field to capture the email address in my pre-chat survey question. The survey question name is ‘Email’. The PowerFX formula I am using to set the value in the variable needs to refer to the exact name, (including caps and lower-case letters) of the pre-chat survey question name. To pass this data from the pre-chat survey question to Copilot Studio, open Copilot Studio and navigate to ‘Topics & Plugins’. Since I want to store this data each time there is a new conversation, I will add this functionality to the ‘Conversation Start’ Topic. You can access this topic by clicking on the ‘System’ tab. Below the trigger, click on the + button and select ‘Variable Management’, then select ‘Set a variable value’. Click ‘Create a new variable’ and enter the variable name, (make it something that makes sense). Click on the right arrow in the ‘To value’ field and click on ‘Formula’. Then enter the following formula: Text(System.Activity.Value.<variablename>). If the name of your pre-chat survey question variable is ‘Email’ then the PowerFX formula will look like this:
Text(System.Activity.Value.Email)To bring the answer to other pre-chat survey questions over to Copilot, you can create additional nodes the exact same way as described above.
Context variables vs Pre-chat questions
Note: You can also create context variables, which are pretty much the same as pre-chat question variables, but the difference is that they will not show up as questions on the chat widget. Context variables allow the application to store data in a variable without any manual input. These variables can store data related to other things, for example data about the channel the chat came through. In my environment I have a context variable called va_Scope which stores data related to the type of agent answering the chat. When the chat first comes in, the variable is blank. If the chat is answered by a bot, the va_Scope variable will be set to ‘bot’. This is interesting as we can use this variable to route the conversation to the correct queues. In this example, if I want to have Copilot pick up the chat when it’s initiated, my logic is if ‘va_Scope = blank’, then route this chat to the bot queue (which only has a bot user in that queue). I hope this gives you more of an understanding of the importance of context valuables overall.
Removing classic pre-chat survey configurations
If you implemented the solution I provided in my article, then you’ll need to remove these configurations first, as they will no longer work and the variables will interfere with the variables in the new topic I referred to earlier. I noticed this when I upgraded my classic Copilot (aka Power Virtual Agent) to the new Copilot. Since this was a bot upgrade, I had to make a copy of my classic Copilot first in order to upgrade it to the new version. This means the configurations mentioned in my article were part of my newly upgraded Copilot. I had to remove all of the configurations, so let me talk you through how to do that. In my article I showed how to create a new topic called ‘Pre-Chat Survey Variable Topic’ that creates several variables; bot.msdyn_contact_msdyn_ocliveworkitem_Customer, bot.EmailAddress and ContactFirstName. As you know, these are global variables that can be called by any topic, so I had to remove these variables from all my topics. You can do this by opening the topic you initially created for this (‘Pre-Chat Survey Variable Topic’) and clicking on a variable in the topic. For example, the bot.msdyn_contact_msdyn_ocliveworkitem_Customer variable. After you do this, you’ll should see the variable topics window open on the right side of the screen. When you click on ‘View all references’ and then ‘Other’ you’ll see all the topics that are using the variable. You can open each topic and remove/update the nodes that are using the variable. Once all variables are removed from the topics, you can delete the topic that created the variables, which in my case is my ‘Pre-Chat Survey Variable Topic’, and you can delete the power automate flow.
Check the Copilot user’s bot provider column!
If you are having the same issue I was having, where data from Dynamics 365 Customer Service is no longer passed to Copilot Studio, then you might want to check the ‘Bot Provider’ column of the bot user. For some reason the bot provider column for my bot user had been switched to ‘Other’, but it should have been set to ‘Virtual Agent’. The difference in bot providers is important, as there is different functionality for each. For example, a ‘Virtual Agent’ type of bot provider stores data variables differently from Azure bots. In this case since my bot was set to ‘Other’, no data from Dynamics 365 Customer Service was getting passed. By changing the bot provider column from ‘Other’ to ‘Virtual Agent’, it fixed the issue. You can check the ‘Bot provider’ column by going to make.powerapps.com. (Make sure you are in the correct environment.) Then navigate to the user table and find the bot’s user account. Add the bot provider column to the view and make sure it is set to ‘Virtual Agent’ (NOTE: This setting should show ‘Virtual Agent’ if this is a copilot that was created in PVA or Copilot Studio). I hope you enjoyed this article! Be sure to check in again next week for a new article or subscribe here to never miss another post!


Comments are Closed