


Show in which warehouse work order products are available on the Field Service Mobile App
Field technicians probably want to know where the products they need (to complete a work order) are located so they can stock up on those items before traveling onsite to perform the work. I believe it would be beneficial to be able to see in which warehouse (if any) a certain work order product is available so I am going to explain how to show this.
When using field service, we have a lot of options to configure the screens in the mobile application, and in this article I am going to show how you can show where a certain work order product is available directly from the work order product form. The first thing we want to do is open the configuration tool Woodford by logging into Dynamics 365 and navigating to settings>Woodford>MobileCRM Woodford HTML 5. Open the project in Woodford and on the left side scroll down to (or search for) the work order products entity. Click on the icon on the left to get to the Views, Forms and Charts, then open the form.

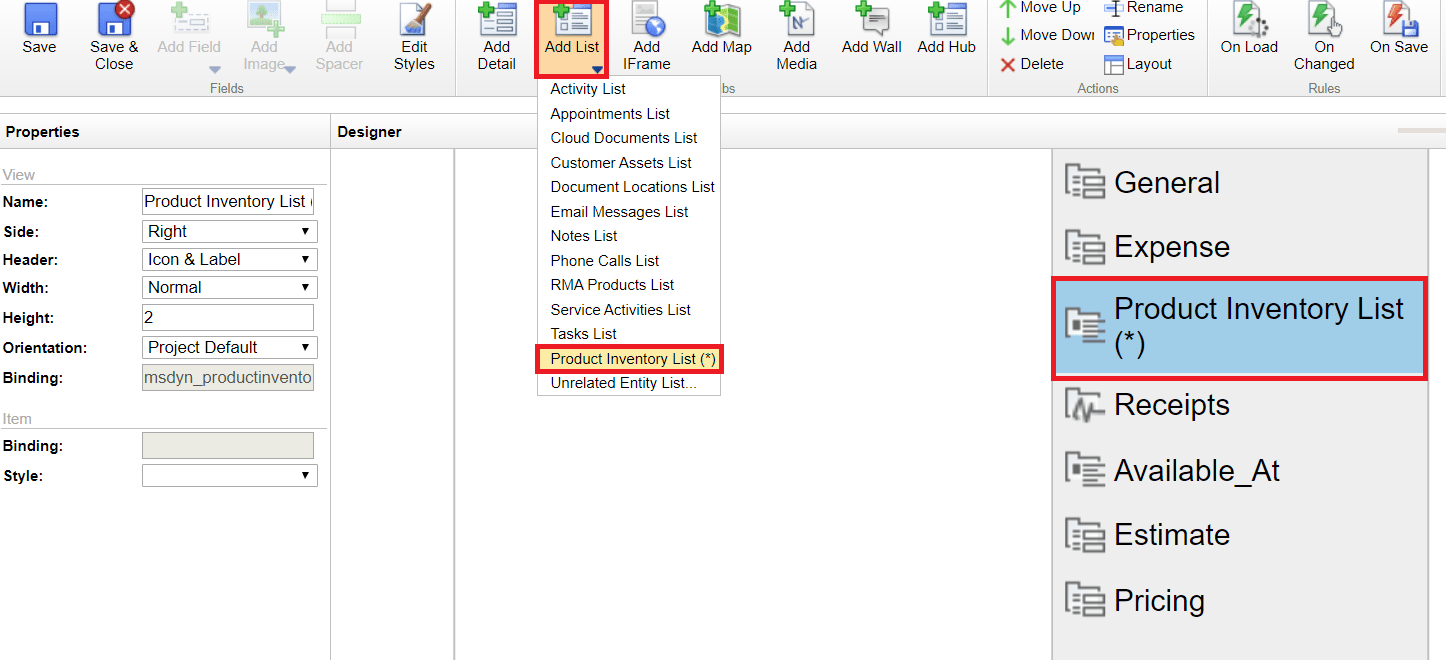
When the form opens, Click the ‘Add List’ button on the ribbon and select ‘Product Inventory List’. This will add a tab to the form with the name ‘Product Inventory List’. At this point you can rename the tab (click the ‘Rename’ button on the ribbon.)
Double click on the tab to open it and deselect the ‘My Inventory’ View. Leave the ‘Product Inventory’ view selected and check the box under ‘Initial View’. Click on the Lookup views tab, and only leave the ‘Product Inventory’ view selected, and check the box under ‘Initial View’. Go back to the Associated Views tab.
Highlight the Product Inventory view and select ‘Edit Filter’. Under product inventory, click on the add condition button twice, which will add two fields called ‘Bin’. Select the first ‘Bin’ field and change it to the product field, then change ‘Contains Data’ on the right side of the field to ‘Equals’ and click the ‘Variable’ button on the ribbon. (This is where we will filter out to only show the warehouses that have this particular (work order) product in stock.) We want to use the product lookup field because both the product inventory entity and the work order product entity have this lookup field in common, so we can use this to filter on. By filtering this way, we’re only going to pull up product inventory records that share the product that is selected in the work order product – product field. Since product inventory records are related to a warehouse, we can then show the warehouse(s) that are related to that product inventory record.

Select the second ‘Bin’ field and select quantity available, change ‘Contains Data’ to ‘Is Greater Than’ and set the field to 0 as shown in the screenshot above, so that if the quantity available is less than 0, the Product Inventory record will not show up. Click ‘Save and Close’ on the filter page, the tab properties and the form.
The last thing we want to do is to confirm the Warehouse field related to the Product Inventory record is visible on the view. In order to check this, go back to the main project, scroll down to or search for the Product Inventory entity, then click the icon on the left side of the Product Inventory entity and double click to open the Product Inventory view. Add all the fields you want to the view and save the view. Don’t forget to publish the project!

In order to test this, schedule a work order to your resource in Field Service, open the booking in the field service mobile app and navigate to the work order products on the booking. Open one of the work order product records. Make sure this (work order) product is available in one of your warehouses! The result should look like the screenshot below.

I hope you liked this post, be sure to check in next week for another article, or subscribe here to never miss another post!


Comments are Closed