


Show/Hide custom buttons with PowerFX when a lookup column has no value
Posted by: Dian Taylor | on January 13, 2026

A friend of mine was recently trying to make a custom button on an opportunity form in Dynamics 365 Sales show on the form, but only when a certain lookup field had a value. They turned to PowerFX to make it happen but there were some some problems getting it to work correctly. For those who haven’t used it much, Power Fx is the low-code formula language built into the Power Platform. It’s super handy for adding logic without writing full code, you can do things like show or hide buttons, calculate values on the fly, validate data and much more. It’s one of those tools that makes configuring Dynamics 365 way faster and much more approachable, especially if you are not a developer like yours truly! There are some PowerFX code examples that you can find online, but it doesn’t really explain a lot of what it does or how to use it on other tables. Since it took me a while to figure out how to do this, and because I searched online but couldn’t find a lot of information on how to do this, I decided to write an article about it where I will explain exactly how you can do this!
Scenario
Here’s the exact scenario my friend was working on. On the Opportunity form in Dynamics 365 Sales, there’s a lookup field called ParentContactId, which links to the Contact table. The goal was to create a custom button by using make.powerapps.com, and to only have that button appear if the contact lookup column on the opportunity is blank. In other words, the button should be hidden if a contact is populated, and only show up when no contact has been filled in. Obviously, the scenario could also have been that the button should only show when the contact lookup IS populated with a value, so I will share both PowerFX formulas in this article. These formulas are simple little tweaks, but it really shows how PowerFX can make forms smarter and more interactive without writing traditional code.

Prerequisite
I first had to create a custom button, which you can do by navigating to make.powerapps.com. From there you will need to make sure the correct environment is selected, after which you will need to access the application for which you want the button to show up. You can see all apps by clicking on the ‘Apps’ navigation item on the left side of the screen and clicking on ‘All’ if you don’t see the app listed under ‘My Apps’. In my case this is the Sales Hub app in Dynamics 365 Sales. If you hover your mouse over any of the apps in the list you’ll notice a pencil icon appear, which will allow you to edit the app. After clicking on the icon, the app configuration screen will load. Since I will create the button for the opportunity form, I hover my mouse over the opportunity view (below the ‘Pages’ section) and click on the tree dots. This shows a menu after which I select ‘Edit Command Bar’ and click on ‘Edit’.

In the next screen that pops open you’ll need to choose where the button should live. Since I want this button to show on the opportunity form, I choose ‘Main form’ and click the ‘Edit’ button. This will open the Command Designer, from where we can create our own custom buttons. To add a new button, you need to click the ‘+New’ button on the command bar and enter a name for the button. I will call this button ‘Test’ and select an icon for it.
Add contact table to component library
Before I go any further it’s important to understand that I will need to add the contact table to the component library first! If this is the first time that a custom button is added to the environment, you’ll see a notification that reads ‘Create component library to enable PowerFX’. This means you can’t use PowerFX for any of the buttons, not until you create a new component library. When you click on the link a pop-up window will open stating a new component library will be created.
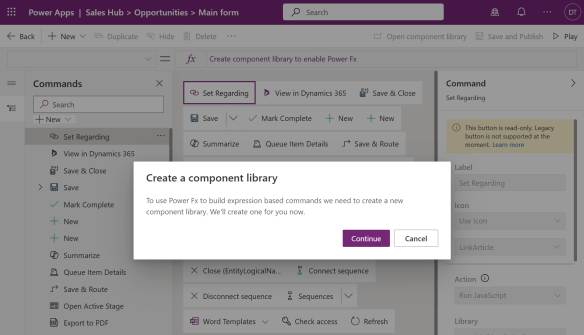
Click the ‘Continue’ button. NOTE: If you don’t see the ‘Create component library to enable PowerFX’ link, it means a component library was already created. If that is the case it’s possible that you see the ‘Open component library’ button on the command bar, but it’s grayed out. After you create the button the button, the ‘Open component library button’ will become available.
If you created the button as instructed above, a screen will pop-up asking if you want to save your changes when you click the ‘Open component library’ button. I click ‘Save’ as I am going to configure the button’s PowerFX logic after I add the contact table to the component library. (The PowerFX function won’t work otherwise). When the Component library loads, click on the ‘data’ icon on the left side of the screen. To add the contact table, click on the ‘Add Data’ button and search for ‘Contacts’. Click on the table name and the table will be added. If you want to add additional tables, you can do that from here. Click on the ‘Publish’ button in the top right of the screen to publish the changes, then return to the Command Designer.
Add the PowerFX code
When you return to the Command Designer you’ll see the ‘Resume editing in Command Designer’ pop-up screen. Click ‘Resume’ and the form will reload. This is to make sure that all the configurations in the Component Library will be available. Make sure you do this after the Command Library is published. I am not going to get into details on actions to add to buttons, this article is focused on the scenario my friend encountered, which is the ability to show or hide the button based on the contact lookup on the opportunity form. When you click on the button, the Command pane will open on the right side. This is where you can configure the button. Set the ‘Visibility’ to ‘Show on condition from formula’. This means that whether the button is visible will be defined by the PowerFX formula. On the top left of the screen, (left of the formula bar) change ‘OnSelect’ to ‘Visible’. The next step is to enter the PowerFX formula, but before I do that please be aware that there could be two different scenarios here:
- Show the button if the contact lookup on the opportunity is blank
- Show the button if the contact lookup on the opportunity has data
The scenarios are complete opposites of each other which means that we will need different PowerFX formulas for each of them. If we want to show the button if the contact lookup on the opportunity is blank, we would use: IsBlank(Self.Selected.Item.Contact). If your scenario is the opposite, and you want to show the button if the contact lookup on the opportunity row is populated, you would use this formula: !IsBlank(Self.Selected.Item.Contact). Adding the ‘!’ before the original formula changes the ‘IsBlank’ logic to Is NOT blank. After you selected the correct formula, all you have to do is copy and paste the PowerFX in the formula bar and save and publish the changes! Don’t forget to publish the app where you made these changes as well!
Limitations
There are some limitations to this approach. Power Fx visibility rules are only evaluated against the saved record state, not the unsaved changes on a form. This means the command bar does not react in real time when a user edits or clears a field. This means that when a record initially loads with a value populated, the button may remain visible even after that value is removed, but this is only until the record is saved or the form is refreshed. This does mean that button visibility shouldn’t be driven by unsaved form changes and should be designed with this limitation in mind. If you have the need for the button to show or hide on form changes as well, then I would recommend using something else, like Jscript code.
I hope you enjoyed this article! Be sure to check in again soon or subscribe here to never miss another post!
Posted in Configuration, Contact Center, Customer Service Workspace, D365 Customer Service, D365 Field Service, D365 Sales, PowerFX, Project Service Automation | Tags:button, ContactID, Dataverse, Form, Hide Button, IsBlank, Lookup, lookup column, PowerFX, Show button, table, value, values | Comments Off on Show/Hide custom buttons with PowerFX when a lookup column has no value


Comments are Closed