


Pass customer data from pre-chat survey to Power Virtual Agent

PLEASE NOTE IF YOU HAVE UPGRADED TO COPILOT STUDIO, THE SOLUTION IN THIS ARTICLE IS IS NO LONGER WORKING! PLEASE READ MY NEW ARTICLE ON HOW THIS WORKS IN COPILOT STUDIO!
If you are familiar with Power Virtual Agent and Omnichannel, you are probably aware that when these applications are integrated, we can create one or more pre-chat survey questions that will show in the chat when a customer engages with Power Virtual Agent. Admins can configure these questions in Omnichannel for Customer Service, which is an add-on to Dynamics 365 Customer Service. These pre-chat questions are a great tool. Besides collecting information prior to the start of the chat session, they also allow the system to identify the customer who initiated the chat. This is important when a chat is handed over to a live agent in Omnichannel as they will have all the relevant customer data at their fingertips when conversing with the customer. But what if there is no need to hand the conversation over to an agent and I still want to pass information regarding the identified customer to my Power Virtual Agent? In this article I am going to show you can do exactly that!
Scenario
My scenario for this is as follows: I have a few pre-chat survey questions that I created in Omnichannel for Customer Service. I want to pass customer data from a pre-chat survey over to the bot so that I can use a Power Automate flow to query my Dynamics 365 Customer Service database and find the related contact. Once I find the contact I want the bot to greet the customer by their first name and continue the chat.
Configuration
Create Pre-Chat Survey Questions
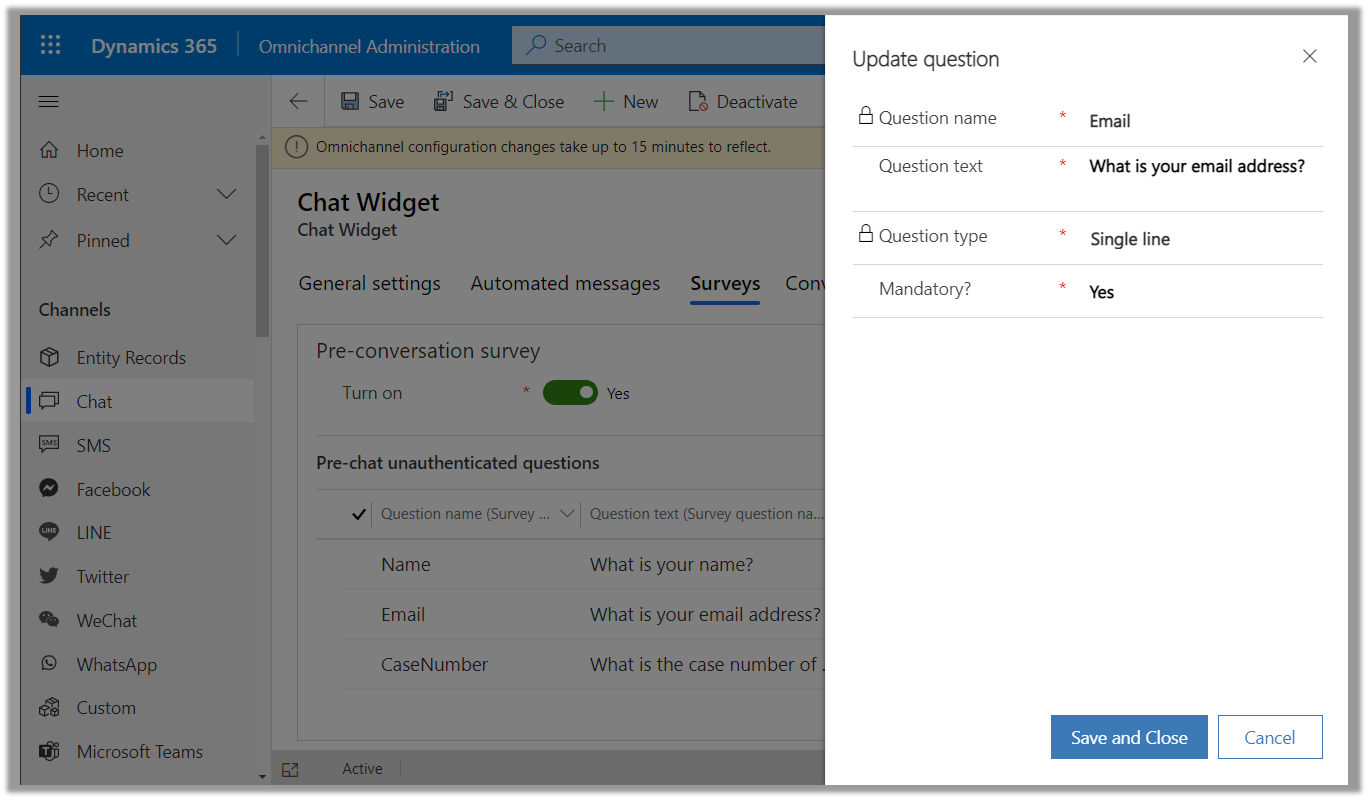
We start the configuration after Power Virtual Agent and Omnichannel for Customer Service have been integrated. The first thing I need to do is go to the Admin Center for Omnichannel for Customer Service (Omnichannel Administration) and navigate to the chat widget. This is where I will create the Pre-Chat survey question(s). Open the chat widget you want to create the question for and click on the ‘Survey tab’. Make sure you turn the ‘Pre-Conversation Survey’ on and then click on ‘+New’ to create a new question. In the ‘Question name’ field enter ‘Email’. The ‘Question text’ can be something like ‘What is your email address’. Select ‘Single Line’ as the question type and set the ‘Mandatory’ field to ‘Yes’. Make sure you save and close the question. NOTE: Omnichannel configuration changes can take up to 15 minutes to take effect.
Power Virtual Agent Configuration
In order to pass customer information from the pre-chat survey to the bot, we need to configure a context variable in a Power Virtual Agent topic. The great thing here is that you only need to create this variable once, after that you can reuse the variable in other topics too! NOTE: I’m not going to get into the details of what options are available but if you want to learn more about context variables that can be configured take a look at this docs site.
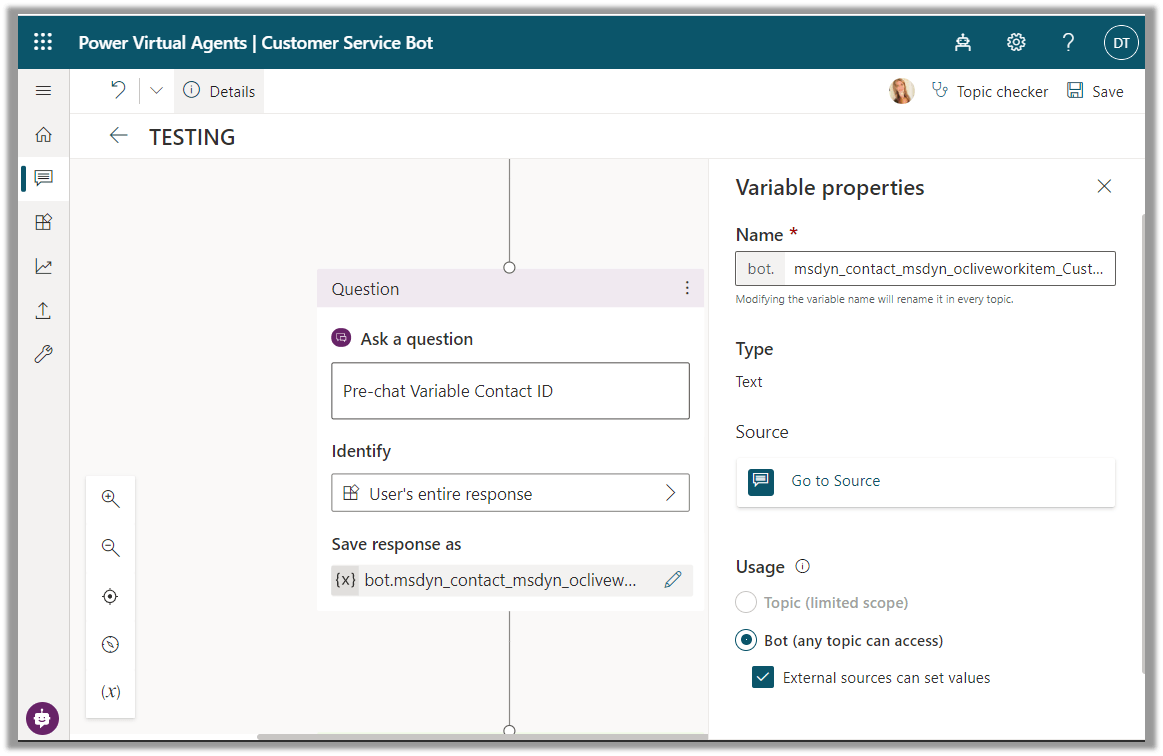
Open Power Virtual Agent create a new topic. I created a new topic and called it Pre-Chat Survey Variable Topic, so it will be easy for me to locate it and understand what it does. Click on the ‘+ Add Node’ button to add a node to the topic and select ‘Question’. Keep in mind that the customer is not going to see this question. This is just a variable that we are creating to pass the customer information from the pre-chat survey question that has the customers’ information. In the ‘Ask question’ field you can type anything you want, but I am entering ‘Pre-chat Variable Contact ID’ so I know what this is. For the identify field choose ‘User’s entire response’, then click on the pencil icon under ‘Save response as’. This is where we configure the actual variable where the customer data will be stored. The variable properties window should open on the left side of the screen. Under ‘Usage’ select ‘Bot(any topic can access)’ and check the box that reads ‘External sources can set values’. Enter the following value in the Name field on the top of the screen: msdyn_contact_msdyn_ocliveworkitem_Customer
This context variable contains the record ID for the customer (contact) record that is linked to the conversation as explained here.
Power Automate Flow
The next thing we need to do is build a flow to retrieve the contact ID from the variable and search Dynamics 365 Customer Service for the contact record. I am going to keep this very simple, but if you’re going to implement this in production you should add some checks in your flow, in case the email address that was entered is not tied to a contact in your database. Click ‘+Add Node’ below the ‘Pre-chat Variable Contact ID’ question we created earlier and select ‘Call an action’. Then click on ‘Create a flow’. The Power Automate page will load and you’ll notice the Power Virtual Agents step is already there. Make sure you name your flow accordingly. In the Power Virtual Agents step click ‘+Add an input’ and select ‘Text’. In the first field you can enter anything you want (I called it customerdata) but in the second field you need to enter the name of the variable we created in the Power Virtual Agent topic: bot.msdyn_contact_msdyn_ocliveworkitem_Customer

The data that comes flowing through here is JSON script but in order for us to access it, we need to parse the JSON and get the customerid (guid) so we can use it to query Dynamics 365 Customer Service. Click on the ‘+Next step’ button below the Power Virtual Agents step and search for and select ‘Parse JSON’. In the ‘Content’ field, select ‘customerdata’ from the Power Virtual Agents step from the Dynamic content window. In the schema window copy and paste the following:
{
    "type": "array",
    "items": {
        "type": "object",
        "properties": {
            "RecordId": {
                "type": "string"
            },
            "PrimaryDisplayValue": {
                "type": "string"
            }
        },
        "required": [
            "RecordId",
            "PrimaryDisplayValue"
        ]
    }
}
Below is the image of what the Parse JSON step should look like.

In the next step we’re going to query the Dynamics 365 Customer Service database, which lives in data verse. In my scenario the Dynamics 365 Customer Service app lives in another environment (in the same tenant) so I have to use the ‘Get Row’ action using the Microsoft Dataverse(legacy) connector. If your bot and the data verse environment live in the same environment, you can use the Microsoft Dataverse connector. The configuration is almost the same. Under the Parse JSON action, click ‘+Next Step’ and search for and select the ‘Get row’ action for dataverse. If you’re using the Microsoft Dataverse(legacy) connector you will need to select the dataverse environment you want to query, if you’re using the Microsoft Dataverse connector you will not have to do that. For ‘Table Name’ select the contacts, as we want to query the contacts table. For the ‘Item Identifier’ field we’re going to use an expression. The reason for this is because the Parse JSON step will give us an array back, so if we wouldn’t use an expression, flow would automatically add an ‘Apply to All’ step around the ‘Get row’ step, which is not what we want. I had a little trouble figuring this out, but my coworker Taylor Becktold came to the rescue and was able to provide me with the correct expression in 5 minutes! We want to get the first record of the query, so in the ‘Item identifier’ field I am going to enter the following expression: body(‘Parse_JSON’)[0][‘RecordId’] Make sure you click ‘OK’ in the expression window to add it to the ‘Item identifier’ field as shown in the image below.

The last step is already there, this is where we’re going to pass information back from this Power Automate flow back into Power Virtual Agent. Click on the ‘Return value(s) to Power Virtual Agents’ step and click ‘+Add an output’. In the first field (enter title) enter ‘Contact First Name’. Click inside the second field (‘Enter a value to respond’) and search for ‘First Name’ from the ‘Get a row’ step. Make sure you save the flow!
Power Virtual Agent Configuration (continued)
Go back to the topic you were working on in Power Virtual Agent. Click ‘+Add Node’ below the ‘Pre-chat Variable Contact ID’ question we created earlier and select ‘Call an action’. Select the Power Automate flow we created in the previous section. Under ‘Power Automate inputs(1)’ you’ll see that you need to enter data in the customerdata field to pass to the Power Automate flow. Click on the dropdown ‘Enter or select a value’ and select the bot.msdyn_contact_msdyn_ocliveworkitem_Customer variable we created earlier.

The last step in this example is where we are showing a message that has the first name of the customer, which is what was returned to Power Virtual agent from the Power Automate flow action we entered in the previous step. Obviously you don’t have to show a message, you could also use this in a question. Click ‘+Add Node’ and select ‘Message’. In the message enter ‘Hello ‘ then click on the insert variable button and select the ‘ContactFirstName’ variable.

The message should look like the screenshot above. That is it! Make sure you test this functionality in the power virtual agent bot to make sure it’s all working the way you want. Of course you can build out the topic more however you like, this is just an example of how this can be used. If you have other topics where you want to use this functionality please remember you don’t have to setup the variable in Power Virtual Agent more than one time. The variable is a global variable, meaning that we can access it from other topics as well, you would start with the flow action to get the contact information. I hope you enjoyed this article! Be sure to check in again next week for a new article or subscribe here to never miss another post!


Comments are Closed