


Viva Sales(Preview) | Part 1

I am sure you’ve heard about Viva Sales, which is yet another application developed by Microsoft for sales people! Microsoft describes this application as a seller experience application designed to get sellers out of the busy work and in front of customers. This is actually very exciting because this tool will not just bring together the power of a more connected platform, but this tool will also help sellers become even more productive, by allowing them to add and update data in their CRM system from the applications they are already comfortable with, like Outlook and Microsoft Teams! Some of this will even be done automatically so that sellers can focus on what they need to focus on: SELLING! On top of that Viva Sales comes with AI driven reminders and suggestions! Does this mean Viva Sales can only be used with Dynamics 365 Sales? Actually, NO! Microsoft announced that Viva Sales will work with any CRM system, including Sales Force! The app is currently in public preview which means it’s free to try, but during this preview it’ll only work with Dynamics 365 Sales and SalesForce’s CRM. To learn how to get started with the preview click here.
You’ve probably already guessed it, I installed Viva Sales on my sandbox instance and was able to test some of the functionality in Microsoft Outlook and Microsoft Teams, and that’s what this and next week’s article is all about! In this article I will focus on the Outlook functionality with Viva Sales, and next week I will do a deep dive into how it works with Microsoft Teams. Keep in mind not all the Viva Sales features are present in this preview, but this gives us a glimpse of what this application will be capable of!
Viva Sales(Preview) and Microsoft Outlook
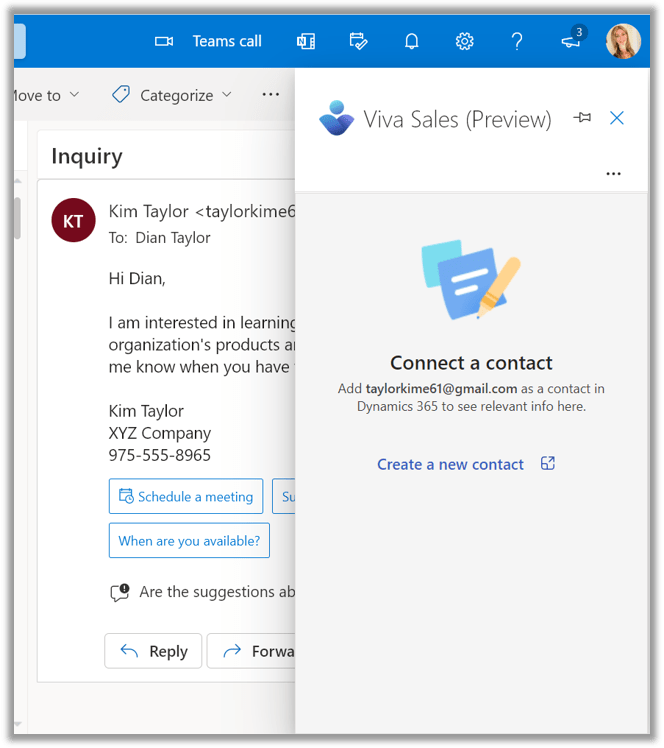
When a seller logs into Outlook after the installation of Viva Sales, they will see a ‘welcome pane’ on the right side of Outlook. They’ll need to sign in using their Office 365 or Sales Force credentials in order to start using Viva Sales. When an email message is clicked after they completed the sign in, they’ll notice the viva icon which they can click on. You’ll notice the pane that opens on the right side of the email looks very similar to the Outlook app for Dynamics 365 Sales. There are some differences though.
When an email comes in from a sender for whom there is no contact record in Dynamics 365 Sales, you’ll see the ability to create a contact record in Dynamics 365 Sales in the Viva Sales pane. By clicking the ‘Create a new contact’ link in the side pane, the full contact form from Dynamics 365 will open, allowing the seller to create a new contact record in Dynamics 365. I currently didn’t see the ability to create a lead record in Dynamics 365 Sales. I am not super happy with this, as I would prefer to have the option to add a person as a lead vs a contact.
If a seller opens an email from a sender who exists as a contact record in Dynamics 365, you’ll notice on the top of the Viva side pane that sellers have the ability to mark the sender or the email as a customer. Viva Sales looks at the (external) email address the message came from to see if there is a contact record in Dynamics 365 that has the same email address. If there is only one contact in Dynamics 365 with the same email address, Viva sales will automatically connect the record. If there isn’t a contact in Dynamics 365 with that email address, then you’ll need to create a contact for this individual in your CRM system before being able to mark them as a customer. Keep in mind that after a contact from Dynamics 365 is connected, you can still change the connection to a different contact record. It’s also important to note that when I was testing this, I had created a lead in Dynamics 365 with the email address annie@email.com, but Viva Sales didn’t pick up this lead. It still suggested to me that I had to create a contact record before I could see the Dynamics 365 record in the side pane and mark them as a customer. I’m hoping Microsoft is going to add leads to Viva sales, because we wouldn’t like these duplicate records to be created.
The ability to mark someone as a customer in Viva Sales seems to let the application know that communications with this person are important and need to be and tracked in Viva Sales. Email messages from senders in outlook that have been marked as a customer can also be changed to non-customers. You’ll notice when this is done, there is no longer any information shown for this sender in the Viva pane. Unfortunately when I changed a ‘customer’ marked email to a ‘non customer’, I didn’t find a way to change it back to ‘customer’, so I am hoping this is something that will be added when Microsoft rolls out Viva Sales.

When a contact from Dynamics 365 is connected in Viva Sales, users will be able to view related data and Dynamics 365 data directly in the Viva Sales pane. The details section allows sellers to add any personal notes, and shows any related contacts. When clicking on the Dynamics 365 tab in the Viva Sales pane, sellers will be able to review related data from Dynamics 365. In this preview you’ll see the contact information and I noticed that if any of the 7 contact fields of the Viva Sales contact is blank, the field won’t be shown in the pane. I like this as it keeps the form nice and clean. A soon as data is added to a field, it will show up. The contact details can be added by clicking the pencil icon next to the contact information, and by clicking ‘update Dynamics 365’ it will do exactly that.
Below the contact information you’ll notice the related account information(if the contact is linked to an account), and below that any related opportunities (if there are any). I love the fact that unlike the Dynamics App for Outlook, that only shows opportunities related to the specific contact you received the email from, Viva Sales shows you ALL opportunities at the customer account, regardless of who is populated in the contact (parentcontactid ) field! If you look at the Viva Sales product page and review the ‘See Viva Sales in action‘ video, you’ll notice it also shows activities and documents in the Viva Sales pane, which suggests integration with SharePoint as well! This is exciting stuff that most likely will be coming later!

Just like the Dynamics 365 app for outlook, you can also access the Viva Sales pane from appointments and when you are composing a new email message. If you have multiple recipients Viva Sales displays them in the side pane and you can see which contacts have been marked as a customer and which have not. By clicking on the ‘Review’ button next to the recipient name in Viva Sales you can view their details in Viva Sales and Dynamics 365 (if they are linked) or create a new contact in Dynamics 365.
I hope you enjoyed part 1 of my overview of the Viva Sales preview! Be sure to check back next week for part 2 of my overview of Viva Sales or subscribe here to never miss another post!! In the next article I will discuss the integration with Microsoft Teams and I’ll talk about where the Viva Sales data is stored. To learn more about how to install the Viva Sales preview check out this article. To read the user guide for Viva Sales and Outlook check here.


Thanks for posting. Quick question when using via sales how to i track or not track email into dynamics?
This is not available, but fingers crossed this will be added before this goes GA. If it will be added or not, I do not know. 🙂
I understood the difference between App for Outlook and Viva Sales so far but would you say Viva Sales is a/ will be a complete replacement of the App in the future?
At this point Microsoft has made no comments to that statement, so we’ll have to wait and see!