


Schedule weekly email with quote details and hyperlink | Part 2

Last week I wrote part 1 of my article on how you can use Power Automate to automatically send a weekly email with data from Dynamics 365 Sales, or Dataverse. If you haven’t read the article yet, I would suggest doing that first. You can access the article here. In today’s article I am going to finish building the Power Automate flow. Last week we left off at the ‘List Records’ step, where we were querying Dataverse for quote records, in the next step we will create the HTML table, which we will later put in the email.
In the flow, click on ‘+Next step’ and search for ‘Create HTML table’. In the ‘From’ field enter the ‘Value’ from the Dynamic content window below ‘List Records’. Change the ‘Columns’ drop down to custom, this will allow you to configure the columns vs have the system automatically create them. The columns I used below the header are: ‘Quote ID’, ‘Quote’, ‘Owner’, ‘Effective To’ and ‘URL’. NOTE: When entering the header names, the system doesn’t allow for spaces between words. You can enter the name (and any spaces) in notepad and then paste them into the header field. Below the value fields we are going to put the dynamic values from the ‘List Records’ step which holds the quote data. You can do this by clicking on the corresponding value field next to each header field. For the ‘Quote ID’ header I select ‘Quote ID’, for the ‘Quote’ header I select ‘Name’ and for the ‘Owner’ header I select ‘Owning User Full Name’. The ‘Effective to’ field needs to be formatted a bit so it looks good in the HTML table and I want to show the data in my time zone (EST). You can use the new ‘Format data by examples’ preview feature for this again, below is the expression I used:
convertFromUtc(item()?[‘effectiveto’], ‘US Eastern Standard Time’, ‘MM/dd/yyyy’)
The last field in the HTML table is the direct link to the quote in Dynamics 365 and this took me a bit to get working correctly. I don’t want to actually show the entire URL in the column, instead I want to show the word ‘Record Link’ and make that a clickable hyperlink in the HTML table. In order to do that I will use the ‘concat’ function in the expression, after which I enter my organization’s URL PLUS the guid of the quote row. Lastly I add the piece where I show the wording ‘Record Link’ and make that a clickable link. Below is the explanation of the expression, click on the image to enlarge it.

Below is the expression I used, make sure you replace your org name and the (sales hub) app id for this to work correctly.
concat(‘<a href=”https://YOURORG.crm.dynamics.com/main.aspx?appid=5e37f33f-515b-e811-a854-000d3a11470e&cmdbar=true&pagetype=entityrecord&etn=quote&id=’,item()?[‘quoteid’],'”>Record Link</a>’)
There is still some additional work I need to do for the URL piece of the HTML table to work. If I don’t do this, the URL field will not show a clickable URL, instead it will show the entire text string, which will look something like this:
<a href=”https://contoso.crm.dynamics.com/main.aspx?appid=5e37f33f-515b-e811-a854-000d3a11470e&cmdbar=true&pagetype=entityrecord&etn=quote&id=4d80de7f-428c-ed11-81ad-00224827b681″>Record Link</a>
The reason it’s not showing the clickable link is because there are some characters and letter combo’s included in the ‘Create HTML Table’ action that we will need to remove so that it will turn into a clickable URL. If you run the flow, open the ‘Create HTML table’ step and click on ‘Show raw inputs’ you’ll see the data that the ‘Create HTML Table’ step is putting out, which looks like this: (The data below only shows one quote row so it’s easier to show what I’m trying to do here)
{
"body": "<table><thead><tr><th>Quote ID</th><th>Quote</th><th>Owner</th><th>Status</th><th>Effective To</th><th>URL (hardcoded link text)</th></tr></thead><tbody><tr><td>QUO-01066-Z2L2P1</td><td>Demo Deal</td><td>Dian Taylor</td><td>Open</td><td>01/04/2023</td><td><a href="https://rsmd365demo.crm.dynamics.com/main.aspx?appid=5e37f33f-515b-e811-a854-000d3a11470e&cmdbar=true&pagetype=entityrecord&etn=quote&id=81bf42f5-418c-ed11-81ad-00224827b681">Record Link</a></td></tr></tbody></table>"
}What we need to do is remove the following symbols and symbol/letter combinations from the ‘Create HTML table’ output:
- <
- <
- >
- >
- "
- “
We can do this by adding a compose step after the ‘Create HTML table’ step. In the ‘Input’ field I entered the following expression, which will remove (replace them with nothing) the symbols and letter/character combinations from the ‘Create HTML Table’ output:
replace(replace(replace(body('Create_HTML_table'),'<','<'),'>','>'),'"','"')The last step in this flow is to send an email with the HTML table. You can send this from a particular user or you can send an email from a shared mailbox, which is what I will do. Click ‘+New step’ and select the ‘Send an email from a shared mailbox V2’ action. I have created a mailbox called ‘Sales Communications’ to send communications from and a distribution list called ‘Sales Reports’ containing all the managers that will receive the email so these will be used to send the email from and to. Since I want the email with the HTML table to look nice, (format the table, add some borders, etc.) I also added some HTML to the message. In order to add the HTML code to the message you’ll need to click on the </> icon which is located on the command bar in the ‘Body’ field. Below you can see the code. The @{outputs(‘Compose’)} text represents the output of the compose step that’s below the ‘Create HTML table’ step. You can remove this and use the Dynamic Content window to add the output in the email body.
<p>Hello!<br>
<br>
Please see below for quotes that need follow up this week.<br>
<br>
<span style="font-size: 14px"><strong>QUOTES</strong></span></p>
<br>
<html>
<head>
<style >
table, th,tr, td  { border : 1px solid black; }
 th {background-color:silver;}
</style>
</head>
<body>
@{outputs('Compose')}
</body>
</html>
<br>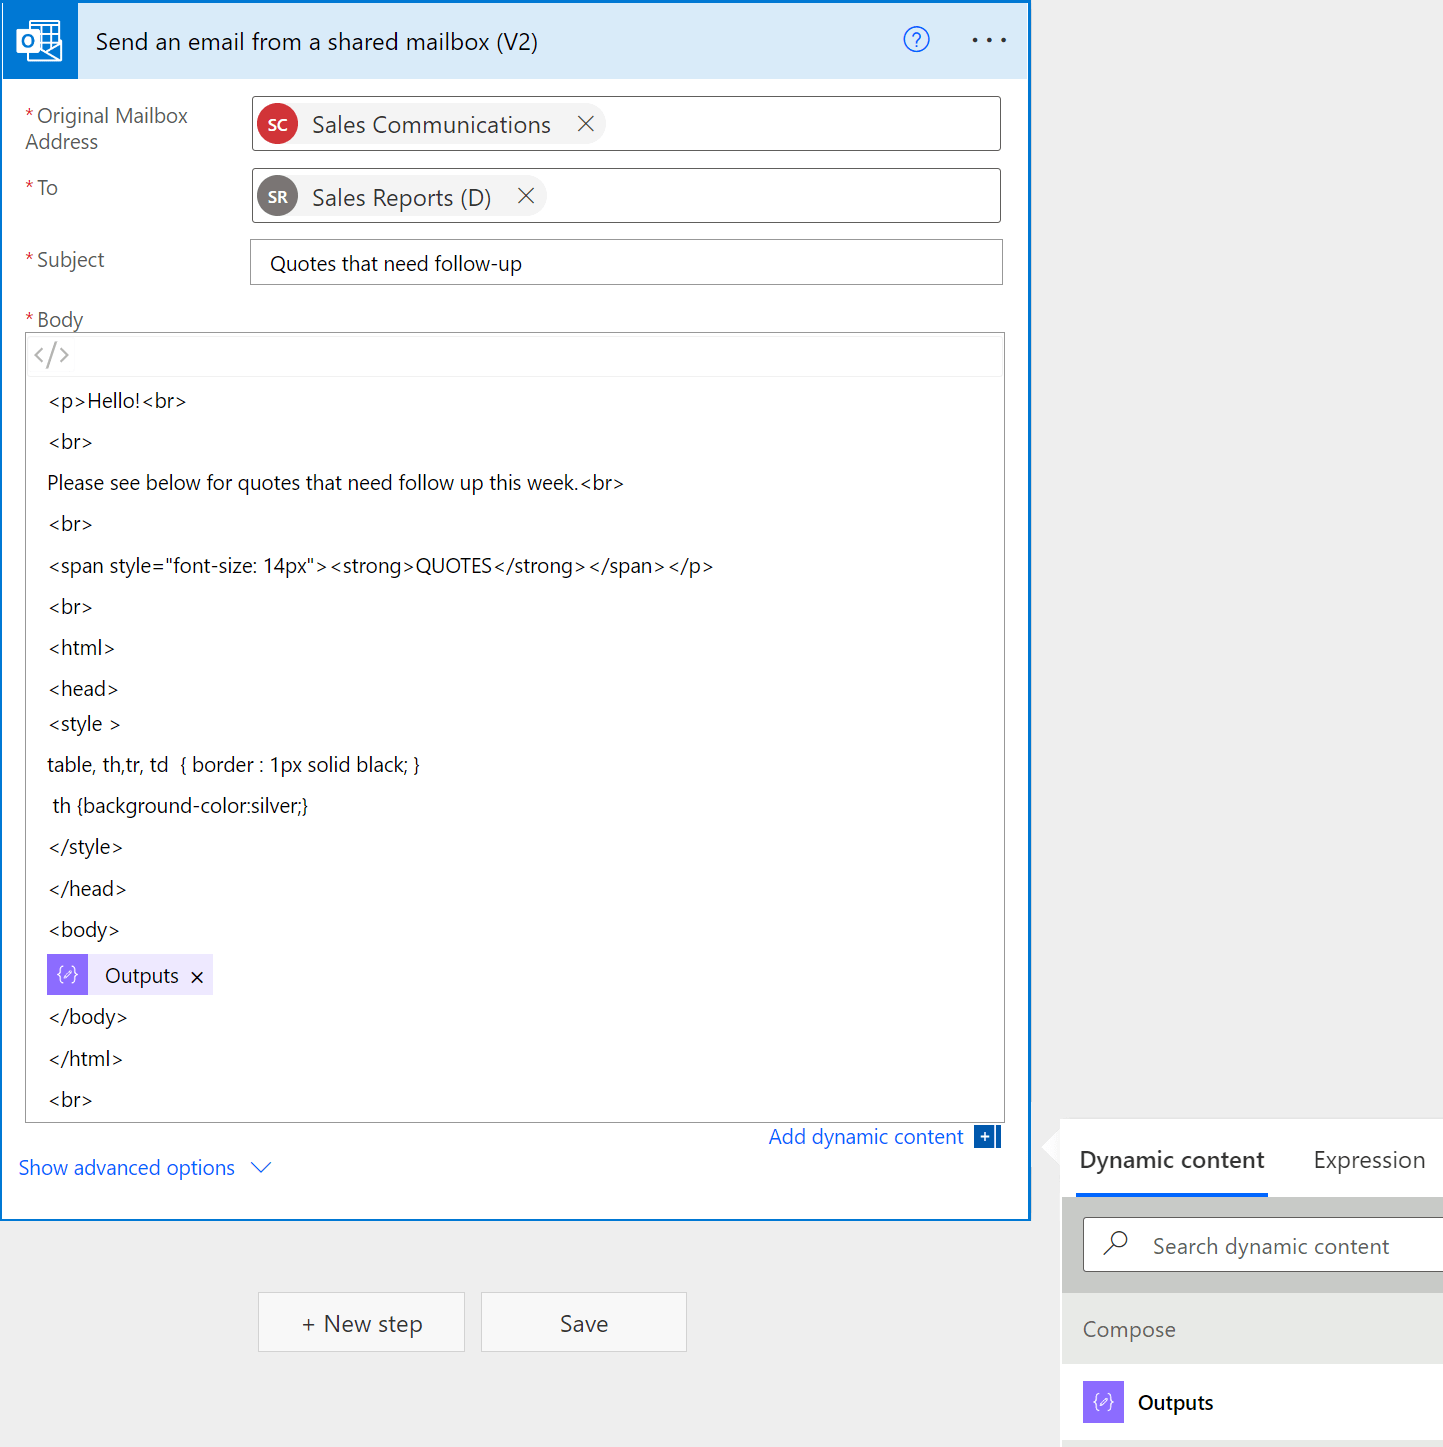

Now all you have to do is save the flow, and test it! You can do this by clicking the ‘test’ button on top of the screen, select “Manual’ to run the flow manually. The image above shows what the email will look like.
If you want to download a copy of the above power automate flow, you can do that from my github account. The link to access that is here, the solution can be downloaded from the solution folder. Enjoy!
I hope you enjoyed reading this article! Be sure to check in again next week for a new article or subscribe here to never miss another post!


Comments are Closed