


Microsoft Teams embedded chat | Part 2

In late October of 2021 I wrote an article about one of my favorite new features in Dynamics 365. Yes, you guessed it, I am talking about the Microsoft Teams integration with Dynamics 365. In particular, I am referring to the embedded chat within Dynamics 365. This functionality allows users to access Microsoft Teams chats directly from within Dynamics 365 and even allows users to link chats to Dynamics 365 records. (For more details you can read the article here.) Since the article came was published there have been some improvements to the embedded chat experience, which I am going to discuss in this article.
Enable Dynamics 365 tables for Teams embedded chat
There are two main features that have been added to the embedded Microsoft Teams chat in Dynamics 365. The first one I want to discuss is the ability to enable tables in Dynamics 365 for which the embedded chat feature is turned on. Maybe you were under the impression that once the embedded Teams chat has been turned on for an environment, that this is now available for all tables/records in Dynamics 365. This is not the case, and honestly also not something you probably want to be enabled everywhere in the application. Microsoft allows us to select the tables for which we want to enable the embedded Teams chat. There are a few areas in Dynamics 365 where you can add tables/turn on the embedded Teams chat experience:
Customer Service: To pick the tables you want to enable/disable, you need to navigate to the Service Management area in the Customer Service Hub app. The Microsoft Teams integration settings can be accesses by scrolling down until you see the ‘Microsoft Teams Integration’ section on the sitemap. You’ll need to click on ‘Collaboration’ below the ‘Microsoft Teams Integration’ section to access the settings. When you scroll down on the main page, you’ll notice a section called ‘Link chats to Dynamics 365 records. You’ll also notice that there are several tables that have already been enabled. By clicking on the ellipse (3 Dots on the right side of the table name) you can choose to edit the settings for the table or remove the table all together. In order to add tables, you’ll need to scroll down and click the ‘Add record types’ button. From there you can select the table you want to add and save the change.

Field Service: You can also access the settings for tables in the Field Service app. In order to access the settings mentioned above you’ll need to navigate to the Settings area in the Field Service app. Just like in the Customer Service Hub app, the Microsoft Teams integration settings can be accesses by scrolling down until you see the ‘Microsoft Teams Integration’ section on the sitemap. You’ll need to click on ‘Collaboration’ below the ‘Microsoft Teams Integration’ section to access the settings.
Customer Service Workspace/Omnichannel: If you want to enable this functionality for the Customer Service Workspace app or the Omnichannel for Customer Service app, the steps are a little different. There is no settings area to turn this on, so you’ll need to use the App Profile Manager for this. (To learn more about the App Profile Manager take a look at this article I wrote.) You can access the profile manager by navigating to make.powerapps.com. Make sure you have the correct environment selected. Click ‘Apps’ on the sitemap and click on the ellipse next to the customer service workspace app or Omnichannel app. Select ‘App Profile Manager’ from the list. The App Profile Manager will open. Click ‘App Profiles’ on the sitemap. Select a profile you want to edit. Please keep in mind most default profiles can’t be edited, however the ‘Omnichannel Upgraded OOB Default app profile’ can be. When you open the profile click on the ‘Productivity pane’. You can turn on the Microsoft Teams collaboration by setting the slider to ‘On’.

I was a little surprised that I didn’t see the same settings in the Sales Hub app. You can turn the Teams embedded chat on, but these settings to add tables that can take advantage of this functionality are not visible in the Sales Hub app. I also didn’t see this setting in Project Operations. However, if you need to add to add the settings page to the sitemap of your app you can do that by adding a subcomponent with a type of URL. In the URL field copy and paste the value shown below and save and publish your changes.
/main.aspx?pagetype=control&controlName=MscrmControls.TeamsCollaborationAdmin.TeamsCollaborationAdmin
Provide context for linked chats
Besides just turning on the embedded Teams chat in Dynamics 365, we can also configure if we want to provide some context to the person we’re sending the chat to. For example, when you’re starting a new chat regarding a case, it would be helpful if you can add the case number and maybe the customer’s name so that you don’t have to manually enter that information when initiating the chat. This is a setting that can be enabled, but please note that this information will only be inserted in a chat if the chat is linked to a specific record.
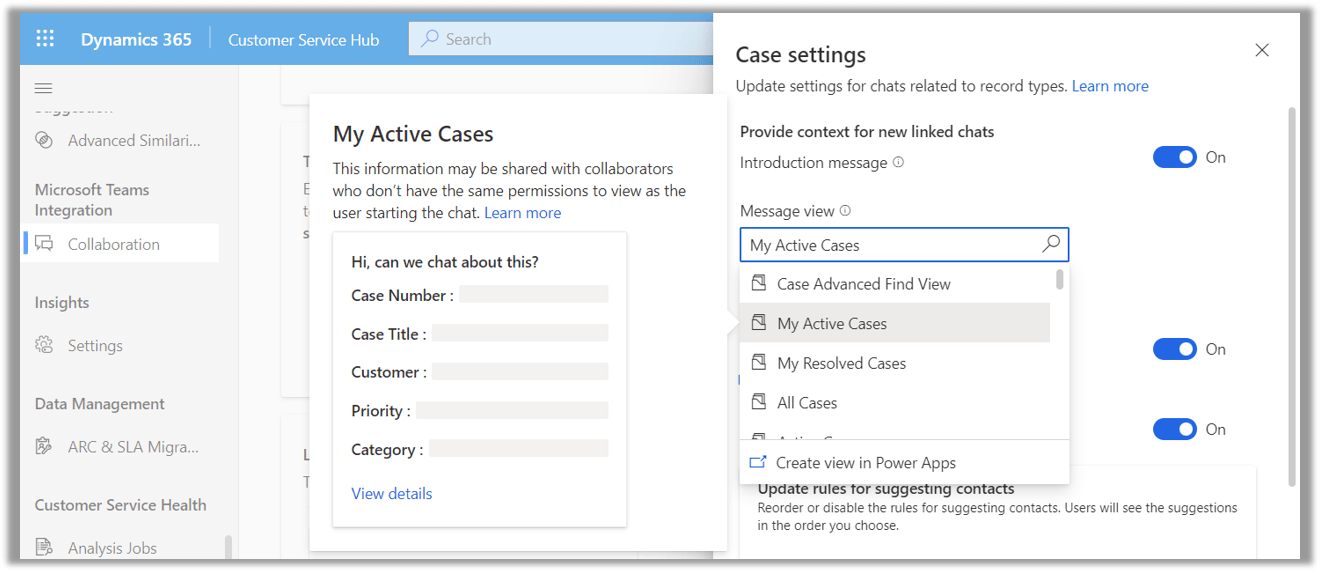
In order to configure this functionality, you’ll need to navigate back to the same place where you can choose which tables are enabled for the Teams embedded chat. I mentioned earlier to click the ellipse next to the table name, where users can click ‘Remove’ to remove this functionality from the table. The other option is to click the ‘Edit’ button, which will open a settings page with details for the table’s settings. From here you can enable to provide context for new linked chats by turning the ‘Introduction message’ on. You’ll need to pick a ‘Message view’ which is a table view. The first 5 fields on the view will be inserted into the new linked chat message that is initiated from Dynamics 365. If you click on the search icon and hover your mouse over the different views, you’ll be able to see the what the introduction message looks like and which fields will be included. This can be configured for each table.
Suggested Contacts
Two additional feature settings that you can configure while on the table settings page (screenshot above) is the ability for the system to suggested people who could help with a particular Dynamics 365 record. These suggestions will show when a user opens a record or starts a new linked chat from within Dynamics 365.


When looking at the options below the ‘Suggest Contacts’ section you’ll notice the ability to enable ‘Rule-based suggested contacts’. These rules are predefined and can’t be changed, however we can change the importance of each rule by moving them into the right order.
When looking at the options for the Case table, you’ll notice we have an additional setting under ‘Suggested Contacts’, where we can enable AI-based suggested contacts as well. Enabling this option will allow the system to suggest other folks who have experience in resolving similar cases in Dynamics 365. This feature takes advantage of the case suggestions logic that already exists in Dynamics 365 Customer Service, you just need to turn it on so that you can use it in the context of suggested contacts as well. The AI logic for suggested contacts finds similar cases and identifies contacts that worked on those similar cases based on baked in logic. There are several factors the AI-model looks at when suggesting contacts based on similar cases:
- What is the average time it took for the contact to resolve the related/similar case. The contact that spent the least average time will be more likely to be suggested as a contact
- How long ago did a contact resolve a similar case? The more recent a similar case was resolved the higher the chance of the contact being suggested.
- How many similar cases has the contact resolved? Contacts with the highest number of resolved similar cases is more likely to be added as a suggested contact.
- How similar is/are the case(s)? More similar the resolved cases are, the more likely this person will be suggested as a contact.
I hope you found this article informative! To see a visual representation of this article, check out the video below! Make sure to check in next week for a new article or subscribe here to never miss another post!


Comments are Closed