


Customizing the booking calendar in the Field Service mobile app

I wrote several articles about the new features for Dynamics 365 that were part of 2021 release wave 2, but in some instances wasn’t able to go into details because some of the functionality wasn’t available yet at the time I wrote those articles. In today I am going to discuss a specific feature for Dynamics 365 Field Service. Previously we weren’t able to add any custom fields to the calendar control in the Dynamics 365 Field Service mobile app, which meant that we were stuck with the out of the box fields that are available in the control which are: Service Account, Incident type, the account address and the booking status. The problem was if a technician wanted to see more details related to a booking, they needed to open the actual booking record to see more information. With the release of 2021 wave 2, we now have the ability to add our own custom fields to the calendar control in the mobile application, which will make it much easier for field techs to see booking info at a glance directly from the booking calendar. Makers will be able to add up to three additional columns to the control, which can be columns from the bookable resource booking table, or from tables that are related to the bookable resource booking table. These columns can be custom or out of the box columns that are already part of Dynamics 365 Field Service. Additionally you can also change the existing incident type column to show a different one if you want. In this article I am going to discuss the steps to add the fields to the control.
Configuration
Unfortunately this configuration can’t be done yet from the new maker experience which means users will have to use the legacy experience. In Dynamics 365 you’ll need to open the default solution which you can do by clicking the gear icon from within Dynamics 365 Field Service and selecting ‘Advanced Settings’. You could also navigate to admin.powerplatform.com, selecting the environment you want to make this configuration in, and expanding ‘resources’. Click on ‘All legacy settings’. Once the settings page opens, you’ll need to click on settings from the top bar and select ‘Customizations’, then ‘Customize the system’, which will open the default solution.
From here you will need to expand entities on the left hand side and you’ll need to scroll down until you find the bookable resource bookings table. The first thing you’ll need to do is add the columns to the view that is used in the mobile app. The out of the box default view is called ‘Bookings’ but if you have additional views that are used in the mobile app you’ll need to add the fields on these views as well in order to show them on the calendar control. Open the booking view and click ‘add columns’ to add the columns to the view. This will make the fields available to the control. Once the fields are added to the control you can click ‘Ok’ and save the view. As mentioned earlier, if you have any other views that are used in Field Service mobile, make sure you update those views in the same manner.
On the left side of the default solution click on the Bookable Resource Booking table, then click on the controls tab on the top of the screen. You should see the booking calendar control under the controls section of the screen. This is the default control for the Field Service mobile application. When you click on the control you’ll notice the property and values show below the controls section. You’ll notice the ‘Primary Custom Field’ which is formatted in bold in the mobile application and is currently configured to show the ‘Primary Incident Type’ column from the work order table. If you want to show a different column , you can change it by clicking on the edit button and changing the value in the ‘Bind to a static value’ section. Below the ‘Primary Custom Field’ you’ll notice the three custom columns that you can add to the control, called ‘Custom Field 1’, ‘Custom Field 2’, and ‘Custom Field 3’. This is where you can add the additional columns to the calendar control. In order to add a column to the control, you’ll need to click the edit button on the right side of the screen.
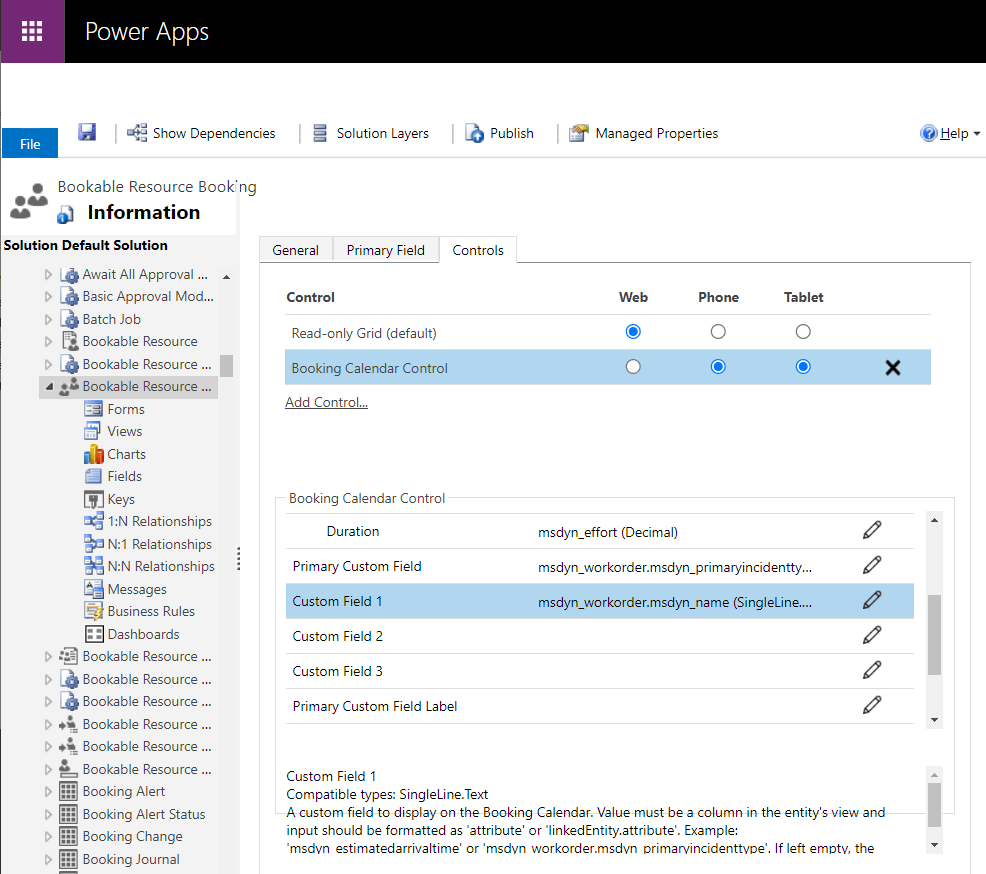
Once the edit button is clicked the the ‘Configure Property “Custom Field” window opens and you’ll notice two different areas called ‘Bind to a static value’ and ‘Bind to a value on a field’. You’ll need to edit the ‘Bind to a static value’. If you want to add a column from the bookable resource booking you can enter the system name here. For example if you want to add the booking method column from the bookable resource booking table you’ll need to enter ‘msdyn_bookingmethod‘. If you want to add a column from a related table you’ll need to enter the table name first, followed by a period, then followed by the system column name. For example if you want to add the work order number column from the related work order you’ll need to enter ‘msdyn_workorder.msdyn_name’.
Below the custom fields you’ll notice the Primary Custom Field Label and the Custom Field Labels for columns 1, 2, and 3. You’ll notice by default they are blank, which means there are no column labels shown on the calendar control. If you wanted to show labels, then this is the place where you can configure them. As you probably already expected, Custom Field Label 1 represents the label for Custom Field 1, and so on.
I hope you enjoyed this article! Be sure to check in again next week for a new article or subscribe here to never miss another post!


Comments are Closed