


Configure Field Service mobile colored views

Before I start working on configurations for a customer demonstration I usually do some discovery with the prospect so understand what is important to them and what are the pain points they want resolved. One of the things that comes up quite regularly is the ability for field technicians to be able to identify high priority work orders quicker. In this article I’m going to discuss how we can configure bookable resource booking views for the Field Service mobile app. I am going to configure the view to have colored items based on data in the priority field. I.E if the priority is ‘Moderate’, show that item in a yellow color, if the priority is ‘Urgent’, show that line in a Orange color, if the priority is ‘Emergency’, show that line in a red color. Below is an image of what the view will look like.

The field service mobile component in Dynamics 365 is built on the Resco technology platform, which means that there is a little bit of a learning curve when it comes to configurations. The configurations are done in the Woodford application, which can be accessed through Dynamics 365 Customer Engagement.
Configurations
I’m going to create colored rows inside the view for each of the priority statuses that exist in my environment. I can then add some logic in the row script of the view where I can configure which colored row to show, depending on the data in the priority field of the work order.
View Rows
Open the Woodford app by clicking on the gear icon in the right top corner and selecting advanced Settings, then navigate to Settings > Woodford in Dynamics 365. Click on the link ‘MobileCRM Woodford HTML5’. Open the project, then search for the bookable resource bookings entity and click on the icon on the left side of the entity. Open the view you want to configure. When the view configuration window loads, click on the ‘Clone Row’ button on the top. At this point you’ll see the name (left side) of the row has changed, the word ‘Copy’ has been amended to it. Change the name to ‘Emergency’ and enter ffd96b6b in the color field. You will see that all the cells in the row are now colored red. Click Save on the ribbon.

Click the ‘Clone Row’ button again on the ribbon. Rename the row to ‘Urgent’ and set the color to ffe8b790, save the row. Click the ‘Clone Row’ button on the ribbon one more time. The name of this row is ‘Moderate’ and the color we’re going to use is ffd0d83e. Click the save button on the ribbon.
Row Script
In this section we’re going to add the logic to show the colored rows we just created, based on the data populated in the priority field of the work order. Click on the ‘Row Script’ button on the ribbon. Click on the ‘If+’ button on the ribbon, then select ‘Entity’ from the dropdown list next to condition. In the next dropdown field, select ‘(msdyn_workorder.msdyn_workorder.msdyn_priority)’. This is the priority field on the work order entity. Set ‘equals’ as the next drop down, then pick ‘Emergency’ from the priority statuses list.
Click on the ‘+Step’ button on the ribbon. Next to step select ‘Template Index’, select ‘Assign’ in the next dropdown field, then select the Emergency row template we created in the previous steps. We need to add this logic for each one of the priority statuses.
Click on the ‘If+’ button on the ribbon again, then select ‘Entity’ from the dropdown list next to condition. In the next dropdown field, select ‘(msdyn_workorder.msdyn_workorder.msdyn_priority)’. Set ‘equals’ as the next drop down, then pick ‘Moderate’ from the priority statuses list.
Click on the ‘+Step’ button on the ribbon. Next to step select ‘Template Index’, select ‘Assign’ in the next dropdown field, then select the Moderate row template.
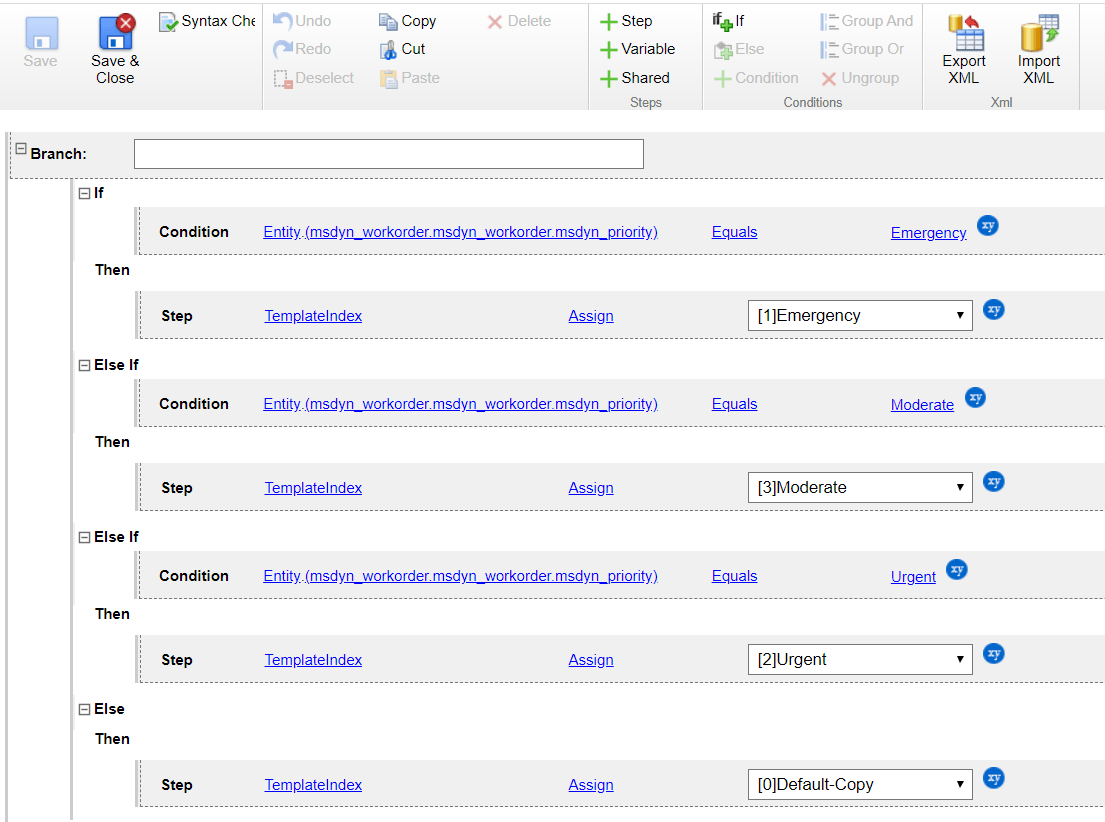
Click on the ‘If+’ button on the ribbon again, then select ‘Entity’ from the dropdown list next to condition. In the next dropdown field, select ‘(msdyn_workorder.msdyn_workorder.msdyn_priority)’. Set ‘equals’ as the next drop down, then select ‘Urgent’ from the priority statuses list.
Click on the ‘+Step’ button on the ribbon. Next to step select ‘Template Index’, select ‘Assign’ in the next dropdown field, then select the Urgent row template.
Click on the ‘Else+’ button on the ribbon, then click on the ‘+Step’ button on the ribbon. Next to step select ‘Template Index’, select ‘Assign’ in the next dropdown field, then select the Default row template.
Click the ‘Save & Close’ button on the ribbon, which will close the Row Script editor, then click ‘Save & Close’ again to close the view. Click ‘Publish’ on the ribbon and synchronize the Field Service Mobile app to download the latest changes.
Make sure you assign some work orders that have different priorities when you test this functionality.
I hope you enjoyed this post! Be sure to check in again next week for a new topic or subscribe here to never miss another post!


That’s super configuration. This will help in real time