


Assign SLA based on Case creation time

A few weeks ago I received a question from someone who asked me if it was possible to assign an SLA to a case based on the time of day a case was created. For example if the case was created in the morning between 8AM and 11:59AM it would get the ‘Morning SLA’ attached, and if it was created betweem 12PM and 5PM it would get the ‘Afternoon SLA’ attached. I have to admit I had to do a little bit of digging and experimenting, but I was able to use Power Automate to get this to work! Keep in mind that for the Power Automate Flow I am going to build here I’m focusing on the use case and functionality I just described above. If you’re going to utilize this in production you will most likely need to build some additional checks and conditions. I have to warn you, this is a long article, but boy is it worth the read! (if I say so myself)
Trigger
I will build this flow using the (dataverse) common data service(current environment) connector and I’ll be looking at the ‘createdon’ field of the case to determine when the case was created. When you log into flow.microsoft.com click on ‘+New flow’ and select the ‘automated cloud’ flow. From here you can either search for the ‘When a record is created, updated or deleted’ trigger common data service(current environment) or you can click skip and select the trigger on the next screen. Since we only need this flow to run when a case is created, I select the ‘create’ trigger condition. Obviously ‘cases’ is the table/entity we need to select in the ‘entity name’ field. Set your scope (I’m using organization but you can choose the correct scope based on your requirements)

Compose #1
In the next step we will use a compose action so that we can convert data that’s in the case’s ‘createdon’ field from UTC time to my local time. As you probably already know the ‘createdon’ field is a date and time field. I don’t care about the actual date in this field, I only care about the time the case was created. When using the compose action I will not only convert the time in the ‘createdon’ field to my own local time, but I will also need to use 24 hour time, (I’ll tell you later why). For the same reason I only need the hour the case was created, no minutes, no seconds. For example if the case was created on 1/5/2021 at 10:35AM I only need the hour which is 10.
Ok now that we have that out of the way, let’s create our first compose step.
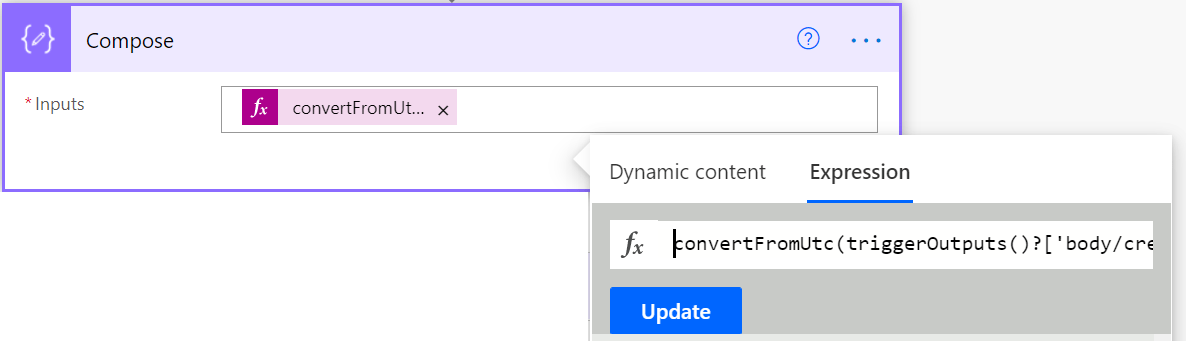
Click on ‘+New Step’ and select the ‘compose’ action. Click your mouse in the ‘inputs’ field and in the window that opens click on the expression tab. I will enter the following expression:
convertFromUtc(triggerOutputs()?[‘body/createdon’],’US Eastern Standard Time’, ‘HH’)
What I am doing here is first converting the date/time in the ‘createdon’ field to my local timezone: convertFromUtc(triggerOutputs()?[‘body/createdon’],’US Eastern Standard Time’ and then I am limiting the information I am getting out of that field: ‘HH’ (hours only).
I am typing in capital letters for the hours, as this will give me back the 24 hour format I am looking for. The reason I am using 24 hour time or military time is because I need to use a condition later in the flow to check if the case was created within the 8 and 11:59 timeframe or between 12 and 17 military time. Keep reading and hopefully it will all make sense.
Compose #2
The next problem I had was that this first compose action gives me the correct data, but it’s in a string format. If you are using conditions where the logic is to see whether the data you’re using is greater/smaller/equal etc. to a number, the source data needs to be a number as well or as we call it in database terms: an integer. In order to get flow to see the data as a number I need to do another compose action where I will convert the string to an integer. There’s an app expression for that!
Click ‘+New step’ and select ‘compose’. Click your mouse again in the ‘Inputs’ field and click on the ‘Expression’ tab that opens. Type in the following: int(outputs(‘Compose’))

The ‘int‘ function allows you to convert the data that’s entered into an integer. As you can see the second part of the expression (outputs(‘Compose’) represents the output of the first compose action. Keep in mind that if you’re renaming this first compose action you will need to reflect this in the expression in the second compose action for it to work.
In the next step is where I’ll use a condition to compare the data that I have in the Compose 2 step. If a case was created in the timeframe of 8am and 11:59am I want to assign the ‘8-12PM SLA’, if it was created within 12-5PM time slot I want to assign the ’12-5PM SLA’ to the case. NOTE: I have already created the SLA’s before creating my Power Automate flow. If you want to learn how to setup SLA’s please read the article I wrote on this topic here.
Condition #1 & 2
Click ‘+Next step’ and select the condition action. Then click hover your mouse over the + button (above the condition step you just added) and select ‘Add a parrallel branch and choose another condition step. This will automatically be named condition 2 which we will configure later.
For condition #1 I am going to enter two condition lines and since they both need to be true I will use the ‘AND’ option. Click inside the ‘Choose a value’ field and select the output from the Compose 2 action. (This will hold the actual HOUR (in 24 hour format) the case was created.) Set the middle field to ‘is greater or equal to’ and type in the number ‘8’ in the ‘Choose a value’ field. Click on ‘+Add’ to add the second line. Click inside the ‘Choose a value’ field and select the output from the Conpose 2 action again. Set the middle field to ‘is less than or equal to’ and type in the number ’11’ in the ‘Choose a value’ field. This means that any cases that were created when the hour was 11 (I.E 11:15, 11:59) will follow this path. When you added the condition you noticed there are now two boxes visible (Yes and No) which is the path that will be taken if the condition is true or false.

Condition #1- If yes & List Records #1
We will not configure any steps under the ‘If no’ box. In the ‘If Yes’ box, click ‘Add an action’ and select the ‘List Records’ step. This is where I will query Dynamics 365 for a list of SLA’s that are both active and named ‘8-12PM SLA’. Select ‘SLA’s’ for the entity name. The ODATA query for this is: name eq ‘8-12PM SLA’ and statecode eq 1 which we will enter in the ‘Filter Query’ field of the ‘List records’ step. Since I only want to return 1 SLA, I am entering 1 for the top count. Now what would happen if someone deactivated the SLA that we’re querying for? If the SLA is not found, we the number of records that will be returned in the ‘List records’ step will be less than 1 so lets use that knowledge to configure our next step.

Condition #3
Click ‘Add Action’ and select another condition step. This will automatically be named Condition 3. Click in the first field of the compose step and click on the ‘Expressions’ tab again. Since we can’t query the results of the List Records step by using the Dynamic Content ‘value‘, we need to actually get the length of the list. (‘Length’ represents the number of items in the list) Enter length(body(‘List_records’)?[‘value’]) into the expression window and click ‘OK’. In the middle field select ‘is equal to‘ and enter ‘1‘ for the last field. This expression says that if the total number of items in the previous ‘List records’ step is equal to 1 (If it found and SLA).
Under the ‘If No’ step you could do something like send an email notification to let people know the SLA needs to be reactivated. Then the step after that email send should be a ‘Terminate’ action to stop the flow.

Compose #3
In the next step we’re going to get the unique ID of the SLA that we queried for in the list records step. We are not going to add anything under the ‘If yes’ box, we will add these steps below the ‘If Yes/If No steps. Click ‘Add an action’ and select another ‘Compose’ action (Compose3). Click inside the ‘Inputs’ field on the compose action and click on ‘Expression’ again. Type in the following: body(‘List_records’)[‘value’][0][‘slaid’]
This is pointing to the ‘List Records’ step we did earlier and is getting the SLA unique ID. The [0] part of the expression tells flow to only use the first record of the ‘List records’ step. By using this compose step you will also not have Power Automate put the ‘Apply Each’ step around your logic.

Update a record #1
Once we have the SLA unique ID we can use that in the next action, which allows us to update the case with the proper SLA. Click ‘Add an action’ and select ‘Update a record(Current environment)’. I actually renamed the step to ‘Update case with 8-12PM SLA’ but this is optional. Select ‘Cases’ as the entity name and set the item ID by selecting ‘Case’ (from the trigger) from the dynamic content window. The case who triggered the flow is the case we want to update. Click on ‘Show advanced options’ and scroll down to the ‘SLA(SLAs)’ field. Type in slas and an opening bracket ( then select the output from the Compose 3 step from the Dynamic content as this is where the unique ID of the SLA is stored. Make sure to add the closing bracket ) at the end. This completes the patch for the first condition (#1) step.

Condition #2
I will now build the logic under the condition #2 step we created earlier. Just like we did in the condition #1 step, we will also have two condition lines in this step.
Scroll back up to condition #2 and click ‘+Add’ to add a second condition line. Since these also both need to be true I will use the ‘AND’ option. Click inside the ‘Choose a value’ field and select the output from the Compose 2 action. (This also holds the actual HOUR (in 24 hour format) the case was created.) Set the middle field to ‘is greater or equal to’ and type in the number ’12’ in the ‘Choose a value’ field. Click inside the ‘Choose a value’ field of the second line and select the output from the Compose 2 action again. Set the middle field to ‘is less than or equal to’ and type in the number ’16’ in the ‘Choose a value’ field. This means that any cases that were created when the hour was 16 (4PM) (I.E 16:15, 16:59) will follow this path. When the condition was added the two yes/no boxes appeared again, which is the path that will be taken if the condition is true or false.
NOTE: You might need to add another condition for when a case is created outside of these hours, but that depends on your requirements.

Condition #2- If yes & List Records #2
We will not configure any steps under the ‘If no’ box. In the ‘If Yes’ box, click ‘Add an action’ and select the ‘List Records’ step. This step will be named ‘List records 2′. This is where I will query Dynamics 365 again for a list of SLA’s that are active and named ’12-5PM SLA’. Select ‘SLA’s’ for the entity name. The ODATA query for this is: name eq ’12-5PM SLA’ and statecode eq 1 which we will enter in the ‘Filter Query’ field of the ‘List records’ step. Since I only want to return 1 SLA, I am entering 1 for the top count.
(You can configure the same logic underneath this step as we did earlier in Condition #3, where an email message can be sent to someone stating the SLA is not active and the flow would terminate if the SLA is not found. The expression would need to be slightly adjusted to reference the correct list records action: length(body(‘List_records_2’)?[‘value’]))
Compose #4
In the next step we’re going to get the unique ID of the 12-5PM SLA that we queried for in the previous ‘List records 2’ step. You probably noticed this is very similar to the expression in the Compose 3 step, I just needed to point to the ‘List Records 2’ step. Just like in the Compose 3 step I are not going to add anything under the ‘If yes’ box, I need to add these steps below the ‘If Yes/If No’ steps. Click ‘Add an action’ and select another ‘Compose’ action (Compose 4). Click inside the ‘Inputs’ field on the compose action and click on ‘Expression’ again. Type in the following: body(‘List_records_2’)[‘value’][0][‘slaid’]

Update Record #2
This is the last step in the flow! Almost done! In the previous step we captured the SLA unique ID which I will use in this next action, which allows us to update the case with the 12-5PM SLA. Click ‘Add an action’ and select ‘Update a record(Current environment)’. I actually renamed the step to ‘Update case with 12-5PM SLA’ but this is optional. Select ‘Cases’ as the entity name and set the item ID by selecting ‘Case’ (from the trigger) from the dynamic content window. The case who triggered the flow is the case we want to update. Click on ‘Show advanced options’ and scroll down to the ‘SLA(SLAs)’ field. Type in slas and an opening bracket ( then select the output from the Compose 4 step from the Dynamic content as this is where the unique ID of the SLA is stored. Make sure to add the closing bracket ) at the end. That is it! Make sure you test your flow!

I hope you enjoyed this post! Be sure to check in again next week for a new article or subscribe here to never miss another post!


Hi Dian,
I greatly appreciate your articles and look forward to each post!
I was wondering why you chose to set the SLA GUID on the Case as opposed to updating a field on the Case to hold the hour value and let the SLA associate itself based on the applicable when criteria?
I didn’t know if there was a programmatic reason for it or if (like a lot with Dynamics) there are just multiple ways to get to the end goal.
Hi Scott, that is a great suggestion and probably even better than how I’m doing it!