


Power Virtual Agents: Advanced authoring canvas preview

You might remember that back in May of this year, (during the Microsoft Build event) new capabilities coming to Power Virtual Agents were announced. I was able to get my hands on one of the environments to test it out and write an overview on the new features. If you haven’t read the article you can do that here.
I also created an accompanying video which can be accessed from the bottom of the article. Today most of these features (and new capabilities) are available in the public preview (since Nov 10th 2022, you can read more about the announcement here.) In this article I am going to dive a little deeper in some of these features to give you a better idea on what exactly they are an how we can utilize them once this becomes generally available. Please keep in mind that since this is currently in preview, this is not a finished product yet. There are still things that are being streamlined and added as we speak before this goes into production! At this point I don’t have a date yet on when this will become GA, but in the meantime we get some time to play around with the new features and test them out!
Accessing the preview
There isn’t anything you have to turn on to access the preview, you’ll notice the ‘Try the preview’ button on several screens. You’ll also notice a tile with the header ‘A new Power Virtual Agents is available to preview’ on the right bottom side of the screen when you open a chat bot. I would suggest going this route because this allows you to create a copy of an existing bot and ‘upgrading’ it to the new updated version. This will not delete the original bot, or do anything to it, it’s just creating a copy in the new experience. This is helpful because you won’t have to start from scratch!

Once your bot is upgraded to the new experience you’ll notice that the word (Preview) has been added to the title. This will make is easier to distinguish between the original and upgraded bot. When you open the bot you’ll have access to the preview.
Options from a list variable
One of the features that I didn’t have access to when I wrote my overview article in May, is the ability to bring in options from a list variable when the bot asks a question. Let me explain what that is. Normally when we ask a question in Power Virtual Agents we can show certain options to the customer to choose from, (Multiple choice options) but these options are static. With this new feature, we can bring options from another application into Power Virtual Agents by calling an action. This means that the options we show to the customer in the chat will be dynamic! I’m sure you can understand how beneficial this is, as this means that we will never have to manually update the options again, since we are pulling them in using an action! The second reason this is a great feature is because this will be helpful when it comes to using an action (like a Flow) from within Power Virtual Agents to create records in other applications. For example this feature could come into play if you want to populate the Subject field when creating a case during the chat. We could accomplish this by feeding all subject rows from Dynamics 365 Customer Service into Power Virtual Agents and showing these as options a customer can choose from in the chat. Once a subject has been chosen in chat we can call a flow to create a new case and populate the subject field on the case!! Another scenario could be the population of custom fields when a new case is created through chat. I am going to show an example of the latter.
Example
I have created a custom table in Dynamics 365 Customer Service called ‘Drop Down Values’ and this table holds rows which represent case categories. I have placed a lookup to the ‘Drop Down Values’ table on the case form so that when a case is created, a case’s category can be set. In my scenario, each category can have several sub categories, which are listed in the same ‘Drop Down Values’ table. I added a (new_parent) lookup on the ‘Drop Down Values’ table to link (child) sub categories to a parent category. On the case form I added a second lookup to the ‘Drop Down Values’ table, called ‘sub categories’. Using this setup, this allows for filtering of sub/child categories on the case form based on the (parent) category: when a category is chosen, the subcategory field only shows the related child categories. You can see the example in the below image. (More details on the setup can be found in this article.)

Now that you understand the setup of the categories/drop down values with the case table, how great would it be if we could use these categories and subcategories in Power Virtual Agents?! Let me show you how this is done!
Create a new topic
In order to create a new topic I navigate to topics and click on the ‘+New topic’ button on the top bar. First I enter a trigger phrase which will direct customers to this topic (1). For the second node I create a (2) message (this is not required, but I wanted to make sure I was accessing the correct topic during testing.) The message is very simple, it’s just saying ‘Let me get your options’. In the next step (3) I am going to call a Power Automate flow to get a list of all the drop down values in Dynamics 365 Customer Service.
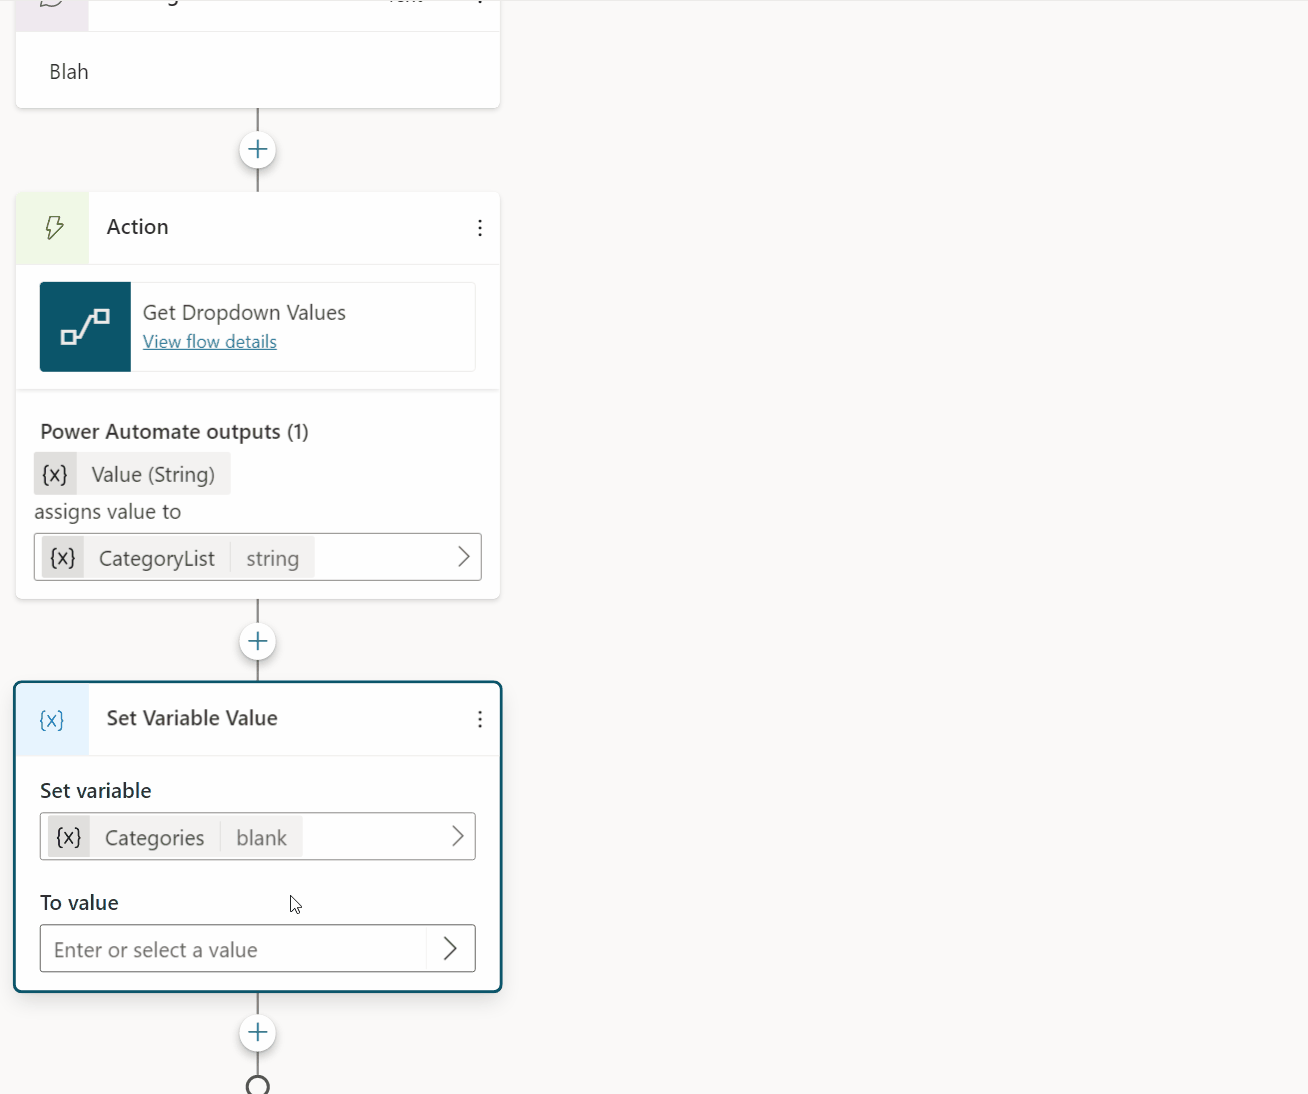
After the message node, I add another node (3) to call an action. I select the Power Automate flow called ‘Get Dropdown Values’, which will query Dynamics 365 Customer Service (Dataverse) to get the list of rows from my custom Drop Down values table and feed them back into Power Virtual Agents. NOTE: I am not going to discuss how I created this flow, I will write a separate article which I will publish next week. All you need to understand at this point is that I received the list of values from Power Automate in a string, but each row is separated by a comma.
In the screenshot below you can see that the ‘Drop Down Values’ from Dataverse are being passed back from Power Automate to Power Virtual Agents. I am storing this data in the variable that is visible below ‘assigns value to‘. I renamed the variable to ‘CategoryList’.

In the next node I am going to use a few of the new features available in this preview. First I select the ‘Set Variable Value’ node, which allows me to store values in a variable! Previously we could only store variables in a question, so this is a pretty cool new option! I click on ‘Select Variable’ and then ‘Create a new variable’. I rename the newly created variable to ‘Categories’. This is where I will store the drop down values, after I separate the individual values. (This is similar to using the ‘text to columns’ function in excel). Remember, as I mentioned earlier, the list of drop down values is coming into Power Virtual Agents as one long string, and the drop down values in the string are separated by commas like this: Inquiry,Service,Password reset needed,Billing Issues,Product Issue
I need to split the string into individual values in a table so that each of the values will be an option to choose from in the chat question. I can do this by using PowerFX in the ‘Set Variable Value’ node, which is another new feature in Power Virtual Agents!
In the ‘Set Variable’ node, click on the arrow below ‘To Value’, then click ‘Formula’. In the formula window I enter the PowerFX formula Split(Topic.CategoryList, “,”)
NOTE: You’ll notice that the Categories variable is now showing as a ‘table’.
The last and final step is to add a question node. This is where I will ask the question in the chat and show all the drop down value options that I split into individual values in the ‘Set Variable Value’ node. I enter ‘What is your case regarding?’ in the message field. I click on the arrow below ‘Identify’ and select ‘Options from a list variable’. You’ll notice a new field appears (List Variable) where I need to select the list variable that has the options I want to show for this question. I click on the arrow and select the ‘Categories’ variable I created previously in the ‘Set Variable Value’ node. I save the response to the question as ‘CaseCategory’. (If needed I can use this later to create a case.)

I hope this gives you a good idea on how we can start to using the new Set Variable nodes, PowerFX formulas and list variables in Power Virtual Agents! Be sure to check in again next week to learn how I created the Power Automate flow used in this example or subscribe here to never miss another post!


Great summary. Thank you!